
New Ubuntu
#!/usr/bin/bash

# Restore backup
cp .bashrc .bashrc.orig
rsync -av /media/kurome/DataBackup/Backup/Home/latest/ /home/kurome/

# Update system
# sudo sed -i 's@//.*archive.ubuntu.com@//mirrors.ustc.edu.cn@g' /etc/apt/sources.list # will list in "Other Software"
sudo apt update
sudo apt upgrade -y

# Enable custom systemd service
sudo cp ~/.opt/clash/clash.service /usr/lib/systemd/system
sudo cp ~/.opt/aria2/aria2.service /usr/lib/systemd/system
sudo systemctl enable --now clash.service
sudo systemctl enable aria2.service

# Install apps
sudo sh -c 'echo "deb [arch=amd64 trusted=yes] https://dl.google.com/linux/chrome/deb/ stable main" > /etc/apt/sources.list.d/google-chrome.list'
sudo apt update
sudo apt install -y \
adb fastboot \
aria2 \
qemu-system-x86 samba \
git \
proxychains \
tree zfsutils-linux \
fcitx5 fcitx5-chinese-addons \
google-chrome-stable \
timeshift \
libfuse2 \
vlc \
curl \
vim \
fdupes \
python3-pip \
libavcodec-extra \
unrar \
goldendict \
kdeconnect \
gnome-tweaks gnome-shell-extensions chrome-gnome-shell \
gnome-shell-extension-gsconnect \
breeze qt5ct

sudo apt install -y --no-install-recommends ubuntu-restricted-extras
sudo dpkg -i ~/.opt/pkgs/wps-office_11.1.0.11664.XA_amd64.deb
sudo dpkg -i ~/.opt/pkgs/Xmind-for-Linux-amd64bit-22.11.2556.deb
sudo sed -e 's/9050$/7890/g' -i /etc/proxychains.conf

# System settings
gsettings set org.gnome.desktop.media-handling automount false
gsettings set org.gnome.shell.extensions.dash-to-dock show-mounts false
gsettings set org.gnome.shell.extensions.dash-to-dock click-action cycle-windows
gsettings set org.gnome.shell app-picker-layout "[]"

# ufw
sudo ufw enable
sudo ufw allow proto tcp from 192.168.2.0/24 to any port 1714:1764
sudo ufw allow proto udp from 192.168.2.0/24 to any port 1714:1764

# utc
sudo timedatectl set-local-rtc 0
Backup Your System
Rsync
备份
#!/bin/bash

set -o errexit
set -o nounset
set -o pipefail

readonly SOURCE_DIR=/
readonly BACKUP_DIR="$(findmnt -nr -o target -S /dev/mapper/luks-5277e33d-604f-4c1e-bc8c-40c14544614e)/Ubuntu2204"
readonly DATETIME="$(date '+%Y-%m-%d_%H:%M:%S')"
readonly BACKUP_PATH="${BACKUP_DIR}/${DATETIME}"
readonly LATEST_LINK="${BACKUP_DIR}/latest"

mkdir -p $BACKUP_DIR

rsync -av \
 --delete "${SOURCE_DIR}/" \
 --link-dest "${LATEST_LINK}" \
 --exclude={"dev/*","proc/*","sys/*","tmp/*","run/*","mnt/*","media/*","lost+found/*","Trash/*","DataBackup/*","DataPool/*","swapfile","cxoffice",".cxoffice","*.iso","*.qcow2",".steam","Downloads/*","*.exe","Ventoy","Desktop/*","Music/*",".snapshots","Games","Pictures/*","Videos/*",".cache"} \
 "${BACKUP_PATH}"
rm -rf "${LATEST_LINK}"
ln -s "${BACKUP_PATH}" "${LATEST_LINK}"
注意:
${SOURCE_DIR}/必须带反斜杠,否则会备份SOURCE_DIR这个目录,而不是这个目录里的内容。--exclude="Trash",Trash被认为为目录,而非文件或文件和目录,并且,它不支持路径~/.local/share/Trash- 注意:正因为
--exclude不是按照路径,所以才特别方便,比如 usb 在不同发行版之间可能会挂载到不同的路径(如 ubuntu 的会在 /media 下,fedora 的会在 /run 下),但是一般以 usb 的 label 比如 DataBackup 作为挂载目录,那么只需要把 DataBackup 放在--exclude之中,就可以在备份时排除这个 usb 设备而不需要考虑具体的路径了。
查看备份大小
$ sudo du -hs /backup/
16G    /backup/
整个备份为16GB,所花时间 12m。
通过 crontab 使之每周一12点自动备份:
$ sudo crontab -e
0 12 * * 1 /path/.backup.sh
还原
分区、格式化和挂载
# lsblk -f
sda
├─sda1
│    vfat   EFI   A642-AF58                             246.9M     2% /boot/efi
└─sda2
     ext4   ROOT  c83192bb-14f3-45d1-9345-20785a419414  190.1G     8% /
# mkdir -p /mnt/ubuntu
# mount /dev/sda2 /mnt/ubuntu
# mkdir -p /mnt/ubuntu/boot/efi
# mount /dev/sda1 /mnt/ubuntu/boot/efi
还原:还原的时候,如果带 --delete,那么就会删除备份时 --exclude= 不包含的内容。还原的时候,同名文件内容会恢复到备份时候的状态。
# rsync -av 备份目录 源目录
# rsync -av /path/to/backup/latest/ /mnt/ubuntu
-
chroot
# mount --types proc /proc /mnt/ubuntu/proc # mount --rbind /sys /mnt/ubuntu/sys # mount --make-rslave /mnt/ubuntu/sys # mount --rbind /dev /mnt/ubuntu/dev # mount --make-rslave /mnt/ubuntu/dev # mount --bind /run /mnt/ubuntu/run # mount --make-slave /mnt/ubuntu/run # chroot /mnt/ubuntu -
update /etc/fstab
# blkid
/dev/sda2: LABEL="ROOT" UUID="c83192bb-14f3-45d1-9345-20785a419414" TYPE="ext4" PARTUUID="4659f9ec-1e96-4d4a-ad0e-e32a69a477ce"
/dev/sda1: LABEL_FATBOOT="EFI" LABEL="EFI" UUID="A642-AF58" TYPE="vfat" PARTUUID="4bf5d597-b541-e845-8b70-c8ad6374df22"
fstab 模版如下
# ROOT UUID=c83192bb-14f3-45d1-9345-20785a419414 / ext4 errors=remount-ro 0 1 # EFI UUID=A642-AF58 /boot/efi vfat umask=0077 0 1 # SWAP UUID=63c78f3a-91ab-43f2-bf97-6e3348e0fc00 none swap default 0 0 # swapfile /swapfile none swap sw 0 0 -
reinstall grup
# grub-install --target=x86_64-efi --efi-directory=/boot/efi
# grub-mkconfig -o /boot/grub/grub.cfg
不能带 –bootloader-id=GRUB,否则建立 /boot/efi/EFI/GRUB 目录。
-
reboot
# exit
# cd
# umount -l /mnt/ubuntu/dev{/shm,/pts,}
# umount -R /mnt/ubuntu
# reboot
TAR
Backup
$ cd / # THIS CD IS IMPORTANT THE FOLLOWING LONG COMMAND IS RUN FROM /
$ tar -cvpzf backup.tar.gz \
--exclude=/backup.tar.gz \
--exclude=/proc \
--exclude=/tmp \
--exclude=/mnt \
--exclude=/dev \
--exclude=/sys \
--exclude=/run \
--exclude=/media \
--exclude=/var/log \
--exclude=/var/cache/apt/archives \
--exclude=/usr/src/linux-headers* \
--exclude=/home/*/.gvfs \
--exclude=/home/*/.cache \
--exclude=/home/*/.local/share/Trash /
deja-dup/Duplicity
Simple backup tool for GNOME
The deja-dup settings can also be changed with dconf-editor in the dconf-tools apt package. The settings are in org.gnome.DejaDup.
gsettings list-recursively org.gnome.DejaDup
gsettings set org.gnome.DejaDup include-list "['/home/kurome/.aria2', '/home/kurome/.clash', '/home/kurome/.config/autostart', '/home/kurome/.config/Typora', '/home/kurome/.config/variety', '/home/kurome/.hugo', '/home/kurome/.local/bin', '/home/kurome/.local/share/applications', '/home/kurome/.local/share/TelegramDesktop', '/home/kurome/.ssh', '/home/kurome/.telegram', '/home/kurome/.typora', '/home/kurome/Documents', '/home/kurome/Downloads', '/home/kurome/Templates', '/home/kurome/Music', '/home/kurome/.config/containers', '/home/kurome/.local/share/fcitx5']"
from: launchpad.net: How do I also backup my deja Dup settings?
The settings used to be stored there, and the files are still present.
In more recent version they are stored in:
~/.config/dconf
Resotre
duplicity file:///home/kurome/DataBackup/Linux/ Restore/
Others
Does the UEFI partition either “MUST” or “SHOULD” be first for some reason? If so why?
The key words “SHOULD”, “MUST” and “MAY” (capitalised) in this answer are to be interpreted as described in RFC 2119.
An (U)EFI System Partition (ESP from now on):
- MAY reside at the beginning of the disk and
- SHOULD be FAT32 because of Windows compatibility.
The only official limit is:
- the ESP MUST reside in the first 2.2 Terabytes of the disk.
So, the ESP MUST reside anywhere in those first 2.2 TB of the disk, but there is absolutely no need for the ESP to be the first partition or reside on the beginning of the disk whatsoever. (It’s just that some large company in Redmond, WA advises system integrators differently)…
I would put it as the last partition on the disk (if < 2.2TB) as it’s only used to load other OSes, but that’s just a personal, totally subjective opinion!
In Boot Option Name, type Ubuntu, and in File Name select the file grubx64.efi and then Click on ‘OK’.
-
Cronopete
-
Deja Dup
-
Rclone
-
Rdiff-backup
-
Restic
-
Rsync
-
BorgBackup:带有压缩和加密特性以用具有数据去重功能的备份解决方案。它基于 BSD 许可证,支持 Linux、MacOS 和 BSD。
-
UrBackup:它可以做镜像和文件的完整和增量备份;你可以保存整个分区或单个目录。它有 Windows、Linux、和 MacOS 客户端,并且采用 GNU Affero 公共许可证。
-
LuckyBackup:根据其网站介绍,“它是一个易于使用、快速(只传输变化部分,而不是全部数据)、安全(在做任何数据操作之前,先检查所有需要备份的目录,以确保数据安全)、可靠和完全可定制的备份解决方案。它在 GPL 许可证下发行。
-
Casync :一个可寻址内容的同步解决方案 —— 它设计用于备份、同步、存储和检索大文件系统的多个相关版本。它使用 GNU Lesser 公共许可证。
-
Syncthing:用于在两台计算机之间同步文件。它基于 Mozilla 公共许可证使用,根据其网站介绍,它是安全和私密的。它可以工作于 MacOS、Windows、Linux、FreeBSD、Solaris 和 OpenBSD。
-
Duplicati:一个可工作于 Windows、MacOS 和 Linux 上的、并且支持多种标准协议(比如 FTP、SSH、WebDAV 和云服务)、免费的备份解决方案。它的特性是强大的加密功能,并且它使用 GPL 许可证。
-
Dirvish :一个基于磁盘的虚拟镜像备份系统,它使用 OSL-3.0 许可证。它要求必须安装有 Rsync、Perl5、SSH。
-
Bacula:允许系统管理员去管理备份、恢复、和跨网络的不同种类计算机上的多种数据的一套计算机程序,它支持在 Linux、FreeBSD、Windows、MacOS、OpenBSD 和 Solaris 上运行,并且它的大部分源代码都是基于 AGPLv3 许可证的。
-
BackupPC:一个高性能的、企业级的、可以备份 Linux、Windows 和 MacOS 系统的 PC 和笔记本电脑上的数据到服务器磁盘上的备份解决方案。它是基于 GPLv3 许可证的。
-
Amanda :一个使用 C 和 Perl 写的备份系统,它允许系统管理员去备份整个网络中的客户端到一台服务器上的磁带、磁盘或基于云的系统。它是由马里兰大学于 1991 年开发并拥有版权,并且它有一个 BSD 式的许可证。
-
Back in Time :一个为 Linux 设计的简单的备份实用程序。它提供了命令行和图形用户界面,它们都是用 Python 写的。去执行一个备份,只需要指定存储快照的位置、需要备份的文件夹,和备份频率即可。它使用的是 GPLv2 许可证。
-
Timeshift :一个 Linux 上的备份实用程序,它类似于 Windows 上的系统恢复和 MacOS 上的时间胶囊。它的 GitHub 仓库上介绍说:“Timeshift 通过定期递增的文件系统快照来保护你的系统。这些快照可以在日后用于数据恢复,以撤销某些对文件系统的修改。”
-
Kup :一个能够帮助用户备份它们的文件到 USB 驱动器上的备份解决方案,但它也可以用于执行网络备份。它的 GitHub 仓库上介绍说:”当插入你的外部硬盘时,Kup 将自动启动并复制你的最新的修改。“
How to make a disk image and restore from it later?/Moving entire Linux installation to another drive
It’s Clonezilla(再生龍) Live: http://clonezilla.org/
The tutorial for Clonezilla can be found here.
Easy backup/restore of installed system?
Yes you can use remastersys for that.You can see a complete tutorial here
清理系统
删除不再需要的包
sudo apt autoremove
APT cache
# see the size of this cache
$ sudo du -sh /var/cache/apt
# remove only the outdated packages
$ sudo apt-get autoclean
# delete apt cache in its entirety
$ sudo apt-get clean
apt-get 和软件中心下载的软件包一般放在 /var/cache/apt/archives/ 目录,一般都安装在 /usr/
Journal logs
# check the log size
$ journalctl --disk-usage
# clear the logs that are older than a certain days
$ journalctl --vacuum-time=3d
Thumbnails cache
# check the size of thumbnail cache
$ du -sh ~/.cache/thumbnails
$ rm -rf ~/.cache/thumbnails/*
Duplicate files
Find and remove duplicate files:You can use a GUI tool like FSlint or a command line tool like FDUPES for this task
Old Linux kernels
Remove old Linux kernels
# List all installed Linux kernels
$ sudo dpkg --list 'linux-image*'
$ apt-get remove linux-image-VERSION
清理 Snap
与 snap 有关的系统文件都存放在 /var/lib/snapd 目录下。根据你所安装的 Snap 包的数量,这个目录的大小可能在几 GB。
sudo du -sh /var/lib/snapd
根据设计,Snap 至少会在你的系统上保留一个你所安装的软件包的旧版本。你可以通过使用 Snap 命令看到这种行为:
snap list --all
你应该看到同一个软件包被列了两次,而且版本和修订号都不同。
为了释放磁盘空间,你可以删除额外的软件包版本。你怎么知道要删除哪一个呢?你可以看到,这些较旧的软件包被标记为“禁用”。
#!/bin/bash
# Removes old revisions of snaps
# CLOSE ALL SNAPS BEFORE RUNNING THIS
set -eu
snap list --all | awk '/disabled/{print $1, $3}' |
    while read snapname revision; do
        snap remove "$snapname" --revision="$revision"
    done
命令行技巧
Bash 快捷键
编辑命令
Ctrl + a:移到命令行首Ctrl + e:移到命令行尾Ctrl + f:按字符前移(右向)Ctrl + b:按字符后移(左向)Alt + f:按单词前移(右向)Alt + b:按单词后移(左向)Ctrl + xx:在命令行首和光标之间移动Ctrl + u:从光标处删除至命令行首Ctrl + k:从光标处删除至命令行尾Ctrl + w:从光标处删除至字首Alt + d:从光标处删除至字尾Ctrl + d:删除光标处的字符Ctrl + h:删除光标前的字符Ctrl + y:粘贴至光标后Alt + c:从光标处更改为首字母大写的单词Alt + u:从光标处更改为全部大写的单词Alt + l:从光标处更改为全部小写的单词Ctrl + t:交换光标处和之前的字符Alt + t:交换光标处和之前的单词Alt + Backspace:与 Ctrl + w 类似,分隔符有些差别
重新执行命令
Ctrl + r:逆向搜索命令历史Ctrl + g:从历史搜索模式退出Ctrl + p:历史中的上一条命令Ctrl + n:历史中的下一条命令Alt + .:使用上一条命令的最后一个参数
控制命令
Ctrl + l:清屏Ctrl + o:执行当前命令,并选择上一条命令Ctrl + s:阻止屏幕输出Ctrl + q:允许屏幕输出Ctrl + c:终止命令Ctrl + z:挂起命令
Bang (!) 命令
!!:执行上一条命令!blah:执行最近的以 blah 开头的命令,如!ls!blah:p:仅打印输出,而不执行!$:上一条命令的最后一个参数,与Alt + .相同!$:p:打印输出!$的内容!*:上一条命令的所有参数!*:p:打印输出!*的内容!number:运行 history 中行数为 number 的命令^blah:删除上一条命令中的 blah^blah^foo:将上一条命令中的 blah 替换为 foo^blah^foo^:将上一条命令中所有的 blah 都替换为 foo
你可能不知道的SHELL
Shell也叫做命令行界面,它是*nix操作系统下用户和计算机的交互界面。Shell这个词是指操作系统中提供访问内核服务的程序。
这篇文章向大家介绍Shell一些非广为人知、但却实用有趣的知识,权当品尝shell主食后的甜点吧。
科普
先科普几个你可能不知道的事实:
-
Shell几乎是和Unix操作系统一起诞生,第一个Unix Shell是肯·汤普逊(Ken Thompson)以Multics上的Shell为模范在1971年改写而成,并命名Thompson sh。即便是后来流行的bash(shell的一种变体),它的年龄实际上比当前流行的所有的Linux kernel都大,可谓在Linux系统上是先有Shell再有Kernel。
-
当前绝大部分*nix和MacOS操作系统里的默认的Shell都是bash,bash由Brian Fox在1987年创造,全称Bourne Again shell ( bash)。
-
你或许听说除了bash之外,还有Bourne shell ( sh),Korn shell ( ksh),C shell (包括 csh and tcsh),但是你知道这个星球上一共存在着大约50多种不同的shell么?想了解他们,请参考 http://www.freebsd.org/ports/shells.html。
一些强大的命令
-
在命令行前加空格,该命令不会进入history里。
-
ctrl-x e快速启动你的默认编辑器(由变量$EDITOR设置)。
为什么说 zsh 是 shell 中的极品?
色彩高亮
并不是传统基于正则表达式的色彩高亮,而是真的会判断你输入的是啥的色彩高亮。
比如一个主题白色代表普通命令或者程序,红色代表错误命令,青色的代表内建命令或者 alias (echo 和 ls ),这些都不是正则判断出来的,是真的去检查的。非零的错误码(上一条命令错误),也可以高亮显示。
命令提示
注意,命令提示和补全是两个完全不同的系统,很多时候提示比补全更有用。你输入命令,后面就用灰色给你提示命令的参数,而且是随着你动态输入完每一个字母不断修正变化。
这个命令提示是基于你的历史命令数据库进行分析的,随着你输入的命令越来越多,提示将会越来越准确和顺手。
如果你觉得它提示的正确,你可以 CTRL+F 表示采纳,后面就会自动帮你一次性全部输入完了。
智能补全
缩写路径补全:
cd /v/w/h
敲一个TAB
cd /var/www/html/
补全目录、命令参数补全连敲两次TAB进入选择模式,除了 tab/shift+tab 可以前后切换外,你还可以使用光标键上下左右移动。回车表示确认选择,用 CTRL+G 表示退出。
快速跳转
输入 cd 后面加一个减号后,按一次 tab 马上就列出本次登陆后去过的最近几次路径,接着根据下面的提示输入数字按回车就过去了,比如输入:
cd -5 <回车>
当然你还可以不输入数字,而是再按一次 tab 进入选择模式,上下键或者 ctrl+n/p 来选择,回车确认,ctrl+g 返回。
自动跳转
敲入 z 命令,列出了自从我开始用zsh进入过的目录和他们的权重,进入次数越多,权重越大。z 后面加一个关键词就能跳转到所有匹配的历史路径中权重最高的那个了。空格分隔多个关键字,z会先匹配出第一个来,然后再匹配第二个…
使用:“z -l foo" 可以列出包含 foo 的所有历史路径。
# 按下ALT+O 就执行 cd .. 命令
bindkey -s '\eo'   'cd ..\n'
# 按下 ALT+; 就执行 ls -l 命令
bindkey -s '\e;'   'ls -l\n'
热键绑定
zsh 里面使用 bindkey 命令可以设置一系列热键,用来运行某一个 zsh 内部命令或者某个 shell 命令。
应该知道的LINUX技巧
首先,我想告诉大家,在Unix/Linux下,最有效率技巧的不是操作图形界面,而是命令行操作,因为命令行意味着自动化。
日常
-
请man bash后查找Readline Key Bindings一节来看看bash的默认热键,比如:
Alt-.把上一次命令的最后一个参数打出来,而Alt-*则列出你可以输入的命令。 -
回到上一次的工作目录: cd – (回到home是 cd ~)
-
pstree -p 可以帮你显示进程树。
-
使用 pgrep 和 pkill 来找到或是kill 某个名字的进程。 (-f 选项很有用).
-
通过 <(some command) 可以把某命令当成一个文件。示例:比较一个本地文件和远程文件 /etc/hosts: diff /etc/hosts <(ssh somehost cat /etc/hosts)
-
在 bash中,使用重定向到标准输出和标准错误。如: some-command >logfile 2>&1。
-
使用 man ascii 来查看 ASCII 表。
系统调试
-
如果你想知道磁盘、CPU、或网络状态,你可以使用 iostat, netstat, top (或更好的 htop), 还有 dstat 命令。你可以很快地知道你的系统发生了什么事。关于这方面的命令,还有iftop, iotop等。
-
要了解内存的状态,你可以使用free和vmstat命令。具体来说,你需要注意 “cached” 的值,这个值是Linux内核占用的内存。还有free的值。
-
如果你要找到哪个socket或进程在使用网络带宽,你可以使用 iftop 或 nethogs。
-
如果你要抓网络包的话,试试 wireshark 或 tshark。
-
了解 strace 和 ltrace。这两个命令可以让你查看进程的系统调用,这有助于你分析进程的hang在哪了,怎么crash和failed的。你还可以用其来做性能profile,使用 -c 选项,你可以使用-p选项来attach上任意一个进程。
-
了解用ldd命令来检查相关的动态链接库。注意:ldd的安全问题
-
使用gdb来调试一个正在运行的进程或分析core dump文件。参看我写的《GDB中应该知道的几个调试方法》
-
学会到 /proc 目录中查看信息。这是一个Linux内核运行时记录的整个操作系统的运行统计和信息,比如: /proc/cpuinfo, /proc/xxx/cwd, /proc/xxx/exe, /proc/xxx/fd/, /proc/xxx/smaps.
-
如果你调试某个东西为什么出错时,sar命令会有用。它可以让你看看 CPU, 内存, 网络, 等的统计信息。
-
使用 dmesg 来查看一些硬件或驱动程序的信息或问题。
powerline-shell
不想每次都安装 zsh 与 ohmyzsh?
pip install powerline-shell
Add the following to your .bashrc file:
function _update_ps1() {
    PS1=$(powerline-shell $?)
}

if [[ $TERM != linux && ! $PROMPT_COMMAND =~ _update_ps1 ]]; then
    PROMPT_COMMAND="_update_ps1; $PROMPT_COMMAND"
fi
默认的话,路径会完整显示,会很长
generate the default config at this location using:
$ mkdir -p ~/.config/powerline-shell && \
powerline-shell --generate-config > ~/.config/powerline-shell/config.json
Segment Configuration
{
    "segments":
    [
        "virtual_env",
        "username",
        "hostname",
        "ssh",
        "cwd",
        "git",
        "hg",
        "jobs",
        "root"
    ],
+  "cwd":
+    {
+    "max_depth": 1
+    }
}
检测硬盘坏道和坏块
硬盘坏道分为物理坏道和逻辑坏道。
- 物理坏道:就是硬盘实体有坏的地方,物理坏道推荐换硬盘,当然也有办法重新分区来隔离坏道,不过可能也用不久,所以不推荐。
- 逻辑坏道:是磁盘磁道上面的校验信息(ECC)跟磁道的数据对不上号所致。出现这一故障的原因,通常都是因为一些程序的错误操作或是该处扇区的磁介质开始出现不稳定的先兆。物理坏道也是逻辑坏道产生的一种原因。
发现
dmesg:当有硬盘坏道时,通常在dmesg输出的信息中会有 Buffer I/O Error,所以经常检查dmesg的输出可以及时发现是否存在硬盘问题。
检测
通过fdisk 查看显示所有磁盘或闪存的信息
sudo fdisk -l /dev/sd*
使用 badlocks检查 linux 硬盘上的坏道/坏块
sudo badblocks -s -v /dev/sdb > badsectors.txt
修复
查看上述分区检查出来的坏道信息
tail -f badsectors.txt
先备份数据再修复磁盘。硬盘在使用时不能修复,否则可能存在写并发的问题,所以修复前需要umount对应分区,或使用 Live CD
sudo umount MountPoint
umount 分区成功后,修复命令如下,其中-w表示写入修复的,后面是结束(END)和开始(START)块号,注意END在前,START在后。
sudo badblocks -s -w /dev/sdb 205971590 205971595
修复后再次检查
sudo badblocks -s -v /dev/sdb 205971590 205971595
屏蔽
执行e2fsck(针对 ext2/ext3/ext4 文件系统)或fsck命令,命令中还需要用到 badsectors.txt 文件和设备文件。
# for ext2/ext3/ext4
$ sudo e2fsck -l badsectors.txt /dev/sdb
# others
$ sudo fsck -l badsectors.txt /dev/sdb
如何探索
從「指令」找到「使用說明」
找使用說明
man -f ls
閱讀使用說明
$ man ls
$ man 1 ls

# 若是「bash」內建的指令,則是可以使用「help」
$ help if
上面的「man 1 ls」,「1」指的是「Manpage Sections」。
執行下面指令可以看到各個「Section」的簡介。
whatis intro
然後分別執行下面的指令,可以閱讀更詳細的說明
man 1 intro
man 2 intro
man 3 intro
man 4 intro
man 5 intro
man 6 intro
man 7 intro
man 8 intro
從「指令」找到「所屬套件」
先透過「whereis」來找到「ls」所在的確切路徑。
$ whereis ls
ls: /bin/ls
然後根據這個結果,再執行下面的指令
$ rpm -qf /bin/ls
$ dpkg -S /bin/ls
coreutils-8.32-1.2.x86_64
找「已安裝套件」的「檔案列表」
rpm -ql coreutils
dpkg -L coreutils
包管理相关
Better output for apt upgrade
You can get this better output by asking for more verbose version output (-V, --verbose-versions, see man apt-get).
fucked up
执行snap list可查看被snap化的应用:
- core18 是 snap 应用的运行环境
- snap-store 是 ubuntu snap 应用商店
- snapd 自然不用多说,是snap负责管理应用的daemon
- gtk-common-themes, 只是为了使 snap 化的应用样式保持一致。
- gnome-3-34-1804:This snap includes a GNOME 3.28 stack (the base libraries and desktop integration components) and shares it through the content interface.
看看 mount 的结果,你会发现这些应用居然是以squashfs文件系统打包的,然后解包就是一个将squashfs的文件挂载为一个loop设备:
df -t squashfs
snap后的程序有两大问题:
- 一是慢,虽然Ubuntu官方宣称 snap 速度已经相比之前提升了几倍,但是,老灯同时在用Fedora 32, 所有程序打开流畅无比。但是 Ubuntu 20.04 下启动或关闭程序一些程序是能感受到明显的卡顿。这个卡顿在1秒以上。
- 二是体积大。其打包的app体积,相比于AppImage 或 Flatpak, 也是大很多。以Corebird这个应用为例,snap 112MB, deb 2MB, Flatpak 12MB (参考 Snappy Sceptic Files Bug to Ask Why It Even Exists 一文).
Extract a .deb file
Download .deb package
apt download nginx
Extract .deb package using ar command
You can use the ar command to extract .deb file too. The syntax is:
ar x {file.deb}
Extract .deb package using dpkg-deb command
You can use the dpkg-deb command to extract .deb file too. The syntax is:
dpkg-deb -xv {file.deb} {/path/to/where/extract}
Get packages url using apt
Not all installed packages will have a URL associated with them, of course. However, you could use apt-get dowload:
$ apt-get download --print-uris wget
'http://archive.ubuntu.com/ubuntu/pool/main/w/wget/wget_1.15-1ubuntu1.14.04.2_amd64.deb' wget_1.15-1ubuntu1.14.04.2_amd64.deb 270522 SHA256:a3f3b049ea373402236a804a5a0952c6ef9b356ba8cc19fbc1f257db6e8f3052
This is the candidate version as shown by apt-cache policy, which might not necessarily be the installed version.
Debian 档案库基础
对于典型的 HTTP 访问,档案库在 “/etc/apt/sources.list” 文件中像下面那样指定,例如,现在 stable = bullseye 系统。
deb http://deb.debian.org/debian/ bullseye main contrib non-free
deb-src http://deb.debian.org/debian/ bullseye main contrib non-free
这里,我倾向于使用代号 “bullseye” 来代替套件名 “stable” ,以避免下一个 stable 版本发布时出现意外。
“/etc/apt/sources.list” 的含义在 sources.list(5) 中进行了描述,下面是一些要点。
- “
deb” 的那行定义了二进制软件包。 - “
deb-src” 的那行定义了源代码软件包。 - 第一个参数是 Debian 档案库的根 URL 。
- 第二个参数是发行版名称:可以使用套件名或代号。
- 第三个和之后的参数是 Debian 档案库的有效档案库范围名称。
dists目录是“distributions”的缩写,它是访问当前可用的 Debian 发布版本(和预发布版本)的正统方式。pool目录:软件包位于一个很大的“池(pool)”中,依源码包的名称进行组织。为了便于管理,pool 按照区(“main”、“contrib”和“non-free”)和源码包名的首字母进行分类。这些目录包括一些文件:每个架构的二进制软件包,以及用于生成这些二进制软件包的源码包。
总结
一个套件的下载链接:
[根URL]pool/[有效档案库范围名称]/[套件名首字母]/[套件名]/[套件下载档案]
例如 google chrome的仓库定义是
deb [arch=amd64] https://dl.google.com/linux/chrome/deb/ stable main
下载链接是
https://dl.google.com/linux/chrome/deb/pool/main/g/google-chrome-stable/google-chrome-stable_104.0.5112.101-1_amd64.deb
Find the package that provides a file
-
use the tool
apt-filesudo apt-get install apt-file sudo apt-file update apt-file search libstdc++.so.6 apt-file find kwallet.h -
You can search it in Google directly
Use apt search for package name only
By default, apt search command looks for the searched term in both the name of the package and its description.
You may narrow down the search by instructing the apt command to search for package names only.
apt search --names-only search_term
压缩相关
为什么 Linux 要用 tar.gz,很少用 7Z 或 ZIP?
因为 7z 和 zip 压缩格式都不能保留 unix 风格的文件权限,比如解压出个可执行文件要重新 chmod chown 才能恢复正常。而 tar 格式可以。而 tar 本身不提供压缩,无非就是把包括所有文件的內容和权限拼成一个文件而己,所以用另外如 gzip 格式压缩。为什么是 gzip,因为几乎所有 linux 都支持而已。
extract a specific file from a tar archive
Yes, just give the full stored path of the file after the tarball name.
Example: suppose you want file etc/apt/sources.list from etc.tar:
tar -xf etc.tar etc/apt/sources.list
解压zip
如果解压中文乱码:
unzip -O CP936 xxx.zip
CP936其实就是GBK,IBM在发明Code Page的时候将GBK放在第936页,所以叫CP936。
注意:有些名为 *.rar 文件其实是 zip 文件,直接用 nautilus 解压会乱码,可以用 file filename.rar 确认一下,使用 unzip 解压。
常见国家的编码
韩文编码
1.EUC_KR:用来储存韩国KSX1001字集(旧称KSC5601)的字符。此规格由KSX2901(旧称KS C 5861)定义。
KS X 1001字元使用两个字节来表示: “高位字节”使用0xA1-0xFE,“低位字节”使用0xA1-0xFE
日文编码
1.Shift_JIS :是一个日本电脑系统常用的编码表。它能容纳全角及半角拉丁字母、平假名、片假名、符号及日语汉字。它被命名为Shift_JIS的原因,是它在放置全角字符时,要避开原本在0xA1-0xDF放置的半角假名字符。在微软及IBM的日语电脑系统中,即使用了这个编码表。这个编码表称为CP932。
2.EUC_JP:用来存储日本JISx0208以及JISx0212的字集的字符,但日文文字较多使用ISO-2022-JP或Shift_JIS的方法来表示。
俄文编码
1.KOI8-R:KOI-8系列的斯拉夫文字8位元编码,供俄语及保加利亚语使用。
常见字符编码
ASCII
ASCII是美国(国家)信息交换标准(代)码,一种使用7个或8个二进制位进行编码的方案,最多可以给256(2^80)个字符 (包括字母、数字、标点符号、控制字符及其他符号)分配(或指定)数值。基本的 ASCII 字符集共有 128 个字符,其中有 96 个可打印字符,包括常用的字母、数字、标点符号等,另外还有 32 个控制字符。
文件中每一个字都是美标形象码或空格码,这类文件称为“美标文本文件”,或略为“文本文件”,通常可在不同电脑系统间直接交换。 文件中含有控制码或非美标码的文件,通常不能在不同电脑系统间直接交换。这类文件有一个通称,叫“二进制文件”
ANSI
为了扩充ASCII编码,以用于显示本国的语言,不同的国家和地区制定了不同的标准,由此产生了GB2312, BIG5, JIS 等各自的编码标准。这些使用 2 个字节来代表一个字符的各种汉字延伸编码方式,称为 ANSI 编码,又称为MBCS(Muilti-Bytes Charecter Set,多字节字符集)。在简体中文系统下,ANSI 编码代表 GB2312 编码,在日文操作系统下,ANSI 编码代表 JIS 编码,所以在中文 windows下要转码成GB2312,GBK(gb2312的扩展)只需要把文本保存为ANSI 编码即可。 不同 ANSI 编码之间互不兼容,当信息在国际间交流时,无法将属于两种语言的文字,存储在同一段 ANSI 编码的文本中。一个很大的缺点是,同一个编码值,在不同的编码体系里代表着不同的字。这样就容易造成混乱
GB2312
GB2312是ANSI编码里的一种,对ANSI编码最初始的ASCII编码进行扩充,为了满足国内在计算机中使用汉字的需要,中国国家标准总局发布了一系列的汉字字符集国家标准编码,统称为GB码,或国标码。其中最有影响的是于1980年发布的《信息交换用汉字编码字符集 基本集》,标准号为GB 2312-1980,因其使用非常普遍,也常被通称为国标码。GB2312编码通行于我国内地;新加坡等地也采用此编码。几乎所有的中文系统和国际化的软件都支持GB2312。 GB2312是一个简体中文字符集,由6763个常用汉字和682个全角的非汉字字符组成
GBK
GB 2312的出现,基本满足了汉字的计算机处理需要,但对于人名、古汉语等方面出现的罕用字,GB 2312不能处理,这导致了后来GBK及GB 18030汉字字符集的出现 GBK共收入21886个汉字和图形符号,其中汉字(包括部首和构件)21003个,图形符号883个。GBK编码标准兼容GB2312,共收录汉字21003个、符号883个,并提供1894个造字码位,简、繁体字融于一库。GB2312码是中华人民共和国国家汉字信息交换用编码,全称《信息交换用汉字编码字符集——基本集》,1980年由国家标准总局发布。基本集共收入汉字6763个和非汉字图形字符682个,通行于中国大陆。新加坡等地也使用此编码。GBK是对GB2312-80的扩展.
Big5
在台湾、香港与澳门地区,使用的是繁体中文字符集。而1980年发布的GB2312面向简体中文字符集,并不支持繁体汉字。在这些使用繁体中文字符集的地区,一度出现过很多不同厂商提出的字符集编码,这些编码彼此互不兼容,造成了信息交流的困难。为统一繁体字符集编码,1984年,台湾五大厂商宏碁、神通、佳佳、零壹以及大众一同制定了一种繁体中文编码方案,因其来源被称为五大码,英文写作Big5,后来按英文翻译回汉字后,普遍被称为大五码。大五码是一种繁体中文汉字字符集,其中繁体汉字13053个,808个标点符号、希腊字母及特殊符号。
unicode
为什么电子邮件和网页都经常会出现乱码,就是因为信息的提供者可能是日文的ANSI编码体系和信息的读取者可能是中文的编码体系,他们对同一个二进制编码值进行显示,采用了不同的编码,导致乱码。这个问题促使了unicode码的诞生。 如果有一种编码,将世界上所有的符号都纳入其中,无论是英文、日文、还是中文等,大家都使用这个编码表,就不会出现编码不匹配现象。每个符号对应一个唯一的编码,乱码问题就不存在了。这就是Unicode编码。
unicode,中文叫万国码,统一码,是统一码联盟为了世界上大多数文字系统进行整理和编码。 和unicode类似,iso组织也在做同样的事情,iso开展了 ISO/IEC 10646项目,名字叫“ Universal Multiple-Octet Coded Character Set”,简称UCS。 后来,双方意识到时间上不需要2套通用的字符集,所以双方开始进行整合,到unicode2.0时,unicode的编码和ucs的编码都基本一致。 但是又略有不同。
Unicode深入人心,且UTF-8(Unicode中的一种)大行其道,UCS编码基本被等同于UTF-16,UTF-32了,所以目前UCS基本谈出人们的视野中。
UTF-8
Unicode固然统一了编码方式,但是它的效率不高,比如UCS-4(Unicode的标准之一)规定用4个字节存储一个符号,那么每个英文字母前都必然有三个字节是0,这对存储和传输来说都很耗资源。 为了提高Unicode的编码效率,于是就出现了UTF-8编码。UTF-8可以根据不同的符号自动选择编码的长短。比如英文字母可以只用1个字节就够了。
UTF-16
UTF-16是Unicode的其中一个使用方式,UTF-16比起UTF-8,好处在于大部分字符都以固定长度的字节 (2字节) 储存,但UTF-16却无法兼容于ASCII编码。
Base64
有的电子邮件系统(比如国外信箱)不支持非英文字母(比如汉字)传输,这是历史原因造成的(认为只有美国会使用电子邮件?)。因为一个英文字母使用ASCII编码来存储,占存储器的1个字节(8位),实际上只用了7位2进制来存储,第一位并没有使用,设置为0,所以,这样的系统认为凡是第一位是1的字节都是错误的。而有的编码方案(比如GB2312)不但使用多个字节编码一个字符,并且第一位经常是1,于是邮件系统就把1换成0,这样收到邮件的人就会发现邮件乱码。
为了能让邮件系统正常的收发信件,就需要把由其他编码存储的符号转换成ASCII码来传输。比如,在一端发送GB2312编码->根据Base64规则->转换成ASCII码,接收端收到ASCII码->根据Base64规则->还原到GB2312编码。
BMP
UCS-4根据最高位为0的最高字节分成2^7=128个group。每个group再根据次高字节分为256个plane。每个plane根据第3个字节分为256行 (rows),每行包含256个cells。当然同一行的cells只是最后一个字节不同,其余都相同。 group 0的plane 0被称作Basic Multilingual Plane, 即BMP。或者说UCS-4中,高两个字节为0的码位被称作BMP。 将UCS-4的BMP去掉前面的两个零字节就得到了UCS-2。在UCS-2的两个字节前加上两个零字节,就得到了UCS-4的BMP。而目前的UCS-4规范中还没有任何字符被分配在BMP之外
硬盘相关
dd 制作U盘启动盘
dd bs=4M if=fileName.iso of=/dev/sdx status=progress && sync
Windows 下用 Rufus 且 dd 写入模式
exFAT
文件系统
所谓文件系统,就是文件的储存方式。通过文件系统可以准确找到存储在硬盘中的数据。储存设备都需要指定文件系统,计算机才能读写。
Windows 的文件系统
-
FAT32:是最老的文件系统,所有操作系统都支持,兼容性最好。但是,它是为 32 位计算机设计的,文件不能超过 232 - 1 个字节,也就是不能超过 4GB,分区不能超过 8TB。
-
NTFS:是 Windows 的默认文件系统,用来替换 FAT32。Linux 下有如下方法创建 NTFS 文件系统
# gparted $ sudo apt-get install gparted # mkntfs $ sudo apt-get install ntfs-3g $ sudo mkntfs --fast --label myUsbDrive /dev/sdb1 # mkfs $ mkfs.ntfs -f -L DiskLabel /dev/sdb1 -
exFAT:是 FAT32 的 64位升级版,ex 就是 extended 的缩写(表示"扩展的 FAT32"),功能不如 NTFS,但是解决了文件和分区的大小问题,两者最大都可以到 128PB。
Linux 的 exFAT 格式化
sudo mkfs.exfat /dev/sdX1
分区表
所谓硬盘分区,就是指一块硬盘上面,同时存在多个文件系统。每个文件系统管理的区域,就称为一个分区(partition)。
分区大小、起始位置、结束位置、文件系统等信息,都储存在分区表里面。
分区表也分成两种格式:MBR 和 GPT。前者是传统格式,兼容性好;后者更现代,功能更强大。
img转化成iso
IMG是一种文件归档格式(archive format),主要是为了创建磁盘的映像文件(disk image),它可以用来封装存储整个磁盘(通常指软磁盘,Floppy Disk或Diskette)或整片光盘的内容,使用".IMG"这个扩展名的文件就是利用这种文件格式来创建的。
.IMG这个文件格式可视为.ISO格式的一种超集合。由于.ISO只能封存使用ISO9660和UDF这两种文件系统的存储介质,意即.ISO只能拿来封存CD或DVD,因此才发展出了.IMG,它是以.ISO格式为基础另外新增可封存使用其它文件系统的存储介质的能力,.IMG可向后兼容于.ISO,如果是拿来封存CD或DVD,则使用.IMG和.ISO这两种格式所产生出来的内容是一样的。
将img 转化成iso的有 nrg2iso 或 ccd2iso,分别下载如下:
sudo apt-get install nrg2iso
sudo apt-get install ccd2iso
使用如下:
nrg2iso image.nrg image.iso
ccd2iso <.img filename> <.iso filename>
启用 TRIM
当我在运行 Linux 的计算机上安装我的第一块固态驱动器(SSD)后,我开始探索如何用好它们。SSD 在操作方式上与传统磁性驱动器不同,并且它们需要在软件上另行处理以达到功能优化。
在传统磁盘驱动器上,删除时所删除的文件不会从磁盘中完全删除。这就是为什么你可以恢复已删除的文件的原因。基本上,文件系统仅引用磁盘上文件的位置,并且当文件被删除时,该引用被擦除,以允许你在这些空间中写入新数据覆盖原来的数据。然而,对于 SSD,新数据只能写在驱动器上完全新的或已擦除的单元上。因为必须在写入之前清除空间,如果在写入文件时尚未有足够的可用空间,则必须首先擦除该空间。这可能会对性能产生负面影响。
如果操作系统在写入新数据之前就擦除了未使用的空间,而不是在写入时同时进行擦除,则可以提高文件保存性能。这种做法就是 TRIM。 TRIM 命令本质上允许你的操作系统告诉驱动器哪些区域的数据不再使用,以便擦除它们,加快驱动器将来的写入,可以 SSD 的用户提供更佳的体验。
在 Linux 中,fstrim 提供此功能,它可以为写入新数据而准备驱动器,并延长驱动器的使用寿命。由于在我使用的 Linux 发行版上 SSD 的 trim 不是自动的,所以必须去调度该操作,否则 SSD 的性能会随着时间的推移而降低。
为了在驱动器上运行 fstrim,驱动器本身以及其上的文件系统必须支持 TRIM。TRIM SSD 可以在命令行或 cron 任务中手动完成。作为超级用户(使用 su 或 sudo),运行 fstrim / -v 以完成手动 trim,或者设置 cron 任务以在计算机未使用时定期为你运行此命令。对于 fstrim 的完整选项列表请参考它的 man 手册。
注:可以定期执行fstrim命令,但是不建议在mount / fstab 中使用discard 选项。因为这个选项要求SSD每次删除文件都进行trim操作,比较耗资源,尤其是在文件操作很频繁的时候。所以可以考虑用cron来定期trim。
硬件支持根据使用的驱动器接口类型如 PCI、ATA、SCSI 还是 SD/MMC 而有所不同。你需要咨询你的 Linux 供应商以了解你的特定发行版是如何支持 TRIM 的。
例如,红帽提供以下 SSD 磁盘指南。“性能随着所使用的块数接近磁盘容量而降低,性能影响程度因供应商而异,但是所有设备都会遇到一些性能降低。为了解决性能降低问题,主机系统(例如 Linux 内核)使用丢弃请求以通知存储器给定范围的块不再使用。”
Debian wiki 提供了 SSD 使用的一些基本注意事项:使用 Linux 3.2 或更高版本内核,使用 SSD 的最新固件,使用 EXT4 文件系统,并且“在正常工作负载下有足够的 DRAM 用来操作而不用使用交换空间“。
reserve 5% of the space
By default, ext2/3/4 filesystems reserve 5% of the space to be useable only by root. This is to avoid a normal user completely filling the disk which would then cause system components to fail whenever they next needed to write to the disk.
You can see the number of reserved blocks (and lots of other information about the filesystem) by doing:
sudo tune2fs -l /dev/sda8
For a /home partition, it is probably safe to set the reserved fraction to zero:
sudo tune2fs -m 0 /dev/sda8
Which should make an additional ~5GB available.
Change Partition Label
e2label or tune2fs
The commands e2label or tune2fs used for changing label of ext2, ext3 and ext4 type partitions.
# e2label /dev/sda1 ROOT
OR
# tune2fs –L ROOT_PART /dev/sda1
Here, ROOT and ROOT_PART are the labels to be added to /dev/sda1 which is ext4 formatted partition.
ntfslabel
The ntfslabel command used for changing label of NTFS partitions.
# ntfslabel /dev/sda5 NTFS_DIR
mkswap
The mkswap command used for changing label of SWAP partition.
After unmounting the filesystem, following command needs to be executed to change the label of swap partition.
# mkswap -L SWAP_PART /dev/sda5
Where, /dev/sda5 is the SWAP formatted partition.
exfatlabel
The exfatlabel command used for changing the label of exFAT formatted partition.
# exfatlabel /dev/sda3 EX_PART
Disable usb automount
gsettings get org.gnome.desktop.media-handling automount
gsettings set org.gnome.desktop.media-handling automount false
or use dconf-editor
如果是 KDE:右键任务栏右侧的 Most Recent Device,进入设置取消自动mount 就好了。
Create an ISO File
-
Mkisofs
mkisofs -o [filename.iso] [ directory_path] mkisofs –o backup.iso /home/tin/Documents/backup -
dd
dd if=[source] of=[target.iso] sudo dd if= /dev/sdb of= diskimage.iso -
Brasero
sudo apt-get install brasero
将du的输出按文件大小排序
sdu () {
  du -sk $@ | sort -n | awk '
BEGIN {
  split("K,M,G,T", Units, ",");
  FS="\t";
  OFS="\t";
}
{
  u = 1;
  while ($1 >= 1024) {
    $1 = $1 / 1024;
    u += 1
  }
  $1 = sprintf("%.1f%s", $1, Units[u]);
  sub(/\.0/, "", $1);
  print $0;
}'
}
SSHFS: How to Mount Remote File Systems Over SSH
SSHFS (SSH File System) is a client for mounting a file system located on a remote machine onto your local system through an SSH connection. Using the SFTP (SSH file transfer protocol), the SSHFS command-line tool mounts a physical or virtual disk locally, allowing file transfer between a local and remote machine.
This article demonstrates the installation and usage of SSHFS to mount a remote folder or file system over SSH.
Install SSHFS
sudo apt install sshfs
Mount a Remote File System on Linux
Step 1: Create Mount Point
Create a mount point directory in the mnt folder where the remote file system will be mounted:
sudo mkdir /mnt/<folder name>
Step 2: Mount the Remote File System Using SSHFS
Mount the remote file system to the created mount point using the SSHFS tool:
sudo sshfs [-o <options>] <remote user>@<remote host>:/<path to remote directory> /mnt/<folder name>/
Enter the login password when requested if using password authentication. If the remote server uses SSH key authorization, provide the path of the private key. For example:
sudo sshfs -o allow_other,IdentityFile=/home/kb/.ssh/id_rsa ubuntu@131.153.142.254:/home/ubuntu/ /mnt/test/
The allow_other option allows access to users other than root.
Step 3: Unmount a Remote File System on Linux
Lastly, when finished with the mount point, unmount the remote file system with:
sudo umount /mnt/<folder name>
交换文件
在桌面环境中,交换分区或文件用来实现休眠(hibernate)的功能,即将当前环境保存在磁盘的交换文件或分区部分。除此之外,某些特定软件需要 swap 才可以正确运行。交换文件与分区性能相同,且交换文件更为灵活,可随时变更大小,增加与删除。
sudo fallocate -l 4G /swapfile # 创建4G的交换空间,大小根据需要自定
sudo dd if=/dev/zero of=/swapfile bs=1M count=4096 status=progress # 或者使用 dd
sudo chmod 600 /swapfile # 设置正确的权限
sudo mkswap /swapfile # 格式化swap文件
sudo swapon /swapfile # 启用swap文件
最后,向 /etc/fstab 中追加如下内容:
/swapfile none swap defaults 0 0
KDE 自身提供开箱即用的睡眠功能(suspend),即将系统挂起到内存,消耗少量的电量。休眠(hibernate)会将系统挂起到交换分区或文件,几乎不消耗电量。
File recovery
Ddrescue
GNU ddrescue是一个用于磁盘、CD-ROM与其他数字存储媒体的资料恢复工具。其将原始存储区块(如扇区)从一个设备或文件复制到另一个,同时以智能方式处理读取错误,透过从部分读取的区块中截取尚称良好的扇区来最小化资料损失。
File or grep
With a bit of chances, sometimes I can recover deleted files with this script or next solution in the answer :
#!/bin/bash

if [[ ! $1 ]]; then
    echo -e "Usage:\n\n\t$0 'file name'"
    exit 1
fi

f=$(file 2>/dev/null /proc/*/fd/* | awk '$NF == "(deleted)"{print $(NF-1)}')

if [[ $f ]]; then
    echo "fd $f found..."
    cp -v "$f" "$1"
else
    echo >&2 "No fd found..."
    exit 2
fi
There’s another useful trick: if you know a pattern in your deleted files, type alt+sys+resuo to reboot+remount in read-only, then with a live-cd, use grep to search in the hard-drive :
grep -a -C 500 'known pattern' /dev/sda | tee /tmp/recover
then edit /tmp/recover to keep only what were your file(s) before.
Hey, if with unix philosophy all is files, it’s time to take advantage of this, no ?
I don’t understand how the grep solution worked for you, it outputs only binary data. How is that useful? – w00t
Sure, it “only” spits out binary data. But sometimes that binary data happens to contain the ASCII bits corresponding to the file I’m looking for. I guess I don’t understand the question? – wchargin
the trick is to use a search pattern that is very specific to that file. The grep command will take the 500 lines before and after each matching line, so it will still spit out a lot of irrelevant data, but with a text editor that can cope with that (e.g. Vim), it’s easy to sort out the good from the bad stuff. You could also filter out all lines with nonprintable characters by piping it through another grep command:
grep -av "[^[:print:]]"– JimmyMcHoover
Extundelete
安装:
sudo apt install extundelete
查看挂载:
$ df -lh
/dev/sdb1       6.8G  4.1G  2.8G   60% /media/taroballs/taroballs
卸载文件系统:停止对当前分区做任何操作,防止inode被覆盖。inode被覆盖基本就告别恢复了
umount /dev/sdb1
通过inode节点恢复:
-
通过扫描查找删除的文件夹
extundelete /dev/sdb1 --inode 2 -
恢复单一文件tmppasswd
extundelete /dev/sdb1 --restore-file passwd -
恢复目录deletetest
extundelete /dev/sdb1 --restore-directory deletetest -
恢复所有
extundelete /dev/sdb1 --restore-all -
恢复指定inode
extundelete /dev/sdb1 --restore-inode 14
Commands to see mountpoint
On Linux, you can now use the findmnt command from util-linux (since version 2.18):
$ findmnt -S /dev/VG_SC/home
TARGET SOURCE                 FSTYPE OPTIONS
/home  /dev/mapper/VG_SC-home ext4   rw,relatime,errors=remount-ro,data=ordered
Or lsblk (also from util-linux, since 2.19):
$ lsblk /dev/VG_SC/home
NAME       MAJ:MIN RM  SIZE RO TYPE MOUNTPOINT
VG_SC-home 254:2    0  200G  0 lvm  /home
That one is also useful to find all the file system mounted under a specific device (disk or partition…):
$ lsblk  /dev/sda2
NAME                    MAJ:MIN RM   SIZE RO TYPE MOUNTPOINT
sda2                      8:2    0  59.5G  0 part
├─linux-debian64 (dm-1) 252:1    0    15G  0 lvm
└─linux-mint (dm-2)     252:2    0    15G  0 lvm  /
To get the mountpoint only:
$ findmnt -nr -o target -S /dev/storage/home
/home
$ lsblk -o MOUNTPOINT -nr /dev/storage/home
/home
Above findmnt does return with a failure exit status if the device is not mounted, not lsblk.
So:
if mountpoint=$(findmnt -nr -o target -S "$device"); then
  printf '"%s" is mounted on "%s"\n' "$device" "$mountpoint"
else
  printf '"%s" does not appear to be directly mounted\n' "$device"
fi
mount an ISO image/file
- Create the mount point directory on Linux: sudo mkdir /mnt/iso
- Mount the ISO file on Linux: sudo mount -o loop /path/to/my-iso-image.iso /mnt/iso
- Verify it, run: mount OR df -H OR ls -l /mnt/iso/
- Unmount the ISO file using: sudo umount /mnt/iso/
桌面环境相关
在中文介面下,如何只用英文目錄名稱?
-
方案一:先切到英文介面再重新開機,此時 Fedora 會問你要不要將子目錄換為英文名稱(選 Yes),再切回中文介面重新開機,Fedora 會再問你一次要不要更改子目錄為中文名稱(選 No),收工!
-
方案二:
LANG=C xdg-user-dirs-gtk-update # 同意更新 xdg-user-dirs-gtk-update # 保留且不再問 -
方案三:手動修正配置文件
~/.config/user-dirs.dirs,然後在主目錄下創建對應目錄,重啟即可解決.
XDG_TEMPLATES_DIR
If you drop any files in “Templates” folder. Then when you right-click and create a new document, you can select any of these files as a basis for the new file.
If you have deleted the folder and need to restore this functionality:
gedit ~/.config/user-dirs.dirs
Check that there is a line containing the following - if not, add this line.
XDG_TEMPLATES_DIR="$HOME/Templates"
nmcheck.gnome.org
nmcheck.gnome.org is not malware. It is the gnome network manager connectivity check (for captive portals/hotspots). Click the link and you will see a single text file with a text in it. It should be “NetworkManager is online”.
Check /etc/NetworkManager/NetworkManager.conf. There probably is a section with this in it:
[Connectivity]
uri=http://nmcheck.gnome.org/check_network_status.txt
on Ubuntu 20.04 no [Connectivity] line like accepted answer in /etc/NetworkManager/NetworkManager.conf.
But you can disable the auto connectivity check by:
- Go to
Settingsapp - Go to
Privacymenu - On
Connectivitytab, uncheckConnectivity Checking
Automatic Light / Dark Mode
for GNOME, this shell extension exists: Night Theme Switcher
改善触摸板体验
众所周知,Macbook 的触摸板是体验最好的,很多果粉都吹 Macbook 的触摸板用了之后“就不再想要去用鼠标”。
有一群人搞了一个项目:「Linux Touchpad like Macbook Update」。顾名思义,就是“把 Linux 的触摸板搞的像 Macbook 一样”。
这个项目的主要作用就是针对现在 Linux 下对于触摸板管理的相关驱动进行一些修改和优化,以提升触摸的使用体验,尤其是包括“多点触摸”等等等。
sudo add-apt-repository ppa:p12/xorg-gestures
sudo apt-get update
当然,尽管如此,我们也只是在驱动层面改善了触摸,在应用层面还需要另一个工具的帮忙:touchegg
安装完毕之后你的三指上滑和三指下滑都可以正常使用了,譬如三指上滑是窗口最大化,三指下滑是窗口最小化。
Preferring Chinese fonts to Japanese ones
-
Copy the system configuration file /etc/fonts/conf.avail/64-language-selector-prefer.conf to the per-user font configuration folder.
mkdir ~/.config/fontconfig/ cp /etc/fonts/conf.avail/64-language-selector-prefer.conf ~/.config/fontconfig/fonts.conf -
Move SC and TC adn HK fonts in front of JP and KR ones in the aliases defined in
~/.config/fontconfig/fonts.conf:<?xml version="1.0"?> <!DOCTYPE fontconfig SYSTEM "fonts.dtd"> <fontconfig> <alias> <family>sans-serif</family> <prefer> <family>Ubuntu</family> <family>Noto Sans CJK SC</family> <family>Noto Sans CJK TC</family> <family>Noto Sans CJK HK</family> <family>Noto Sans CJK JP</family> <family>Noto Sans CJK KR</family> </prefer> </alias> <alias> <family>serif</family> <prefer> <family>Noto Serif</family> <family>Noto Serif CJK SC</family> <family>Noto Serif CJK TC</family> <family>Noto Serif CJK JP</family> <family>Noto Serif CJK KR</family> </prefer> </alias> <alias> <family>monospace</family> <prefer> <family>Ubuntu Mono</family> <family>Noto Sans Mono CJK SC</family> <family>Noto Sans Mono CJK TC</family> <family>Noto Sans Mono CJK HK</family> <family>Noto Sans Mono CJK JP</family> <family>Noto Sans Mono CJK KR</family> </prefer> </alias> </fontconfig> -
Restart apps.
Mac OS X Fonts
Older: Typography of Apple Inc.
Monaco: With the August 2009 release of Mac OS X 10.6 “Snow Leopard”, Menlo was introduced as the default monospaced font instead of Monaco in Terminal and Xcode, However, Monaco remains a part of macOS. Monaco is the default font in the current Python IDLE when used on a Mac running OS X El Capitan.
OS X Mavericks (version 10.9): Lucida Grande
OS X Yosemite (version 10.10): Helvetica Neue
OS X El Capitan (version 10.11) : San Francisco
Now: Fonts for Apple platforms
- SF Pro: Is the system font for iOS, iPad OS, macOS and tvOS.
- SF Compact: Is the system font for watchOS and includes a rounded variant.
- SF Mono: Is used in coding environments like Xcode.
- SF Arabic: Is the Arabic system font on Apple platforms.
- New York: A companion to San Francisco, this serif typeface is based on essential aspects of historical type styles.
Format Chinese, Japanese, or Korean text in Pages on Mac
For best results, use these recommended fonts:
- Simplified Chinese: PingFang SC
- Traditional Chinese for Taiwan: PingFang TC
- Traditional Chinese for Hong Kong and Macau: PingFang HK
- Korean: Apple SD Gothic Neo
- Japanese: Hiragino Sans (sans serif) or Hiragino Mincho (serif)
Location of core fonts on OSX?
User ~/Library/Fonts/ Each user has complete control over the fonts installed in their Home. These fonts are available to that user when he or she is logged in to the computer. Fonts installed here are not available to all users of the computer.
Local /Library/Fonts/ Any local user of the computer can use fonts installed in this folder. Mac OS X does not require these additional fonts for system operation. An admin user can modify the contents of this folder. This is the recommended location for fonts that are shared among applications.
Network /Network/Library/Fonts/ The Network folder is for fonts shared among all users of a local area network. This feature is normally used on network file servers, under the control of a network administrator.
System /System/Library/Fonts/ Mac OS X requires fonts in this folder for system use and displays. They should not be manually altered or removed.
Classic /System Folder/Fonts/ This folder contains fonts used by the Classic environment (Mac OS X v10.4 or earlier only). If more than one Mac OS 9.1 System Folder is present, only fonts in the System Folder selected in the Classic pane of System Preferences are used. Classic applications can access only these fonts, not those stored elsewhere. Conversely, Mac OS X applications can use these fonts, even when the Classic environment is not active.
直接通过 Mac OS X 的安装镜像找不到字体,在网络上也没有相关教程,只能通过 OSX-KVM 安装一个虚拟机,之后尝试了多种宿主机和虚拟机数据交互方案,最终通过 sftp 成功下载所有字体:
-
QEMU 端口转发:成功!ssh 万岁!
-
How do I get an entire directory in sftp?:
Use the
-r(recursive) flag:get -r *
-
QEMU 的内置SMB服务器:Connecting to SMB shares with Mac OS X,Finder 连接后直接闪退。
-
挂载qcow2镜像内的分区:linux-apfs-rw,挂载的不知道是些什么东西,好像无法挂载 Data Volume。
-
宿主机的USB设备传递至虚拟机:Adding an USB device,虚拟机毫无反应,根本看不到设备。
不同版本的 Mac OS X 字体不一样,字体配置文件也不一样,参考如何修改 macOS 的系统默认中文字体 使用 TinkerTool 来修改默认字体(也需要注意选择对应的版本)。
How to extract a .dmg file in Linux?
Just use 7z x.
7z x jdk-8u51-macosx-x64.dmg
cd JDK 8 Update 51/
7z x JDK 8 Update 51.pkg
7z x Payload~
Design Principles Applied to the SF Fonts
This presentation clarified the difference: SF Pro Display is designed to be used at sizes above 20pt, whereas SF Pro Text is designed to be used at sizes 19pt and below.
Download
-
On FontsHub.pro, you can download fonts for free and use them on your site to design headlines, quotes, paragraphs, lists, or other text elements.
fonts.conf
edit .config/fontconfig/fonts.conf
<?xml version="1.0"?>
<!DOCTYPE fontconfig SYSTEM "fonts.dtd">
<fontconfig>
    <alias>
        <family>sans-serif</family>
        <prefer>
            <family>SF Pro</family>
            <family>PingFang SC</family>
            <family>PingFang TC</family>
            <family>PingFang HK</family>
            <family>Hiragino Sans</family>
            <family>Apple SD Gothic Neo</family>
        </prefer>
    </alias>
    <alias>
        <family>serif</family>
        <prefer>
            <family>New York</family>
            <family>PingFang SC</family>
            <family>PingFang TC</family>
            <family>PingFang HK</family>
            <family>Hiragino Sans</family>
            <family>Apple SD Gothic Neo</family>
        </prefer>
    </alias>
    <alias>
        <family>monospace</family>
        <prefer>
            <family>SF Mono</family>
            <family>PingFang SC</family>
            <family>PingFang TC</family>
            <family>PingFang HK</family>
            <family>Hiragino Sans</family>
            <family>Apple SD Gothic Neo</family>
        </prefer>
    </alias>
</fontconfig>
Windows Fonts
| 语言 | 字体 |
|---|---|
| 英语(English) | Segoe UI |
| 简体中文(Chinese Simplified) | Microsoft YaHei |
| 繁体中文(Chinese Traditional) | Microsoft JhengHei |
| 日语(Japanese) | Meiryo |
| 韩语(Korean) | Malgun Gothic |
| Operating system | Default monospace font |
|---|---|
| Windows 10 | Consolas |
All fonts are stored in the C:\Windows\Fonts folder.
-
使用 7-zip
$ 7z e -aoa \ sources/install.wim Windows/Fonts/"*".{ttf,ttc} \ -o/home/kurome/Downloads/Microsoft/ -
使用 wimmount
sudo wimmount install.wim /mnt/iso/
Is there a unix command line tool that can analyze font files?
In Linux, if you have .ttf fonts, you most probably also have fontconfig, which comes with the fc-scan utility. You can parse the output for the information you want, or use the badly documented --format option.
For example:
fc-scan --format "%{foundry} : %{family}\n" /usr/share/fonts/truetype/msttcorefonts/arialbd.ttf
font.conf
<?xml version="1.0"?>
<!DOCTYPE fontconfig SYSTEM "fonts.dtd">
<fontconfig>
    <alias>
        <family>sans-serif</family>
        <prefer>
            <family>Segoe UI</family>
            <family>Microsoft YaHei</family>
            <family>icrosoft JhengHei</family>
            <family>Noto Sans CJK HK</family>
            <family>Noto Sans CJK JP</family>
            <family>Noto Sans CJK KR</family>
        </prefer>
    </alias>
    <alias>
        <family>serif</family>
        <prefer>
            <family>Noto Serif</family>
            <family>Microsoft YaHei</family>
            <family>icrosoft JhengHei</family>
            <family>Noto Serif CJK JP</family>
            <family>Noto Serif CJK KR</family>
        </prefer>
    </alias>
    <alias>
        <family>monospace</family>
        <prefer>
            <family>Consolas</family>
            <family>Microsoft YaHei</family>
            <family>icrosoft JhengHei</family>
            <family>Noto Sans Mono CJK HK</family>
            <family>Noto Sans Mono CJK JP</family>
            <family>Noto Sans Mono CJK KR</family>
        </prefer>
    </alias>
</fontconfig>
FromUbuntuToKubuntu
sudo apt install kubuntu-desktop
类似的还有
- lubuntu-desktop
- ubuntu-desktop
- xubuntu-desktop
修改 User-Agent
Chrome
- 方法一:依次打开 开发者工具 > More tools > Network conditions,在User agent中选择(已有多种范例可以选择)或自定义相应值。
- 方法二:添加启动参数 –user-agent=“自定义的User-Agent值”,可在命令行或快捷方式的“目标”框中使用。
- 方法三:使用User-Agent Switcher for Chrome之类的扩展程序。
Firefox
- 方法一:在地址栏输入about:config,回车后打开配置编辑器,输入general.useragent.override创建该首选项,数据类型为字符串,再输入自定义的User-Agent字符串。
- 方法二:使用User Agent Switcher and Manager之类的组件。
从 Linux 终端发送桌面通知与提醒
从 Linux 终端发送通知
要从 Linux 终端发送通知,请使用 notify-send 命令。运行 which notify-send 命令来查看它是否在于你的系统中。如果没有,请使用包管理器来安装它。
在基于 Debian 的发行版上,输入:
sudo apt install notify-send
几个简单的通知示例:
notify-send "Dinner ready!"
notify-send "Tip of the Day" "How about a nap?"
你可以用紧急程度、自定义图标等选项来自定义通知。过 man notify-send 了解更多。你也可以在通知正文中使用一小组 HTML 标记,以使消息有一个棒的视觉感受。最重要的是,URL 被呈现为可点击的。例如:
$ notify-send -u critical \
  "Build failed!" \
  "There were <b>123</b> errors. Click here to see the results: http://buildserver/latest"
发送的通知会被桌面环境接收,并像其他通知一样显示。它们将具有相同的外观、交互和行为。
将 notify-send 与 at 结合使用
计划任务通常被用来定期安排命令。at 命令安排在一个指定的时间执行一条命令。如果你像这样运行它,它会以交互模式启动,你可以在其中输入要在指定时间执行的命令:
at 12:00
这对脚本来说并不有用。幸运的是 at 接受来自标准输入的参数,所以我们可以这样使用它:
echo "npm run build" | at now + 1 minute
echo "backup-db" | at 13:00
有许多指定时间的方法。 从绝对时间,如 10:00,到相对时间,如 now + 2 hours ,再特殊时间,如noon 或 midnight。我们可以把它和 notify-send 结合起来,在未来的某个时间向自己发送提醒。例如:
echo "notify-send 'Stop it and go home now?' 'Enough work for today.' -u critical" | at now
Desktop file
Running a .desktop file in the terminal
With any recent Ubuntu that supports gtk-launch just simply go
gtk-launch <file>
Where <file> is the name of the .desktop file with or without the .desktop part. The name must not include the full path.
So gtk-launch foo opens /usr/share/applications/foo.desktop (or foo.desktop located in one of the other permitted directories.)
Set variable in .desktop file
Add the setting of the environment variable, via the env command, to the entry “Exec”:
Exec=env APPMENU_DISPLAY_BOTH=1 digikam -caption "%c" %i
How to validate/verify .desktop files?
You are looking for the desktop-file-validate tool provided by the desktop-files-utils package in your distribution. It check for syntax, using reserved words/characters, in summary, that it complies with the Desktop Entry specification. Here’s a example of a bad .desktop file:
$ desktop-file-validate asdf.desktop
asdf.desktop: error: value "s.0.m.t.h.i.n.g" for key "Version" in group "Desktop Entry" is not a known version
Which in good files like caribou-autostart.desktop won’t show anything.
Dash to Dock
Hide Mounted Drives on the Dock
gsettings set org.gnome.shell.extensions.dash-to-dock show-mounts false
How do you disable the window preview in Ubuntu dock (GNOME sidebar)?
This will allow you to cycle through the open windows by clicking on the icon:
gsettings set org.gnome.shell.extensions.dash-to-dock click-action 'cycle-windows'
To revert the action:
gsettings reset org.gnome.shell.extensions.dash-to-dock click-action
gsettings or dconf value list for a key
If it was a enumeration, you could
gsettings range ...
Example:
$ gsettings range org.gnome.shell.extensions.dash-to-dock click-action
enum
'skip'
'minimize'
'launch'
'cycle-windows'
'minimize-or-overview'
'previews'
'minimize-or-previews'
'focus-or-previews'
'focus-minimize-or-previews'
'quit'
概览 Linux 音频系统
论 Linux 是如何将音乐文件转换成空气的震动
你很有可能从未仔细研究过 Linux 的音频系统. 在大多数情况下, 在装好图形界面后(或者像 ubuntu 或 openSUSE 这种装好就带桌面环境的发行版里),音频就“自然而然”地能用了。的确,对很多人来说,自带的音频设置已经够好了。
然而,隐藏在这“够好”下面的是一套颇为复杂的音频系统。如果你好奇心大发,想要了解 Linux 是怎么将你的音乐文件变成空气的震动的,抑或遇到了一点关于声音的问题,想要大概了解一下音频系统的构成以便定位问题来源,这里是一篇简短的介绍。
俯瞰音频系统
要让你的喇叭或者耳机动起来,我们需要经历以下的步骤:
首先,我们将音频文件 解码 成未压缩的音频流 (waveform)。现在,为了节省空间,大部分音频文件都是压缩过的,比如无损压缩格式 flac, ape 和有损压缩格式 mp3, aac, ogg 等。只有经过解码这个步骤,才能将这些音频文件变成声卡可以认识的音频流。
然后,我们将这些音频流输出到一个 音频服务器 (sound server) 里。比如,如果你想一边看视频一边参加一个视频会议,你就需要使用一个音频服务器把这两个音频流混合到一起以便让声卡播放。
最终,我们将混制好的音频流送到 声卡驱动 那里。由于所有音轨已经被音频服务器汇成一条,驱动仅需将音频流发送给声卡做最终的数模转换即可。
Linux 下的具体实现
架构已经明晰,那么 Linux 下是哪些部件组成了这一架构的呢?
ALSA: 声卡驱动
为了保证音频被正确播放,发送和接收端需要确定比特率,采样深度等参数。
严格来说,ALSA 是一套完整的音频处理系统(毕竟它的全名是 高级 Linux 音频架构 )。但在现在的大多数使用情况下,我们只是将它作为一个声卡驱动用。这里主要介绍实际的使用场景。
ALSA 负责直接与声卡通讯。为了方便应用程序开发,ALSA 提供了一套与硬件无关的 API 以便程序能够轻松地设置输出参数并发送音频流。例如,是否使用声卡提供的硬件混音?还是使用软件混音器?如何调节各应用的响度?等等。
然而,直接使用 ALSA 有很多不方便。为了使 ALSA 能够同时播放多条音频,用户必须做一些设置 。因此,大部分现代的桌面环境使用音频服务器解决这类问题。
PulseAudio: 你或许正在用的音频服务器实现
如果你正在使用某种桌面环境的话,你大概已经用过位于托盘上面的音量控制控件。这通常就是控制 PulseAudio 服务器的一个前端。
为了将多个程序发来的音频流按照指定的音量混音并发往声卡驱动(通常是 ALSA),PulseAudio 拥有一个内置的混音器。PulseAudio 还提供了一套很适合用户界面的 API(例如各大桌面环境的音量控件)。
然而,由于 PulseAudio 主要针对没什么专业需求的 Linux 桌面用户,它使用一套检测系统来发现系统上可用的音频硬件,并自动决定应该如何配置这些硬件。然而,这些配置在很多情况下并不理想。更糟糕的是,为了省电或节省系统资源,内置的混音器往往不能提供最佳的质量,且会引入相当大的内部处理延迟。
简单得说,对于懒得操心细化的配置且并不需要多么高的音频质量的普通用户来说,PuseAudio 应该已经足够好了。
JACK: 创造者与专业用户的音频服务器
PulseAudio 也许对普通用户来说已经够好,那么对于专业用户呢?
答案是 JACK!从设计角度上来说,JACK 并不是用来当作通用的音频服务器使用的。它是一个 “音频连接工具”(正如它的名字,“JACK Audio Connection Kit” 所言)。在 JACK 的世界里面,每个音频节点(可能是个音频软件,也有可能是一个抽象硬件,比如一个 MIDI 键盘)都可以拥有多个输入源和输出源。举个例子,你可以将你的 MIDI 的键盘的 MIDI 输出连接到 FluidSynth (一个 MIDI 电子合成器)的输入源上,这样在 FluidSynth 的输出源上就会输出合成好的声音。然后将 FluidSynth 的输出源同时连接到一个录音软件(比如 Audacity)和主音频输出上。这样。你就可以一边监听你的演奏,一边将它们录制到音频文件当中去。
而且,由于 JACK 是被设计成用作专业音乐制作的,它内置的混音器的质量极佳。因此,有很多 JACK 用户并不用它制作音乐,而是把 JACK 当作一个质量更好且用起来更灵活的音频服务器使用。想让视频会议上的同事们听听你正在听的音乐?没问题!只要将音乐播放器的输出源接到视频会议软件的输入源上即可。
然而,JACK 没能统治 Linux 桌面是有原因的。相对于 PulseAudio 来说,JACK 需要配置一些参数(例如声卡的比特率,缓冲区大小等等)才能正常工作。如果参数不正确,最终的声音会出现莫名其妙的卡顿和损坏。在此之外,JACK 的灵活性有些时候反而是劣势,毕竟为了达成这种灵活性,JACK 有些情况下需要用户手动配置音频节点的连接方式。
PipeWire: 新希望
严格来说,PipeWire 不仅仅是一个音频服务器,不过它的音频服务器功能十分卓越。PipeWire 最早的设计用途是视频流处理系统,不过后来扩展为可以处理任意多媒体流(包括我们关心的音频流)。现在 Wayland 上分享桌面就是由 PipeWire 负责中介,实时视频压缩以及鉴权。相比于 PulseAudio,PipeWire 的 CPU 占用更低,混音器质量更好且处理延迟极低。对于桌面用户来说,PipeWire 对蓝牙音频设备的支持也更加可靠。对于专业用户来说,PipeWire 的音频内部处理延迟已经接近 JACK 了,足以支撑专业音频处理。
更棒的是,PipeWire 完全实现了 PulseAudio 的应用接口。因此,理论上你只需要装上 PipeWire(发行版的包管理器应该会自动卸载 PulseAudio 以防止冲突),所有的程序和控制面板应该都可以完美工作。目前为止(2022年2月,0.3 以上版本)PipeWire 应该已经很稳定了,但是 PipeWire 毕竟是很新的项目,可能还会有一些兼容性问题。
我应该用什么?
如果你一般只听听音乐什么的话,PulseAudio 应该足够好了。如果你遇到了任何音质上面的问题,很有可能只是因为 PulseAudio 没有使用最佳的配置选项,或者有可能是因为你的声卡的驱动有 bug。看一看 ArchWiki 上面的 PulseAudio/Troubleshooting,大多数问题应该很好解决。
如果你想做点音乐的话,JACK 值得一试。你需要一点配置(比如给 JACK 实时权限,找到适合你声卡的配置等等),但配好之后 JACK 的灵活性是无可匹敌的。
如果你觉得 PipeWire 解决了你的痛点的话,PipeWire 值得一试!PipeWire 已经在我的主力机上跑了一年多了,体感没有什么稳定性问题,而且蓝牙连接过程相对 PulseAudio 更可靠。
对于某些特殊情况,比如你只需要运行一个播放音频的软件且需要最小的延迟(a.k.a. 音游),那么你可以试着让应用程序直接使用 ALSA,毕竟这样的话音频将被直接发往声卡,省略了所有中间处理的步骤。或者也可以试试 JACK,毕竟在 JACK 里声音延迟是相对较小且可控的。
Download a single folder from GitHub
Update Apr. 2021: there are a few tools created by the community that can do this for you:
- Download Directory(Credits to fregante)
- It has also been integrated into the excellent Refined Github chrome extension as a button in the Github web UI.
- GitZip (Credits to Kino - see his answer here)
- DownGit (Credits to Minhas Kamal - see his answer here)
Note: if you’re trying to download a large number of files, you may need to provide a token to these tools to avoid rate limiting.
Original (manual) approach: Checking out an individual directory is not supported by git natively, but Github can do this via SVN. If you checkout your code with subversion, Github will essentially convert the repo from git to subversion on the backend, then serve up the requested directory.
Here’s how you can use this feature to download a specific folder. I’ll use the popular javascript library lodash as an example.
-
Navigate to the folder you want to download. Let’s download
/testfrommasterbranch. -
Modify the URL for subversion. Replace
tree/masterwithtrunk.https://github.com/lodash/lodash/tree/master/test➜https://github.com/lodash/lodash/trunk/test -
Download the folder. Go to the command line and grab the folder with SVN.
svn checkout https://github.com/lodash/lodash/trunk/test
You might not see any activity immediately because Github takes up to 30 seconds to convert larger repositories, so be patient.
Full URL format explanation:
- If you’re interested in
masterbranch, usetrunkinstead. So the full path istrunk/foldername- If you’re interested in
foobranch, usebranches/fooinstead. The full path looks likebranches/foo/foldername- Protip: You can use
svn lsto see available tags and branches before downloading if you wish
That’s all! Github supports more subversion features as well, including support for committing and pushing changes.
ou can use Github Contents API to get an archive link and tar to retrieve a specified folder.
Command line:
curl https://codeload.github.com/[owner]/[repo]/tar.gz/master | tar -xz --strip=2 [repo]\-master/[folder_path]\
For example: if you want to download examples/with-apollo/ folder from zeit/next.js, you can type this:
curl https://codeload.github.com/zeit/next.js/tar.gz/master | tar -xz --strip=2 next.js-master/examples/with-apollo
Uniform look
Qt 应用程序,在 Gnome 上的 Appearence 设置就对其无效。
-
方案一:安装并使用同时支持 QT 和 GTK 的主题。
-
Breeze 主题:在 KDE 平台下使用 kde-config-gtk-style 设置 GTK 主题。
sudo apt install breeze-gtk-theme kde-config-gtk-stylego to System Settings > Appearance > Application Style > Configure GNOME/GTK Application Style….
-
Adwaita 主题:
-
在 Gnome 平台下使用 QT_STYLE_OVERRIDE 环境变量
sudo apt install -y adwaita-qt echo "export QT_STYLE_OVERRIDE=adwaita-dark" >> ~/.profile -
或者使用 qt5ct 工具
sudo apt install breeze qt5ct
echo "export QT_QPA_PLATFORMTHEME=qt5ct" >> ~/.profile
我认为,对于 QT 应用程序来说,用 Breeze 主题最好;对 GTK 应用程序来说,用 Adwaita 最好。即各自用各自特定的主题。
-
-
-
方案二:使用 Kvantum。参考 How to Change Look and Feel of Qt5 Apps in Ubuntu, Debian, Fedora Linux 来设置 QT 程序的黑暗模式:
sudo apt install qt5-style-kvantum qt5-style-kvantum-themes -y
echo "export QT_STYLE_OVERRIDE=kvantum" >> ~/.profile
离线保存网页
- pocket(可离线。要账号。有时会抓取错误)
- keep(只有文字没有图)
- evernote(选项多,但阅读,添加和管理无法脱机。要账号。不能保存豆丁、百度文档里面的内容)
- 打印为pdf(格式有变化,图片可能缺损。不能保存豆丁、百度文档里面的内容)
- 另存为html(有些网站,比如豆丁文档也可以完整保存,打印为pdf则不能。缺点是一个网页文件一个文件夹,看着难受。)
接下来是我的解决方案:
chrome插件SingleFile:Single File和SingleFile Core,两个都要装。保存为网页htm格式,一个文件,可以保存豆丁文档,可以脱机。基本完美。安装插件后务必重启浏览器。
有一点要注意的:如果你查看的豆丁或百度文库有好多页,务必要让所有页都显示过一次,再使用single file,才能完全保存。否则脱机的时候只能看到你看过的页面。已测试。
Single File 把样式都内嵌了,图片也是Base64格式内嵌,还把坑爹的脚本都移除了,这样不会出现各种加载错误什么的。
缺点:无法云同步。
2016.7更新:刚刚发现在Chrome地址栏中输入chrome://flags,可以看到一些实验功能,其中包含了将网页保存为.mhtml格式开关,开启后重启Chrome,ctrl+s开启的保存窗口中就多出了一种保存为.mhtml的选项,也即将网页保存为单一文件。
2020年,更新,chrome已经把mhtml加入默认保存方式
Dynamic Workspaces
A kwin script that creates and deletes desktops as you move windows on the last one.
用 JavaScript 写的,可以参考 KWin Scripting Tutorial,还有一个 Plasma Desktop Scripting
meta, super, and hyper keys
-
Meta
The Meta key is not found on modern keyboards. Its use is sometimes emulated with AltGr (on some international layouts) or the right Alt key on the others. In addition:
- Sun keyboards have a meta key (◆) as well
- Emacs calls Esc the Meta key
-
Super
The Super key is equivalent to
 or the ⌘ (command) key. In Ubuntu, it’s just another name for
.
or the ⌘ (command) key. In Ubuntu, it’s just another name for
. -
Hyper
Hyper is the fourth (counting Ctrl) and last modifier on the Space cadet keyboard. In Ubuntu, its function is undefined (I think), but it can be mapped, as in the screen shot above, to
, should it be needed.
KDE 的 Super、Meta 是 Win 键
User’s profile picture in Gnome
Pictures are stored in the folder /var/lib/AccountsService/icons/[user name]
The [user name] is of type image/png format with a size of 96x96 pixels
Under the folder /var/lib/AccountsService/users you have a similar file [user name] that is a .desktop format - for example
[User]
Language=en_GB
XSession=ubuntu
Icon=/var/lib/AccountsService/icons/dad
The Icon= is not created unless you assign a picture in Users and Accounts
If you assign one of the stock pictures the file will contain - for example
[User]
Language=en_GB
XSession=ubuntu
Icon=/usr/share/pixmaps/faces/soccerball.png
Thus –as you can see– just create an Icon= entry in /var/lib/AccountsService/user/[user name] to point to your PNG file or overwrite the icon in the similarly named /var/lib/AccountsService/icons folder
Configure Locales in Ubuntu
The default settings are stored in the /etc/default/locale file.
$ cat /etc/default/locale
LANG=en_US.UTF-8
This file can either be adjusted manually or updated using the tool, update-locale.
sudo update-locale LANG=de_DE.UTF-8
终端相关
個人 bin 資料夾
mkdir -p ~/bin
mkdir -p ~/.local/bin/
在「~/.profile」這個檔案,有將這兩個路徑加入「PATH」。
$ cat ~/.profile
# ~/.profile: executed by the command interpreter for login shells.
# This file is not read by bash(1), if ~/.bash_profile or ~/.bash_login
# exists.
# see /usr/share/doc/bash/examples/startup-files for examples.
# the files are located in the bash-doc package.

# the default umask is set in /etc/profile; for setting the umask
# for ssh logins, install and configure the libpam-umask package.
#umask 022

# if running bash
if [ -n "$BASH_VERSION" ]; then
    # include .bashrc if it exists
    if [ -f "$HOME/.bashrc" ]; then
 . "$HOME/.bashrc"
    fi
fi

# set PATH so it includes user's private bin if it exists
if [ -d "$HOME/bin" ] ; then
    PATH="$HOME/bin:$PATH"
fi

# set PATH so it includes user's private bin if it exists
if [ -d "$HOME/.local/bin" ] ; then
    PATH="$HOME/.local/bin:$PATH"
fi
为什么执行自己的程序要在前面加./
shell是如何运行程序的:如果不给出相对路径,或者绝对路径,那么它会经历下面的查找过程。
- alias中查找
- 内置命令中查找
- PATH中查找
cd /temp
./ls_bak
等同于
/temp/ls_bak
shell通常可以执行两种程序,一种是二进制程序,一种是脚本程序。如果是文本程序,且开头没有指定解释程序,则按照shell脚本处理,如果指定了解释程序,则使用解释程序来解释运行;对于二进制程序,则直接创建新的进程即可。
good practice to avoid using sudo su
It is good practice to avoid performing more actions as root than you need to. sudo facilitates this by allowing you to run individual commands as root without having to log in as root and without needing an interactive root shell for tasks you would otherwise not run a shell to do. But sudo su is not a “backdoor,” it is simply a somewhat less elegant way to do what sudo is designed to allow you to do with sudo -s. Similarly, sudo -i is the more elegant way to achieve what sudo su - would get you: a simulated initial login shell whose environment is like what you would get if you could log in as root on the command line. See man sudo.
Default .bashrc
You don’t need to trust this random gist on Github. Heck, it’s ~10 years old. Don’t you want the latest default - or the default that’s specific to your version of Ubuntu?
You can find the “skeleton” file used to initialize new users in ls -a /etc/skel.
To copy someone else’s comment: just run cp /etc/skel/.bashrc ~/ to copy from that “skeleton” to your current bashrc.
use ‘cp’ to exclude a specific directory
$ shopt -s extglob
$ echo images/*
images/004.bmp images/033.jpg images/1276338351183.jpg images/2252.png
$ echo images/!(*.jpg)
images/004.bmp images/2252.png
使用wget下载目录下所有文件
wget http://your/website/folder/ -c -r -np -nd -k -L -p
根据需要增减参数:
- -c 断点续传
- -r 递归下载指定网页目录下(包括子目录)的所有文件
- -np 递归下载时不搜索上层目录,否则将下载路径的上一级目录下的其它文件
- -nd 递归下载时不逐层创建目录,将所有的文件下载到当前目录
- -k 将绝对链接转为相对链接,如需下载整个站点后脱机浏览网页则需加上此参数
- -L 递归时不进入其它主机
- -p 获得显示HTML页面所需的所有图片等。
Download an Entire Website
sudo apt-get install httrack
httrack https://www.brainpickings.org/
在文件夹内进行的全文搜索
这里写了一个讲究小而美和工具之间组合的全文搜索的方法。
主要用 fzf,一个效率很高对每一行进行模糊搜索的工具。你可以给它喂一堆任意的字符串,然后从中搜索。
比如用 fd 喂给 fzf 所有目录,然后发送给 cd 来快速跳转目录
$ sudo apt install fzf fd-find
$ vim ~/.bashrc
fcd(){
    cd $(fd --type directory | fzf)
}
如果我想跳转到位置比较深 workbench-scheme 下 racket 目录,只需要输入 很短的 wor rac 然后按回车就够了
为了全文搜索,我们需要一个喂给 fzf 所有文件的文件名 + 行号 + 行内容的小脚本 cat-all.py
#!/usr/bin/env python3
import os,sys, subprocess

IGNORE_DIRS=[".git",".vscode","build"]
pwd=os.getcwd()

for  (dirpath, dirnames, filenames) in os.walk(pwd):
    if not any(ig in dirpath for ig in IGNORE_DIRS):
        for file in filenames:
            full_path=dirpath+"/"+file
            relative_path=full_path[len(pwd)+1:]

            mimetype=subprocess.check_output(["file","--dereference","--brief", "--mime-type", full_path]).decode()

            if(mimetype.startswith("text")):
                try:
                    with open(full_path,"r") as f:
                        for ln,line in enumerate(f,start=1):
                            if not line.isspace():
                                print(relative_path,"|",ln,"|",line.strip())
                except:
                    print("[FAILED] ",full_path, file=sys.stderr)
然后就可以这样寻找当前目录下以前写过的所有的 hello, world
cat-all.py | fzf
和 grep "Hello, World" 区别在于一些 hello_world,“Hello to some World”, “World Hello” 之类的也会被匹配到
如果想按回车直接打开对应的文件,只要把 fzf 输出的内容用 awk 截取第一部分传给 xdg-open 就行了
cat-all.py | fzf | awk '{print $1}' | xargs xdg-open &> /dev/null
据测量在我的电脑上这样搜索 80 万 行 左右的文本需要大约 12 秒左右的时间来索引,且过程中 fzf 占用 ~130mb 的内存。
Convert WebP to JPEG/PNG
sudo apt-get install webp
cwebp -q [image_quality] [JPEG/PNG_filename] -o [WebP_filename]
dwebp [WebP_filename] -o [PNG_filename]
例如
ls *webp | xargs -I image sh -c 'dwebp image -o image.png'
Preserve File Permissions While Copying Files
You can use the -p option of cp to preserve the mode, ownership, and timestamps of the file.
diff <(echo "$foo") <(echo "$bar")
By searching the bash manpage for the characters <(, you can find that this is called “process substitution.”
You don’t need to worry about the efficiency of creating a temporary file, because the temporary file is really just a pipe, not a file on disk. Try this:
$ echo <(echo foo)
/dev/fd/63
This shows that the temporary file is really just the pipe “file descriptor 63.” Although it appears on the virtual /dev filesystem, the disk is never touched.
The actual efficiency issue that you might need to worry about here is the ‘process’ part of “process substitution.” Bash forks another process to perform the echo foo. On some platforms, like Cygwin, this can be very slow if performed frequently. However, on most modern platforms, forking is pretty fast. I just tried doing 1000 process substitutions at once by running the script:
echo <(echo foo) <(echo foo) ... 997 repetitions ... <(echo foo)
It took 0.225s on my older Mac laptop, and 2.3 seconds in a Ubuntu virtual machine running on the same laptop. Dividing by the 1000 invocations, this shows that process substitutions takes less than 3 milliseconds—something totally dwarfed by the runtime of diff, and probably not anything you need to worry about!
删除字符串空白符
#!/usr/bin/bash
echo $1 | tr -d [:blank:]
科普
X 和 Wayland
简介
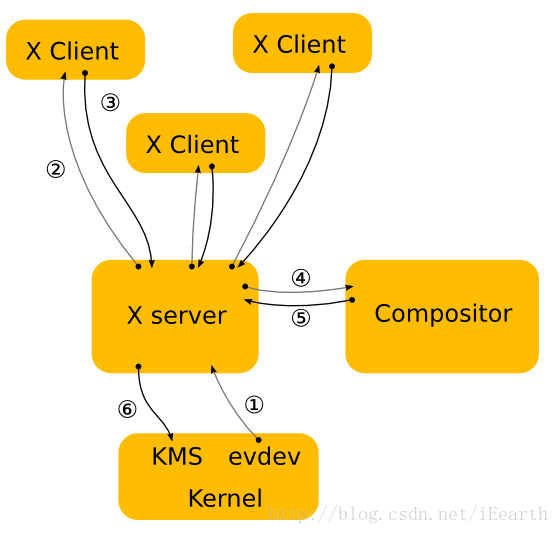
X即X11、X Window System,是用于在类UNIX的操作系统上的位图显示的窗口系统,提供了GUI环境的基本框架。X由X.Org Foundation维护,遵守MIT协议,当前参考实现为X.Org Server。在架构方面,X使用了C/S模型,客户端和服务器可以在同一个机器上,也可以在不同的机器上,X作为Server为应用程序这个Client提供显示和I/O服务。
Wayland是一个显示服务协议,服务端为Wayland Compositor,把X的X Server和Compositor合二为一,旨在替换X,作为类Unix操作系统上更现代、简介的窗口系统,遵守MIT协议,提供了Wayland Compositor的参考C语言实现Weston。
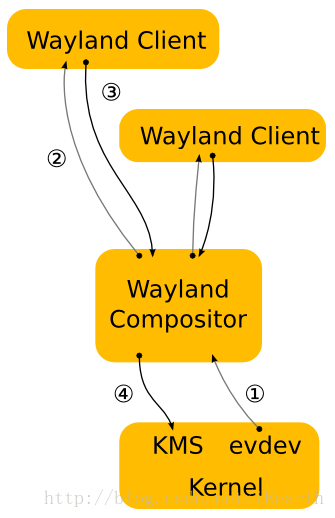
时至今日,原本在X Server中做的事很多已被移到kernel或者单独的库中,因此X Server就显得比较累赘了。Wayland在架构上去掉了这个中间层,将compositor作为display server,使client与compositor直接通信,从而在灵活性和性能等方面上能够比前辈更加出色。
查看是否使用 wayland
echo $XDG_SESSION_TYPE
要切换就在登录界面选择 on wayland 好了。
主要区别
这一切都得从头说起。
X 协议设计于 1980 年代,那时候窗口界面刚刚起步,人们还没什么 3D 特效一类的想法,而且机能也不允许,放到今天任何一个有点桌面基础的人都能理解应该给每个窗口一个 buffer 然后把这些 buffer 里的 texture 贴出来的设计逻辑,但 那时候可没那么多内存让你给每个窗口一个 buffer。所以就如同各种常见的领域一样,有个小天才一拍脑子想,反正 最后显示到桌面上的都是一个屏幕大小,我们只要准备这么大一块内存就行了嘛!换句话说,每个窗口的 buffer 要去掉自己被覆盖住的内存,整体内存大小就是可控的,在内存里是直接没有被覆盖的部分的。
不得不说这位的思路在当时还是很有意义的,加上窗口大小都是矩形的假设,计算实际显示区域并不难,于是 Xserver 就是这样设计的。它维护一个屏幕大小的 buffer 自己计算窗口的实际位置,发生了变化(比如一个窗口盖住另一个),就给变化的窗口发一个重绘信号,这个窗口再发出绘图申请,直接绘制到 Xserver 的 buffer 里。由于 Xserver 知道所有窗口的位置,它就可以重定向鼠标键盘输入过去。然后具体的窗口移动缩放交给 window manager,它再把改过的位置回报给 Xserver。
一切事情都变得很美好,直到某天一个人提出一个问题:我想要半透明的终端!
程序员是不屑于解决提出问题的人的,如果用现代程序员的思维,做一下 alpha 混合其实很简单,只要 Xserver 能读取上层窗口的颜色和下层窗口的颜色就行了,可是你还记得当年的小天才吗?Xserver 说不太好意思,对于 一个像素我内存里只有一层,就是最上面显示的那个窗口……并且积习难改,我们不能改这个 feature……你想上下混合?死宅不要整天做梦,这是老祖宗留下来的不能改啊。
如果你用过没开启 混成 Compositing 的 XFCE 和半透明的 XFCE-Terminal,你会发现它是可以透出窗口下面的壁纸的,先别着急喊我骗子,你在终端下面放一个别的窗口试试?神奇的现象发生了,终端显示的还是壁纸……
上有政策下有对策嘛,一些终端作者想到反正壁纸总是固定的,我读取壁纸图片,取出终端所在的位置,然后在我窗口做个 alpha 混合不就行了?但是人不能自己骗自己啊,这是个客户端的假透明,我们要学习 GNOME 开发者的思维:不够好就砍掉。(大雾
X 一看不行啊,那我们改一下协议吧,加一个叫 混成器 compositor 的东西,如果你写了这个东西,X 就不是直接更新他自己的内存 buffer 了,而是交给混成器。混成器可以获取一系列窗口的内容,让它们都画到不同的 buffer 里面(内存终于够大了啊!),再把它们处理了丢到屏幕上去。Xserver 只是要求 compositor 最后返回一整个屏幕(通常是,也可以小一点)然后给这个直接贴到最上面去(可以简单理解为混成器画好一整张就行了,别的都不管了)。
理论上来说,混成器想怎么放这些窗口就怎么放这些窗口,就算想把他们丢到屏幕外边都行,反正你最后返回一个图就行了,Xserver 也不管是不是涩图。
但是有个尴尬的事情,输出给你管了,输入你管不着啊!之前说了 Xserver 自己按照自己存的窗口位置分配输入,你把窗口挪走了,Xserver 可还是按照自己记录的窗口位置分配输入的,如果你想自己处理窗口位置分配输入,好嘛,Xserver 里面的代码你再复制到你混成器里一份吧!
所以实际上 compositor 里面怎么做的呢?我最后处理完的窗口,位置和 Xserver 记录的位置还得一样,然后 Xserver 给我那个返回整张屏幕的顶层窗口,我就不接收输入了,这样直接透过顶层点到下面,就和窗口位置对应了(什么乱七八糟的破玩意啊!)。如果你要做个动画呢?你做动画的时候,Xserver 那边记录的位置可不跟你变(要是变,按照 X 的设计你这数据得跑好几个来回),你的鼠标点击在这时候是不准的,传不到窗口里面。
这些 compositor 都是各个桌面环境做的,他们一般都集成到自己的 window manager 里了。
而且随着时间发展,越来越多的 Xserver 和 client 是跑在同一个机器上的,很多 client 想自己利用显卡处理图形,就有人在协议上打洞,Xserver 做的越来越少了,更多的事情 client 自己都做了。
你还想再往 X 协议上糊一层吗?别糊了兄弟,你这也太挫了!一开始 X 的设计是提供机制而非策略,Xserver 自己是符合了(然后除了 Xorg 其他实现都死了),和 Xserver 配合的可是被他绑的死死的比如 compositor,性能翻了几倍还得拉着这些历史垃圾跑,Xserver 终于活成了自己最讨厌的样子。
Wayland 做的事情很简单,反正 compositor 都做这么多了,那直接把 Xserver 的功能也丢给 compositor 吧!Compositor 下层接的是 DRM 控制渲染,libinput 控制输入,GBM/EGLStreams 控制内存管理,上层更简单了,每个窗口丢给我一个 texture,我负责安排你们这些 texture 放在哪里,然后我按照我安排的位置,告诉你们鼠标进谁窗口了键盘进谁窗口了。然后因为要把这些 texture 混合到屏幕上,一般都用 OpenGL 的硬件加速,但在 Linux 下创建 OpenGL Context 的 GLX 库是和 X 绑定的,所以一般大家都用 OpenGL ES Context 的库 EGL。这个库只干扰最后合成图片时候的事情,至于你的 texture 用的是 OpenGL 还是 OpenGL ES 还是 CPU 画的都没有关系,现在 Wayland 一概不管了,你自己客户端处理自己的内容吧,我又不是 Xserver!
所以对于 GNOME 和 KDE 等等而言,现在他们打交道的一个是内核一个是窗口,而不是以前一样和 Xserver 打交道了,省了数据交换,同时自己可以自由控制窗口输入输出面积。Xorg 应该被淘汰不是因为功能性原因,而是因为它的设计在当时很聪明,但现在只是历史包袱,实在太挫了。
看完这篇文章建议回去阅读《X 中的混成器與 Composite 擴展》和《Explanations》,可以了解更多的实现细节,现在再看就不会那么混乱了。
Others
Enabling DRM KMS is required.
Note: Currently, Night Light doesn’t work on NVIDIA cards in Wayland sessions.
解决办法就是不使用 Nvidia 闭源驱动或不使用 Wayland。
Note: By default, on Wayland, Gnome applications should be unable to display your cursor themes located in ~/.local/share/icons. As a workaround, you can add that path to XCURSOR_PATH.
$ gsettings list-recursively  org.gnome.desktop.interface  | grep cursor # get default cursor settings
$ vi .bash_profile
# Setting cursor on wayland
export XCURSOR_PATH=${XCURSOR_PATH}:/usr/share/icons:~/.local/share/icons
export XCURSOR_THEME=Yaru
export XCURSOR_SIZE=24
# Add local bin
export PATH=${PATH}:~/.local/bin
然后对比一下水族馆的图形性能数据:
- X11 + Intel 显卡,30fps 左右。
- Wayland + Intel 显卡:接近 60fps。
其实 WebGL 用得不多啦(Google 地图更常卡在网络 I/O 上而不是渲染上)。更多的是播放在线(YouTube)视频啦。
- X11 + Intel 显卡,1080p 60fps,GPU 用满,丢帧三分之一!4k 60fps 也差不多。原来重点不是分辨率(反正 GPU 的解码能力还没用满),重点是视频的帧率啊。
- Wayland + Intel 显卡,4k 60fps 都不怎么丢帧,更不说其它了。GPU 图形计算用到一半左右。
Wayland’s security model prevents programs other than the compositor from grabbing raw keyboard input. Some compositors support remapping keys (for example, mutter through gnome-tweaks), but many do not.
- Open
gnome-tweaks - Click on the Keyboard & Mouse > Additional Layout Option
- Set up Caps Lock behaviour as per your needs.
Qt application with the Wayland
Telegram 使用 gnome wayland 表现不好,毕竟是用Qt开发的,比如cursor变大,图标没有了,输入法不跟随了。
因此:To force the usage of X11 on a Wayland session, use QT_QPA_PLATFORM=xcb.
Exec=env QT_QPA_PLATFORM=xcb /home/kurome/.opt/telegram/Telegram -workdir /home/kurome/.local/share/TelegramDesktop/ -- %u
这样就不需要设置XCURSOR环境变量了。
LTS
There is a new release every 6 months (in April and October), with the version number being year.month (e.g.: 16.04 was released in April 2016). Every two years, the April release is a Long Term Support version.
LTS releases are the ‘enterprise grade’ releases of Ubuntu and are used the most. An estimated 95% of all Ubuntu installations are LTS releases.
Interim releases (normal releases) will introduce new capabilities from Canonical and upstream open source projects, they serve as a proving ground for these new capabilities.
- All Interim releases (13.04 and later) are only supported for 9 months.
- All LTS releases (12.04 and later) are supported for five years (now is ten years) on both the desktop and the server.
Now, support means:
- Updates for potential security problems and bugs (not new versions of software)
- Availability of Commercial support contracts from Canonical
- Support by Landscape, Canonical’s enterprise oriented server management tool set
Ubuntu releases additional versions of the last LTS between releases—such as 14.04.1, that incorporate all of the updates up to this point. This is called a Point-Release (or sometimes snapshot). Those are released every quarter to half year, as needed.
The most important thing (for most people) is how long you get to use an install without having to do a release upgrade. A non-LTS version of Ubuntu only gets updates for 9 months from its release so to stay up-to-date —which is critically important— you need to upgrade twice a year; you need to upgrade through every Ubuntu version…
Conversely an Ubuntu LTS release is supported for 5 years and you can upgrade directly from LTS to LTS. This gives you long-lived, solid base to target and test on that makes it super-easy to release-upgrade when you decide to. It’s therefore ideal for mass deployment, high-availability systems, and just people who don’t like doing release-upgrades.
软件的稳定性
软件的稳定性其实往往来源于:足够多的使用者与足够多的反馈跟改进。
Linux系统,在服务器端的大多数常用软件都有足够多的使用者,所以就足够稳定,由于它在服务器端市场占有率远高于微软,所以服务器端就是比微软稳定,很正常的事。
在桌面端,市场占用率远低于微软,不稳定也是自然的。
为什么Linux下命令行程序往往又好用又稳定?是因为用户喜欢装逼吗?不是,因为命令行程序是服务器端跟桌面端通用的,而服务器端程序经过了足够多用户的使用,经过了足够的反馈开发迭代,所以稳定。而图形界面只有桌面用户用,桌面占有率那么低,这些程序往往缺乏足够的测试人力也缺乏足够的开发维护人力,所以并不会非常稳定。
那么,你要想体验Linux稳定,怎么办?答案就是只使用市场占有率高,用户量大,因而获得了充分测试的软件,这就稳定了。比方说只使用服务器端。或者桌面端只使用最常用的那些,例如终端仿真器,浏览器,输入法,gcc编译器之类,肯定是稳定的。
你看我就用浏览器,输入法,xterm,screen,编程ide,vim,以及一堆命令行的东西,稳定得很啊,六个月才重启一次电脑,重启的那一次还是因为ubuntu升级。
How To Download A Large File Faster From Google Drive?
Step 1: Fetching Your File ID
- Open your browser and go to your google drive, open login with the account that has the file you wish to download.
- Locate the file that you wish to download and select it.
- Right click the file and click on “get shareable link”
- You don’t need to copy the entire link here; you only need the file ID that we will be using later.
The link will look like this: https://drive.google.com/file/d/XXXXX/view?usp=sharing
In this link, you only need to pay attention to the alphanumeric file ID, displayed by XXXXX here.
Step 2: Getting an OAuth Code
- Visit OAuth 2.0 Playground by clicking here.
- On the developer’s webpage, in the “Select & authorize APIs” click on the “Drive API v3” option, and select the: https://www.googleapis.com/auth/drive.readonly option from the available options.
- Once selected click Authorize APIs button on the bottom right corner of the tab.
- After you click on the Authorize APIs button you will be transferred to the google account login screen.
- Select the same google account in which you have your file stored.
- Allow Google OAuth 2.0 to access your drive if asked.
- When you get redirected back to the OAuth 2.0 playground screen click on the “Exchange Authorization Code for Tokens” button as shown.
- Copy the newly generated Access Token and save it on your notepad. You will be needing this in the next step.
Step 3: Downloading The File Using A Command Line Script
curl -H "Authorization: Bearer YYYYY" https://www.googleapis.com/drive/v3/files/XXXXX?alt=media -o ZZZZZ
In your command, replace “XXXXX” with the file ID from above, “YYYYY” with the access token from above, and “ZZZZZ” with the file name that will be saved (for example, “myFile.mp4” if you’re downloading an mp4 file).
Press Enter and let the download begin.
USB插槽鬆動怎麼辦
- 手机

- 充电宝

- 笔记本

- 笔记本

如何将Google搜索限制为特定语言的结果
只是想在Google搜索中添加有关语言参数的更全面的答案。
有4种与语言相关的选项。
Web界面语言: hl=
例: www.google.com/search?q=vilnius&hl=lt
Web Interface Language Codes

hl=zh-CN       Chinese (Simplified)
hl=zh-TW       Chinese (Traditional)
hl=en          English
hl=ja          Japanese
指定语言的页面: lr=lang_
例: www.google.com/search?q=vilnius&lr=lang_lt
Search Language Codes

lr=lang_zh-CN Chinese (Simplified)
lr=lang_zh-TW Chinese (Traditional)
lr=lang_en    English
lr=lang_ja    Japanese
来自指定国家/地区的页面: cr=country
示例:www.google.com/search?q=vilnius&cr=countryLT
请注意,两个国家/地区代码字符必须大写!否则,Google会忽略该参数(自2017年1月3日起)(即使小写字母对于hl=和都适用lr=lang_)。
还有另一个参数– gl=用于搜索结果,因为它们将显示在指定的国家/地区。我尝试对其进行测试,但对我而言,不同参数值的结果没有不同。浏览器或我的Google帐户的某些其他参数/设置可能已过时或覆盖了该设置。
HWE
The Ubuntu LTS enablement (also called HWE or Hardware Enablement) stacks provide newer kernel and X support for existing Ubuntu LTS releases.
The 20.04 LTS HWE Stacks continue to follow Rolling Update Model, as has been in use since 16.04 LTS.
How does Ubuntu make money?
Firstly a lot of people work on Ubuntu in their free time (many of them programming, but also those of here for instance answering people’s questions). Also some people donate to Ubuntu.
However there is more to the story. Canonical Ltd. is a private company that created and continues to pay for Ubuntu. We know Canonical hadn’t been making a profit, but Canonical was initially founded by multi-millionaire Mark Shuttleworth which meant it didn’t have to focus on making money right away.
However Canonical is now looking towards to making Ubuntu profitable. (After all, they have 600+ employees to pay every month!) There are some indications this has been successful. Their key revenue streams offer services around Ubuntu:
- Support services (mostly to business) alongside which they sell Landscape
- Contracting services to businesses (for instance working with OEMs such as Dell, or helping Google with Chrome OS). As Ubuntu makes its way onto mobile phones and TVs then this will grow.
- Ubuntu Software Centre’s paid section (Canonical takes a cut of purchases)
- The Canonical Store (selling physical Ubuntu branded items) - discontinued
- Closed-source projects wishing to use Launchpad.net can purchase a license
- Ubuntu One (online file storage and synchronization service) and Music Store (selling music from within Ubuntu) - discontinued.
- Amazon referrals. When you search the Ubuntu Dash, you may see Amazon products (unless you have turned it off). Ubuntu takes a cut of these.[ref]
All of these are areas that Canonical hopes will grow.
认证硬件
如果不怎么玩游戏的话,建议是直接考虑那些不带独立显卡的笔记本电脑。因为在Linux下双显卡装驱动问题很多。
说到牌子的话,建议是考虑戴尔笔记本。因为戴尔台式机和笔记本,都是尽可能地去兼容Ubuntu来设计的。这个不是说假话做广告。我也就这个问题,看过了几乎所有戴尔系列产品的技术文档了。基本上都是在支持的操作系统列表中,无一例外地包含了Ubuntu。如果是想买能完美使用Ubuntu的本子,戴尔是首选。戴尔绝大部分笔记本机型都能很好完美兼容Ubuntu。
还有一个重要原因就是,ubuntu的所属公司,与戴尔公司是有合作的。也正因为如此,Ubuntu默认就包含了dell的大部分硬件通用驱动,甚至硬件底层管理模块都囊括其中。
PNG, JPG, or JPEG
Ideally, both JPG and JPEG are the same formats and there is no difference between these image extensions. JPEG was shortened to JPG to make it compatible with Windows.
| PNG | JPEG/JPG | |
|---|---|---|
| What is it? | It stands for Portable Network Graphics and is a raster-based graphics format. | It stands Joint Photographic Experts Group and is popular format for images. |
| Compression Algorithm | Lossless compression | Lossy compression |
| Transparency | Image transparency is maintained | image transparency is not maintained |
| Image Size | Bigger | Smaller |
| Image Quality | Better | Inferior |
| Available colors | 16 million | 16 million |
| Common Extensions | PNG | JPEG or JPG |
| Best for | Editing, scaling, and web content | Storage, editing, image processing, and posting |
12 Colors That Go With Black

在线用的 Linux
- JS/UIX - Terminal: 进入后,点击open terminal即可。它提供非常简单的终端环境,而且没有自带gcc等编译套件,不过练习基本命令和shell脚本还是可以的。整体使用起来也比较流畅。
- copy.sh:它可以全屏体验,让你感觉就是在一台真的Linux上玩耍,同时还支持多种发行版,想体验不同系统的可以试试。
- 实验楼:选择 Linux 课程,点击进入课程并打开默认在线环境,就可以开始使用一个完整的在线 Linux 环境(Ubuntu),几乎和本地安装的 Linux 系统没差!
- Unix Terminal Online:这个网站也支持代码的编译运行,而且速度还可以。
- jsLinux:它提供多种系统选择,你也可以在上面编译运行代码。不过整体感觉不是很流畅。
- Bash Shell:专门用来练习 Shell 编程的好地方。
- paiza:同上,可以用来学习shell脚本。
- ShellCheck:如同它的名字,这是一个用来检查你的脚本是否存在问题的工具。
全局菜单
🗓️ 2022/04/05
ayatana 是 Canonical 发起的一个 Linux 端桌面统一体验的项目,规定了桌面托盘、通知消息、全局菜单等功能的实现,Unity 桌面也是这个项目的一部分,在2017年的时候 Canonical 宣布转向使用 Gnome,而 Unity 桌面环境将停止开发。虽然 Unity桌面环境停止开发,但是部分使用 DBus 通讯的接口却保留了下来。
Gnome 是大多数发行版官方默认的桌面的环境,但是原版不安装插件用起来的却是各种难受,包括缺少任务栏/系统托盘,非常占用空间的标题栏。早期使用插件Gnome-Global-AppMenu实现全局菜单,这个仅限于Gtk2/Gtk3,到了Gtk4不支持加载外置模块,导致Gtk4开发的软件的作者除非手动兼容,不然没有全局菜单。所以Gnome-Global-AppMenu 的开发者宣布停止开发这个插件。另外一个是Fildem,目前还在积极的维护。xfce/mate/budgie 桌面环境使用vala-panel-appmenu,效果未知。KDE 从 5.9 版本开始,官方提供了支持,到了现在非常的稳定,属于开箱即用。
Unity 之所以有全局菜单是因为 Canonical 这公司针对常见的软件包做了修改,将本来在软件内展示的菜单,展示在状态栏上面,这种操作只是一种代码外挂,并不是软件本身主动调用很接口生成菜单,有时候还会出现软件本身菜单和全局菜单同时展示的情况。常见的 UI库 GTK2/GTK3/QT都通过这种方式获得了支持,部分软件比如Firefox则采用官方定制版本才能支持全局菜单,总之实现方面并不是很完美。
全局菜单实现需要两个部分组成,一个是桌面环境(具体点是状态条)提供一个窗口菜单注册接口,并且检测运行软件运行情况,绘制菜单项目等功能。软件端则是侦测桌面环境是否支持全局菜单,侦测到支持全局菜单,就需要注册一个会话,并且将全局菜单发送到接口。后续内容将全局菜单展示的组件称为服务端,运行的软件作为客户端,服务端到客户端的通讯方式用的是 dbus。
Android 相关
Transfer files between Linux and Android
- Connect Using USB Cable
- Apps
- Bluetooth
Two Options to Recover Your PC With Android
If your PC is out of action, you can install a new operating system or run a recovery environment thanks to Android. Two solid options are available:
- ISO 2 USB: Lets you burn an ISO file directly to a USB flash drive over USB-OTG.
- DriveDroid: Enables you to store bootable ISO files on Android. With the paid version, support for Windows 10 installation images is added.
AVIF
系统相关
Irqbalance
BTW: I’m pretty sure there are many cases where irqbalance could be very useful for server’s tasks but not for Desktop usage and, especially, for laptop desktop users.
Linux is very servers oriented and any linux distros want to distribute several versions of kernels. So we all have to running a huge amount useless things for servers hardware, software, protocols and ms azure stacks etc and including irqbalance.
If you don’t see 100% loading on CPU0 during your work-flow, you don’t need to use irqbalance at all. Also the modern kernel is managing it itself depending on cpu0 loading.
Seems that linux > 4.9 is able to do irqbalance without an external daemon
Even debian, ubuntu now disable it by default
https://bugs.launchpad.net/ubuntu/+source/ubuntu-meta/+bug/1833322
Block internet access to certain programs
The solution for me happened to be straight forward.
-
Create, validate new group; add required users to this group:
-
Create:
groupadd no-internet -
Validate:
grep no-internet /etc/group -
Add user:
useradd -g no-internet usernameNote: If you’re modifying already existing user you should run:
usermod -a -G no-internet userNamecheck with :sudo groups userName
-
-
Create a script in your path and make it executable:
-
Create:
nano /home/username/.local/bin/no-internet -
Executable:
chmod 755 /home/username/.local/bin/no-internet -
Content:
#!/bin/bash
sg no-internet "$@"
-
-
Add iptables rule for dropping network activity for group no-internet:
-
iptables -I OUTPUT 1 -m owner --gid-owner no-internet -j DROPNote: Don’t forget to make the changes permanent, so it would be applied automatically after reboot. Doing it, depends on your Linux distribution.
-
-
Check it, for example on Firefox by running:
no-internet "firefox"
In case you would want to make an exception and allow a program to access local network:
iptables -A OUTPUT -m owner --gid-owner no-internet -d 192.168.1.0/24 -j ACCEPTiptables -A OUTPUT -m owner --gid-owner no-internet -d 127.0.0.0/8 -j ACCEPTiptables -A OUTPUT -m owner --gid-owner no-internet -j DROP
NOTE: In case of spawning the rules will be maintained. For example, if you run a program with no-internet rule and that program will open browser window, still the rules will be applied.
通过Linux系统进入 BIOS
sudo systemctl reboot --firmware-setup
5 Ways to Check CPU Info in Linux
- lscpu
- /proc/cpuinfo
- lshw
- hwinfo
- dmidecodes
- hardinfo: gui
Logging in as Root in Ubuntu with Live CD
sudo passwd root
Keychain
Squeezing the last drop of convenience out of ssh-agent: Keychain will allow to reuse an ssh-agent between logins, and optionally prompt for passphrases each time the user logs in.
$ sudo apt install keychain
$ vi ~/.bashrc
. ~/.keychain/${HOSTNAME}-sh
$ keychain ~/.ssh/id_rsa
Regenerate initramfs
To create/recreate/update the initramfs file means to update the initrd.img-* ramdisk files in /boot.
Note: I prefer to create a totally fresh version by using the -c option, instead of just updating the existing file by using the -u option.
The proper command would be:
sudo update-initramfs -c -k $(uname -r)
This will create a fresh initrd.img-* file for your currently booted version of Ubuntu.
However, if you can’t boot to the current version of Ubuntu, you may have to modify this command, and by booting to an older version of Ubuntu, you can do it this way:
sudo update-initramfs -c -k 5.11.0-22-generic where the 5.11.0-22-generic part should be replaced with the version of the desired boot kernel.
To get more detailed information, type:
man update-initramfs
Reset lost root password
警告: 攻击者都可以使用上述方法修改系统,要保证系统安全,请限制物理上的访问,或者使用全磁盘加密。
使用 LiveCD
通过 LiveCD 可以使用好几种方法:chroot并且使用passwd命令或者擦除密码域条目。任何Linux的LiveCD都可以使用,chroot时它必须匹配已经安装的架构类型。这里仅介绍 chroot 方式,因为这个方法更不容易出错。
-
启动LiveCD,挂载根文件系统.
-
然后通过下列命令重置密码:
passwd --root MOUNT_POINT USER_NAME -
卸载根文件系统。
-
重启,记下你的密码。
用 Bash 作为 Init
-
将
init=/bin/bash内核参数加入启动加载器的启动项. -
启动后可以看到 Bash 提示符。
-
根文件系统应该是只读挂载,需要以可读写模式重新挂载:
mount -n -o remount,rw / -
用 passwd 创建新的管理员密码。
-
通过
reboot -f重启,不要再次忘记你的密码。
注意: 使用此法时有的键盘不能被初始系统正确加载,你可能不能在bash提示符后输入任何东西。如果出现这种情况,你不得不使用其他方法。
Microcode
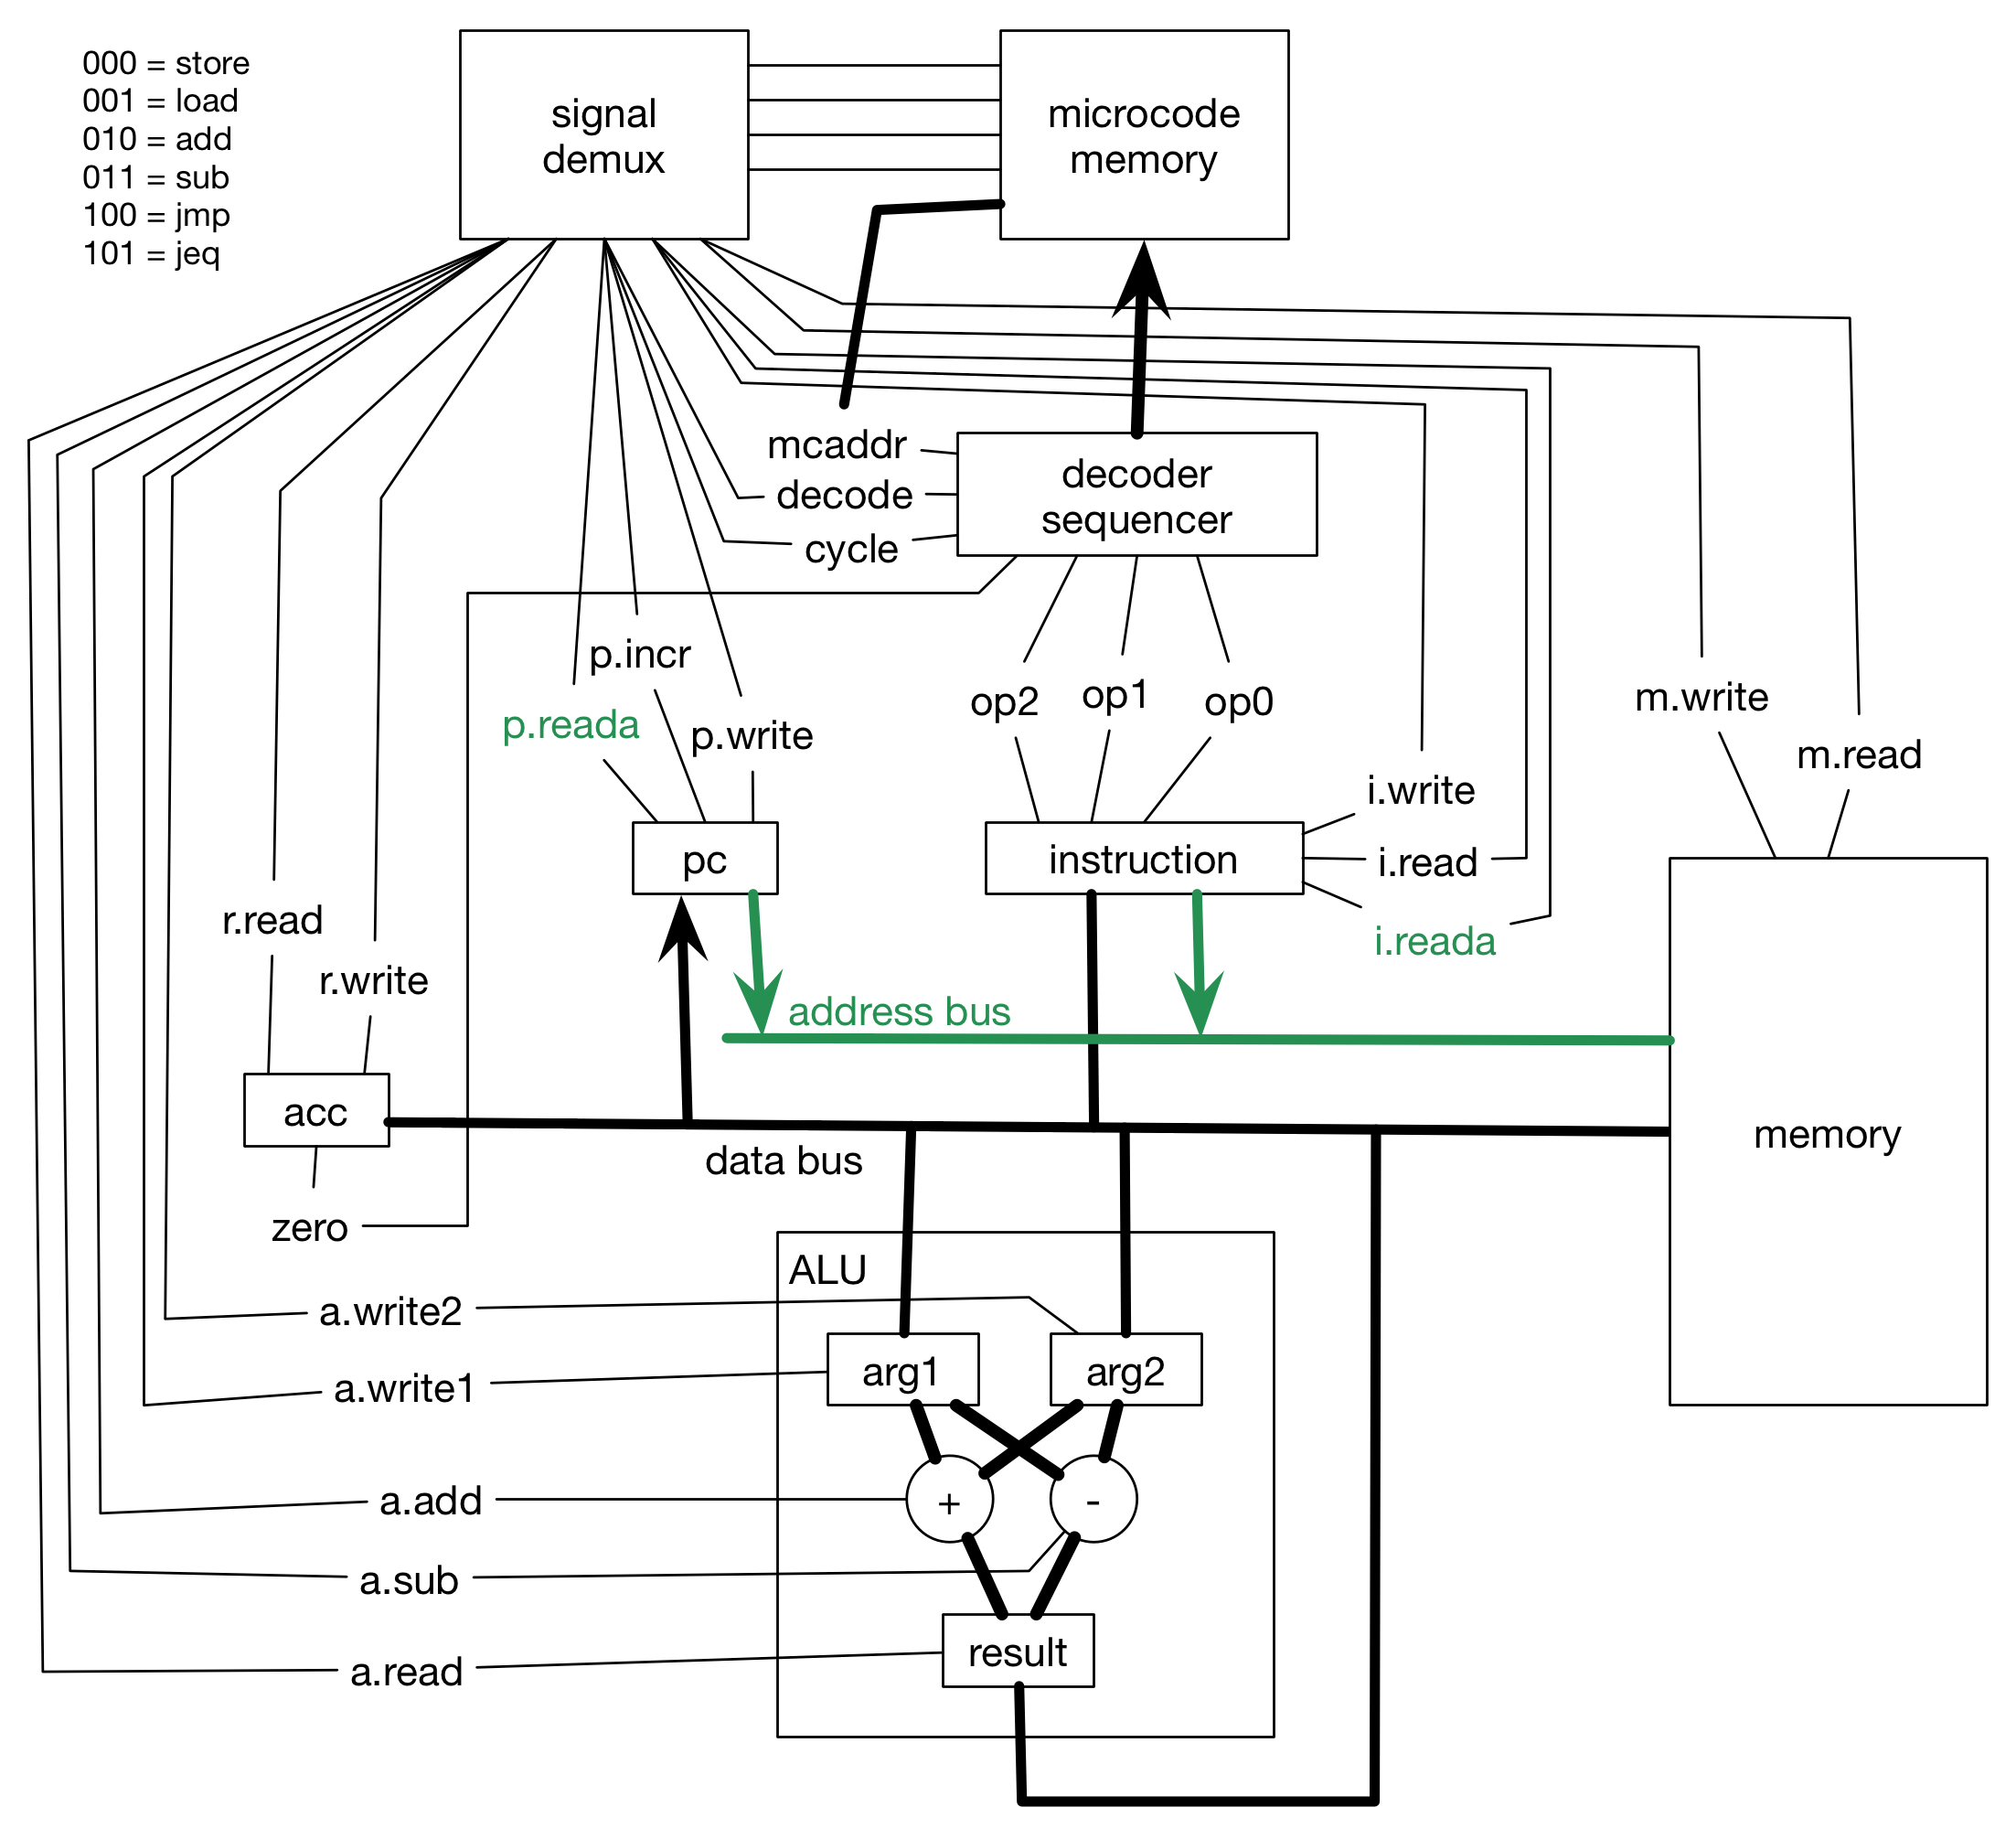
每当听到有人说“这个问题更新一下微码就好了”,就觉得这个哥哥怎么这么迷人,好像在哪里见过。为了也让自己变成这种迷人的哥哥,我也研究了一下到底什么是微码。
这里说的是跑在CPU处理器上的微码,不是IBM那群人嘴里说的那个微码。如果你之前没和IBM打过交道那就当这段话不存在。
计算机体系结构是一层又一层的抽象,典型的比如操作系统对底层硬件的抽象。但鲜有人知的是,操作系统和底层硬件,尤其是CPU之间还存在着几层抽象。什么叫抽象,当然有很多种学术流的解释,但我土气一点的解释就是“不关心”,就是“Don’t care”,就是爱咋地咋地。
用这个模式套用一下我们熟悉的抽象:操作系统要将数据写入磁盘,它不关心怎么操作磁盘;应用要给某个服务器发个数据包,它也不关心怎么操作网卡。
回到我们的微码上来。我们现在常见的操作系统都是用C语言编写,它相对于汇编语言来说,也算是一种“高级语言”。编译器会将这种高级语言编译成汇编语言。只要C语言编写时“不关心”汇编指令是啥,那么就是相对汇编语言做了一次抽象。
马上就到微码了。我们知道汇编指令是执行在CPU上的,那么汇编指令会关心在某个具体型号的CPU上是怎么执行的吗?肯定不会的。汇编的一条ADD指令在80286上可以执行,在最新的Icelake上也能执行,但这两个CPU内部早已发生了天翻地覆的变化,执行ADD的操作已经完全不同了。
换句话说,就是汇编指令并“不关心”是如何在CPU上执行的。
操作系统不关心如何操作磁盘和网卡,是因为这些都有对应的设备驱动操心。汇编指令不关心具体如何在CPU中执行,这个就是由微码来操心了。所以用类比的方式,可以把微码类比成汇编指令针对某一型号CPU的驱动。
同样的汇编指令,会由该型号CPU的微码转成可以跑在该CPU上的微操作(Micro-ops/uops)。这些微操作指导CPU的电路完成汇编指令要求的意图。
在大家还在编写汇编语言代码的时代,微码为汇编语言的编写提供了方便:
- 只关心汇编逻辑,而不用关心CPU内部电路设计和具体的执行方式
- 方便设计出新的汇编指令,由微码翻译成具体的执行逻辑,比如循环中“变量自减若大于零则转跳”,可以用一条汇编指令代替,脏活累活都交给微码去干
- 修复或绕过一些很难修复的处理器数字电路中的Bug
上述第二点也为CISC指令集的实现提供了技术基础。因为不可能所有复杂的指令都是由专门的执行复杂指令的硬件来完成的,也是由简单的数字逻辑模块组合而成的。
在现代CPU里,是存在专门的将汇编指令翻译成微操作的硬件解码器的。但微码依旧存在(就是CPU微架构图中前端那个Microcode sequencer),它作为一个Lookup Table保存在一块ROM中,用来解码复杂的指令,比如浮点运算的指令等。一般是硬件解码器解码得比较快,而用微码解码会比较慢。
理论上,如果你能更改某一个处理器的微码,那么经它翻译的指令可以变成任意其他的指令。因为它关心指令如何在CPU电路中执行。所以现在升级微码主要是用来解决处理器的稳定和安全性的问题。
当然你也可以用它模拟自己没有的汇编指令,比如AVX系列,我只要在看到AVX512的汇编之后,把它翻译成两个“SIMD256”或者四个“SIMD128”指令就好了。
看到这里,你给自己就又加了一层微码的buff。最后贴心地推荐一篇详细说明Microcode怎么执行的文章:Microprocessor Microcode Simple Example
安装/更新微码
微码就是由 Intel/AMD 提供的 CPU 固件。Linux 的内核可以在引导时更新 CPU 固件,而无需 BIOS 更新。处理器的微码保存在内存中,在每次启动系统时,内核可以更新这个微码。这些来自 Intel/AMD 的微码的更新可以去修复 bug 或者使用补丁来防范 bug。
查看当前的微码状态:
sudo dmesg | grep microcode
使用包管理器
sudo apt install intel-microcode
必须重启以激活微码更新:
sudo reboot
手动
只有在你的 CPU 制造商建议这么做的时候,才可以使用下列的方法去更新/安装微码,除此之外,都应该使用上面的方法去更新。大多数 Linux 发行版都可以通过包管理器来维护、更新微码。使用包管理器的方法是经过测试的,对大多数用户来说是最安全的方式。
Repair grub
When you install Windows, Windows assumes it is the only operating system (OS) on the machine, or at least it does not account for Linux. So it replaces GRUB with its own boot loader. What you have to do is replace the Windows boot loader with GRUB. I’ve seen various instructions for replacing GRUB by mucking around with GRUB commands or some such, but to me the easiest way is to simply chroot into your install and run update-grub. chroot is great because it allows you to work on your actual install, instead of trying to redirect things here and there. It is really clean.
DNS缓存
使用以下命令来检查其状态。
sudo systemctl status systemd-resolved
运行以下命令来检查DNS缓存统计信息。
sudo systemd-resolve --statistics
运行以下命令来清除Ubuntu上的DNS缓存。
sudo systemd-resolve --flush-caches
DNS刷新命令不会清除缓存命中和未命中统计信息。 如果要清除所有缓存统计信息,则必须重新启动systemd解析的服务。
sudo systemctl restart systemd-resolved
Change username
Unix-like operating systems decouple the user name from the user identity, so you may safely change the name without affecting the ID. All permissions, files, etc are tied to your identity (uid), not your username.
To manage every aspect of the user database, you use the usermod tool.
To change username (it is probably best to do this without being logged in):
sudo usermod -l newUsername oldUsername
This however, doesn’t rename the home folder.
To change home-folder, use
sudo usermod -d /home/newHomeDir -m newUsername
after you changed the username.
For instance, you could logout, drop to a console (Ctrl+Alt+F1), and sudo su - to become true root (as opposed to sudo -s, where $HOME is still /home/yourname.) Maybe you also have to kill some still running processes from this user first. To do so, enter ps -u username, look for the matching PID and kill them by kill PID-number.
Update: as arrange mentioned, some files may reference your old home directory. You can either keep a symlink for backward compatibility, e g ln -s /home/newname /home/oldname or you can change the file contents with sed -i.bak 's/*oldname*/*newname*/g' *list of files* It creates a backup for each file with a .bak extension.
Some additional information for not so experienced users like me: As I only have ONE user account (administrator), it would not let me change the username (“you are already logged in” was the response in TTY1 (Ctrl+Alt+F1). To get around this:
-
Login with your old credentials and add a new user, e.g. “temporary” in TTY1:
sudo adduser temporaryset the password.
-
Allow the temporary user to run sudo by adding the user to sudo group:
sudo adduser temporary sudo -
Log out with the command
exit. -
Return to tty1: Login with the ‘temporary’ user account and password. Change your username and folder as mentioned above.
exit(until you get the login prompt) -
Go back to TTY7 (Ctrl+Alt+F7) to login on the GUI/normal desktop screen and see if this works.
-
Delete temporary user and folder:
sudo deluser temporary
sudo rm -r /home/temporary
Test Network Speed
sudo apt install speedtest-cli
speedtest
蓝牙与WiFi信号干扰
蓝牙和WIFI干扰?把蓝牙掐死就行了
蓝牙和Wi-Fi信号干扰问题可能你也遇到过,两者主要都是使用2.4GHz频段,导致同时开启时,蓝牙的数据吞吐量会急剧下降,配对设备困难,Wi-Fi间歇性中断,网络受到限制。目前基本没什么办法可以根治这个问题,但你可以下面的方案临时帮你解决一些问题。本文提供了4种方法,可以参考下。
方法1:连接至5GHz无线网络
既然知道了问题出在频段冲突上,那么可以考虑购买一个双频(2.4GHz + 5GHz)路由器,并连接至5GHz的Wi-Fi网络。该方法可以彻底解决干扰问题,但银子也是必不可少的。
方法2:更换Wi-Fi信道
以TP-Link路由器为例,登录路由器Web管理页,在无线设置->基本设置中找到信道选项,将其改为1、6、11中的任何一个。这些为2.4GHz的不重叠传输信道,相较于其他信道更稳定一些。
方法3:开启网卡蓝牙共存功能
在近几年生产的无线网卡中,都支持蓝牙共存功能,方法是在网络适配器属性的高级选项卡中,找到Bluetooth Collaboration或Bluetooth Coexistence Mode(名称可能有所不同),将其设为启用(Enable)。Windows会自动重新连接Wi-Fi,干扰蓝牙的情况也会有所缓解。
对于 Linux
$ lspci -knn | grep Net -A3; lsusb
...
Kernel driver in use: ath9k
Kernel modules: ath9k
...
$ sudo tee /etc/modprobe.d/ath9k.conf <<< "options ath9k btcoex_enable=1"
方法4:远离干扰源
将蓝牙终端与路由器、微波炉、无绳电话机等使用2.4GHz频段的设备隔开使用。
然而蓝牙与WIFI干扰确实是头疼的问题:蓝牙鼠标会受到WIFI干扰经常反应迟缓,而蓝牙音箱则会导致WIFI断网,经常上传失败的绝望。。。。
总之,无线信道的改进还在进行着。。。
RAM & VRAM
VRAM as RAM
RAM as VRAM
Basically the answer is the operating system threats the whole memory pool for the graphics card, and ram as a virtual memory.
Virtual memory is paged two ways through a partition like swap, or a image file like in windows.
The virtual memory then maps the references to memory when you call int* or &memory. To a physical address on your ram or vram depending on where it’s meant to go.
The game cannot force the kernel or operating system to allocate virtual memory to a certain place.
The kernel will dynamically decide where everything goes, and will write to your hard drive if you overflow the current physical limit.
There are tons of articles on virtual memory on windows, bsd and linux. Mac is technically a bsd fork and does use the same methods, and so does the ps4 os.
tl;dr Basically what you are saying doesn’t make sense in terms of virtual memory and this is done automatically( Games automatically use RAM as VRAM when you run out of VRAM. That’s why, when you go over your VRAM limit, your FPS drops like a rock ).
Also some people in this thread are confusing video memory and virtual memory.
功耗控制
针对散热不好的设备或者续航能力不佳的笔记本,功耗控制显得非常必要
使用 TLP 延长电池寿命及续航
如有需要可参阅 TLP 官方文档 和 archwiki TLP。
多年来,Linux 在电池优化方面取得了很大进步,但仍然有一些可选步骤改善笔记本电脑的电池寿命并且延长续航。
TLP 作为一款自由开源的高级电源管理工具提供开箱即用的默认配置。同时也可以高度定制化,以满足特定需求。
电压下探
以下方法仅适用于 Intel 四代酷睿 ™ Haswell 及更新 CPU。有关 AMD CPU 和 Intel 四代酷睿 ™ Haswell 之前的 CPU 请参考 archWiki Undervolting CPU。
对处理器的电压进行最大限度的下探,在挖掘 CPU 体质的极限的同时,起到既能降低发热,又能最大限度保持性能的效果。
如果正常操作,降低电压一般不会损害 CPU,一般建议从 50 毫伏进行尝试,每次降压尝试多增加 10 毫伏。只要确保在降低电压前,系统中任务均被正确保存即可。
降低功率墙
除了电压的下探,同时也可以尝试对处理器的功率墙(TDP)做出降低的限制。比如考虑这种情况 —— 在 CPU 满睿频时,其实不需要默认的那么多功耗来维持,也许在默认功耗的基础上减几瓦,也能维持满睿频,这样就又可以进一步降低温度。对功率墙进行限制不同于对电压进行下探,若限制功率墙的参数较低,这会不可避免的损失较多的性能,但是在散热过差的设备上这也是一个好办法。
对于功率墙的调整,有些主板在 BIOS 中提供了设置项可以直接调整。对于没有设置项的主板,有的主板是锁定了瞬时和长时功率墙,这种情况就无法调整功率墙了。有的主板 BIOS 随没有提供功率墙调整项,但依旧可以通过命令行设置。
通过以下的命令可以查看主板是否可以调整功率墙:
grep . /sys/class/powercap/intel-rapl/intel-rapl:0/* 2> /dev/null
如果在输出中看到了如下的 enabled 值为 1,即可以调整。第一行的数字代表现有的功率墙限制:
/sys/class/powercap/intel-rapl/intel-rapl:0/constraint_0_power_limit_uw:100000000
/sys/class/powercap/intel-rapl/intel-rapl:0/enabled:1
具体的调整步骤参考 Set Max TDP of Intel H-series CPU。
Check if port is in use
sudo lsof -i -P -n | grep LISTEN
sudo netstat -tulpn | grep LISTEN
sudo ss -tulpn | grep LISTEN
sudo lsof -i:22 ## see a specific port such as 22 ##
sudo nmap -sTU -O IP-address-Here
在已有系统安装 Windows
如果是单块硬盘,而且你是 uefi 引导模式,那么先分好 Windows 分区:
- 用 Ubuntu 安装 u 盘启动电脑,选择中文语言,点击“试用” 会启动到桌面,
- 再点击桌面左下角开始菜单,找到工具、磁盘工具,
- 在磁盘工具选中你的硬盘,右键 Ubuntu 分区,调整大小 缩小分区 以便挪出 Windows 分区(尽量有 100G+),
- 缩小后,在空出的空白部分右键,新建分区,新建 NTFS 分区。
- 弄好以后,重启电脑,用 win10 安装 u 盘或 ventoy U 盘准备安装 Windows。
- 在 Windows 安装程序中选中前面新建的 Windows 分区。
你一定要事先拿bcdboot创建一个ESP到u盘上作为备份,不然将来俩系统你覆写我我覆写你,你就开不了机了,得救援模式里搞
如果没备份的话,可以这样 修复 引导:用 Ubuntu 安装盘启动电脑,选择中文语言,点击试用,进入桌面后联网,再右键桌面打开终端,执行
sudo apt install boot-repair
sudo boot-repair
DNS TXT 记录
TXT 记录是为您所在网域之外的来源提供文本信息的一种 DNS 记录,可用于多种用途。该记录的值可以是人工可读文本,也可以是机器可读文本。使用 Google Cloud 服务时,TXT 记录可用于验证域名所有权和执行电子邮件安全措施,例如 SPF、DKIM 和 DMARC。
要为您的网域添加或修改 TXT 记录,请参阅关于 TXT 记录。
- 在Windows或Linux平台的命令行中直接输入nslookup即可打开nslookup。
- 接着输入一个域名,即可查询A记录。输入set type=mx,就会把查询状态调整到mx,接下来输入的域名全部查询mx记录。同样的,输入set type=txt,set type=cname可以查询相应的记录。
- 这里的server表示DNS服务器,Non-authoritative answer表示非权威应答,即DNS服务器的缓存。
$ nslookup
> set type=txt
> qq.ustclug.org
...
Shutdown
sudo shutdown -h +120  # 两小时后关机
sudo shutdown -h 23:00  # 表示在23点定时关机
Runlevel
制脚本目录/etc/rc.d,该目录下存在各个运行级别的脚本文件,以下是centos7为例的查询结果(ubuntu 下没有 /etc/rc.d 目录,都在 /etc/ 目录下):
# ls /etc/rc.d/
init.d rc0.d rc1.d rc2.d rc3.d rc4.d rc5.d rc6.d rc.local
# ls /etc/rc.d/rc4.d/
K50netconsole S10network S64mysqld
# ls /etc/init.d/
functions mysqld netconsole network README
对于SysVinit系统,它将从以下位置执行:
运行级别0 - /etc/rc.d/rc0.d/
运行级别1 - /etc/rc.d/rc1.d/
运行级别2 - /etc/rc.d/rc2.d/
运行级别3 - /etc/rc.d/rc3.d/
运行级别4 - /etc/rc.d/rc4.d/
运行级别5 - /etc/rc.d/rc5.d/
运行级别6 - /etc/rc.d/rc6.d/
对于systemd系统,它将从以下位置执行:
runlevel1.target – /etc/systemd/system/rescue.target
runlevel2.target – /etc/systemd/system/multi-user.target.wants
runlevel3.target – /etc/systemd/system/multi-user.target.wants
runlevel4.target – /etc/systemd/system/multi-user.target.wants
runlevel5.target – /etc/systemd/system/graphical.target.wants
Explanation
-
/etc/rc.d/init.d
该文件夹包含所有服务在各个运行等级中的全部启动脚本。一般来说,它们都是标准的shell脚本,遵守最基本的标准。每个脚本最少接受两个参数start和stop,它们分别代表启动和停止服务(如网页服务)。除此之外,init脚本通常还会接受一些额外的选项,如restart(重启服务器)、status(返回服务当前状态)、reload(告知服务从配置文件中重新载入配置)以及force-reload(强制服务重载它的配置)。当用不带参数的方式运行脚本的时候,一般应该返回一个它会接受的参数列表。
-
/etc/rc.d/rc0.d~/etc/rc.d/rc6.d
这些文件夹分别包含每个运行等级对应的init脚本。在实际使用中,它们一般通过符号链接到/etc/init.d文件夹下的实际文件。不过要注意的是,这些文件夹下的init脚本都有一些特别的名字,命名都以S(start)、K(kill)或D(disable)开头,如K+nn+服务名或S+nn+服务名,其中nn为两位数字。当init进入一个运行等级的时候,它会按照数字顺序运行所有以K开头的脚本并传入stop参数,除非对应的init脚本在前一个运行等级中没有启动。然后init按照数字顺序运行所有以S开头的脚本并传入start参数。任何以D开头的init脚本都会被忽略—这让你可以在指定的运行等级禁止一个脚本,或者你也可以仅仅移除全部符号链接。所以如果你有两个脚本,S01foo和S05bar,init首先会运行S01foo start,当它进入特定的运行等级后再执行S05bar start。
7个运行级别(runlevel)
- 运行级别0:系统停机状态,系统默认运行级别不能设为0,否则不能正常启动
- 运行级别1:单用户工作状态,root权限,用于系统维护,禁止远程登陆
- 运行级别2:多用户状态(没有NFS)
- 运行级别3:完全的多用户状态(有NFS),登陆后进入控制台命令行模式
- 运行级别4:系统未使用,保留
- 运行级别5:X11控制台,登陆后进入图形GUI模式
- 运行级别6:系统正常关闭并重启,默认运行级别不能设为6,否则不能正常启动
-
/etc/rc.d/rc.local
并非所有的发行版都使用了rc.local,通常它是一个留给用户修改的shell脚本。一般会在init进程结束的时候运行它,所以你可以在这里放一些想要运行的额外脚本,而不用再创建自己的init脚本。
-
/etc/rc.d/rc.sysinit
/etc/rc.d/rc.sysinit主要做在各个运行模式中相同的初始化工作,包括设定PATH、设定网络配置(/etc/sysconfig/network)、启动swap分区、设定/proc等等。
-
/etc/rc.d/rc
当运行级别改变时,负责启动/停止各种服务。
Default runlevel
runlevel命令:runlevel打印系统的上一个和当前运行级别。who命令:打印有关当前登录用户的信息。它将使用“-r”选项打印运行级别信息。systemctl命令:它控制systemd系统和服务管理器。- 使用
/etc/inittab文件:系统的默认运行级别在SysVinit System的/etc/inittab文件中指定。 - 使用
/etc/systemd/system/default.target文件:系统的默认运行级别在systemd System的/etc/systemd/system/default.target文件中指定。
在目錄/etc/rc2.d/中的連結檔S03lightdm是負責啟動圖形界面及視窗管理系統LXDE的, 這表示原本約定成俗的runlevel, 其實只是參考, 重要的是, 在要執行的runlevel中放了什麼就是什麼, 也就是說, 原本rc2.d是多人文字模式, 沒有圖形界面的, 由於連結檔S03lightdm啟動了圖形界面, 系統就當然進入了圖形界面.
要移除連結檔S03lightdm, 有幾種方式:
-
直接刪除, 沒了這個檔就不會進入圖形界面了:
sudo rm /etc/rc2.d/S03lightdm -
用系統工具update-rc.d:
sudo update-rc.d lightdm disable 2
Execute command at startup/shutdown
On Ubuntu, scripts for the different runlevels are executed according to their presence in the /etc/rc[0-6].d directories. Runlevel 0 corresponds to shutdown, and 6 to reboot.
Typically the script itself is stored in /etc/init.d, and then symlinks are placed in the directories corresponding to the runlevels you require.
So in your case, write your script, store it in /etc/init.d/, then create a symlink in each of /etc/rc0.d and /etc/rc6.d (if you want both) pointing to your script.
The scripts in each runlevel directory will be executed in asciibetical order, so if the order within the runlevel matters to you, choose the name of your symlink accordingly.
-
Create a shell executable file with your script in /etc/init.d/ directory:
sudo vi /etc/init.d/myscript sudo chmod 0744 /etc/init.d/myscript chown root:sys /etc/init.d/myscript -
The script should have the following format:
#!/bin/bash
# chkconfig: 2345 20 80
# description: Description comes here....

# Source function library.
. /etc/init.d/functions

start() {
    # code to start app comes here
    # example: daemon program_name &
}

stop() {
    # code to stop app comes here
    # example: killproc program_name
}

case "$1" in
    start)
       start
       ;;
    stop)
       stop
       ;;
    restart)
       stop
       start
       ;;
    status)
       # code to check status of app comes here
       # example: status program_name
       ;;
    *)
       echo "Usage: $0 {start|stop|status|restart}"
esac

exit 0
即必须包含 case 语句,该语句须有 start(对应 S) 与 stop (对应 K)两个选项。
-
Since this has to be executed during shutdown or reboot need to create softlinks in /etc/rc0.d/ and /etc/rc6.d
sudo ln -s /etc/init.d/myscript /etc/rc0.d/K99myscript
sudo ln -s /etc/init.d/myscript /etc/rc6.d/K99myscript
If you are on a Red Hat based system(即 RedHat 下有专门工具用来执行上面建立软链接操作)
-
Enable the script
chkconfig --add myscript chkconfig --level 2345 myscript on -
Check the script is indeed enabled - you should see “on” for the levels you selected.
chkconfig --list | grep myscript
在 ubuntu 上我尝试运行
sudo update-rc.d myscript enable 5,结果报错 systemd failing enable with “service is transient or generated”.。解释为:The manual for [systemctl](https://www.freedesktop.org/software/systemd/man/systemctl.html#is-enabled UNIT…) tells us the following about the
generatedstatus:The unit file was generated dynamically via a generator tool. See systemd.generator(7). Generated unit files may not be enabled, they are enabled implicitly by their generator.
So your error message means that one of the methods through which systemd can automatically generate unit files for you is in use, preventing you from using the one you wrote yourself.
在我建立软链接后,比如 S01myscript,执行
sudo update-rc.d myscript disable 5会变为 K01myscript,再执行sudo update-rc.d myscript enable 5会变为 S01myscript 并报上面错误。 -
-
- The script in rc6.d must be with no .sh extension
- The name of your script must begin with K99 to run at the right time.
- The scripts in this directory are executed in alphabetical order.
Report a problem in Ubuntu
If you notice a problem in Ubuntu, you can file a bug report.
-
Type Alt+F2 and type
ubuntu-bug nameofprogramIf you have a hardware issue or don’t know the name of the program affected, just type
ubuntu-bugIf using
ubuntu-bugdoes not work for some reason, file a bug manually and jump to step 4 in this instruction. -
After running one of the above commands, Ubuntu will gather information about the bug. This may take a few minutes. Review the collected information if you wish. Click Send to continue.
-
A new web browser tab will open to continue processing the bug data. Ubuntu uses the website Launchpad to manage its bug reports. If you do not have a Launchpad account, you will need to register for one to file a bug and receive email updates about its status. You can do this by clicking Create a new account.
-
After logging in to Launchpad, enter a description of the problem in the summary field.
-
After clicking Next Launchpad will search for similar bugs in case the bug you are reporting has already been reported. If the bug has already been reported, you can mark that bug as also affecting you. You can also subscribe to the bug report to receive updates about progress with fixing it. If the bug has not already been reported, click No, I need to report a new bug.
-
Fill in the description field with as much information as you can. It’s important that you specify three things:
- What you expected to happen
- What actually happened
- If possible, a minimal series of steps necessary to make it happen, where step 1 is “start the program”
-
Your report will be given an ID number, and its status will be updated as it is being dealt with. Thanks for helping make Ubuntu better!
If you get the “This is not a genuine Ubuntu package” error, it means that the software you are trying to report a bug about is not from the official Ubuntu repositories. In this case, you cannot use Ubuntu’s built-in bug reporting tool.
For more information about reporting bugs in Ubuntu, please read the extensive online documentation.
Default ~/.profile source ~/.bashrc
This is an upstream decision coming from Debian. The rationale for it is explained in this very nice wiki post, of which the following is an excerpt. The executive summary is “to ensure that GUI and non GUI logins work in the same way”:
Optimizing for Gaming
This guide is only for Arch and Ubuntu. Any derivatives like Manjaro, Mint, PopOS, etc should also work.
Enable Multilib
Multilib is required by Steam, So if you are running Steam you can skip this step, If you can not find Steam in your repositories this is your issue.
Add the architecture.
sudo dpkg --add-architecture i386
Update the package manager
sudo apt-get update
Upgrade to newer packages
sudo apt-get dist-upgrade
GPU Drivers
Having the right GPU drivers is imporant, else games won’t run properly.
Manually check which driver you need: https://www.nvidia.com/Download/index.aspx?lang=en-us
For Nvidia you need to add a repository
sudo add-apt-repository ppa:graphics-drivers/ppa && sudo apt-get upgrade
For Nvidia 440 you need these packages so install them.
sudo apt install nvidia-graphics-drivers-440 nvidia-settings vulkan vulkan-utils
Now reboot
sudo reboot
If you use Gnome or GDM you might need to disable Wayland, This is not always the case, But I include it here just in case, If your System won’t reboot you can try this
sudo nano /etc/gdm/custom.conf
Remove the # in front of the #WaylandEnable=false line and it should force Xorg.
Linux kernel
Installing the newest kernel is generally the easiest kernel switch, There are other kernels available, I will include them later.
The easiest way is to use ukuu, First we need to install it.
sudo add-apt-repository ppa:cappelikan/ppa
sudo apt update
sudo apt install mainline
Now ukuu is installed, in this program you can select the newest stable kernel click install and when you reboot the new kernel is used. Do not remove your old kernel. If anything goes wrong you can select which kernel to boot in the grub screen at startup and remove the kernel that gives you trouble.
Feral Gamemode
gamemode 基本上是一组守护进程/库,它可以按需优化 Linux 系统的游戏性能。它实际上只是让 CPU 在用户玩游戏时自动运行在高性能模式下并帮助 Linux 用户从游戏中获得最佳性能。
sudo apt install gamemode
Manual
Install the dependencies
sudo apt install meson libsystemd-dev pkg-config ninja-build git libdbus-1-dev libinih-dev
Clone the repository
git clone https://github.com/FeralInteractive/gamemode.git
Change the directory into the just downloaded folder
cd gamemode
Change the tree to the newest version
git checkout 1.5.1
Run the install script
./bootstrap.sh
Usage
Now that it is installed we need to enable the service with this command
systemctl --user enable gamemoded && systemctl --user start gamemoded
To use gamemode for supertuxkart for example, run this terminal
gamemoderun supertuxkart
To use it in Steam edit the launch option for the desired game to
gamemoderun %command%
If gamemode does not run try to make it executable:
sudo chmod +x /usr/bin/gamemoderun
If gamemoderun does not work for you try this as a launch command:
LD_PRELOAD=$LD_PRELOAD:/usr/lib/x86_64-linux-gnu/libgamemodeauto.so.0 %command%
Nvidia Improvements
Nvidia users might want to enable all options listed here to improve performance in games
- Force Full Composition Pipeline avoids screen tearing by letting the GPU do all the scaling.
- Triple Buffer avoids stuttering gameplay It allows for a stream of data instead of chunks of data.
- IndirectGLXProtocol forces the game to directly communicate with the Nvidia drivers.
- Coolbits enables your card to be overclocked which gamemode will make use of.
Create a Xorg Config file:
sudo nvidia-xconfig
Edit the file with the following command
sudo nano /etc/X11/xorg.conf
Add in these lines under the “Device” section between the other options
Option "TripleBuffer" "on" Option "Coolbits" "28"
Add in these lines under the “Screen” section between the other options.
Option "metamodes" "nvidia-auto-select +0+0 {ForceCompositionPipeline=On, ForceFullCompositionPipeline=On}" Option "AllowIndirectGLXProtocol" "off"
Try this one with risk, It will be sure to crash GNOME, I am not sure about other DEs
just add it to the end of the file
Section "Extensions" Option "Composite" "Disable" EndSection
If you run into any problems, just hit CTRL ALT F3 to switch to a different tty login, run the command to edit the file again and put a # in front of the options that are giving you trouble, Most likely the last one
Alternatively you can just completely remove the file with the following command
sudo rm /etc/X11/xorg.conf
Libstrangle
Libstrangle is a tool that helps you control framerates but also vsync settings. This is especially handy for games that do not support these features, You would like to half your framerate to make it run better save some power or just give your hardware a break.
Libstrangle can be used in multiple ways depending on what you want to achieve.
To use libstrangle you can simply type strangle and then the amount of frames you want to run. There are some examples below, But the features you will probably use are Vsync which you use by using the -v option, the rules for OpenGL and Vulkan are different, Here is what each number does for the different apis.
- OpenGL 0 Force off, 1 Force on, n - Sync to refresh rate
- Vulkan 0 Force off, 1 Mailbox mode, 2 Traditional vsync, 3 Adaptive vsync
You can also limit the game depending on the power state of your device, Set it to 60 while charging and on 30 while discharging for example. You do this by adding a second number right after a colon. in example, strangle 60:30. There are more features but they are not that commonly used, you can check the gitlab link above or simply type strangle -h for more information.
To limit the framerate of supertuxkart to 30 simply run
strangle 30 supertuxkart
To Force enable vsync on 60 fps for an OpenGL Steam game set the launch option to
strangle -v 1 60 %command%
To set the framerate of a vulkan game on Steam to 120 fps but 60 on battery power with adaptive vsync set this as your launch command
strangle -v 3 120:60 %command%
Mangohud
Mangohud is a monitoring tool for Vulkan and OpenGL applications. It can show CPU and GPU usage, temps, But also framerates, frametimes and a lot more.
sudo add-apt-repository ppa:flexiondotorg/mangohud
sudo apt update
sudo apt install mangohud
To configure it with a GUI you can check out GOverlay below. For a manual configuration you can edit
~/.config/MangoHud/MangoHud.conf
If you want exactly my configuration you can just copy this into it without the need for GOverlay.
background_alpha=0.3
font_size=20
background_color=020202
text_color=ffffff
position=top-right
no_display
toggle_hud=F11
cpu_stats
cpu_temp
cpu_color=007AFA
gpu_stats
gpu_temp
gpu_color=00BD00
ram
ram_color=B3000A
vram
vram_color=00801B
io_read
io_write
io_color=B84700
arch
engine_color=B200B0
frame_timing=1
frametime_color=00ff00
#output_file=/home/houtworm/mangohud_log_
#fps_limit 120
#media_player
#toggle_logging=F10
You can tweak all the little things you want here. You can also create different configurations per game by adding a MangoHud.conf file to the game directory.
To use it for any game change its launch option to
mangohud %command%
To use it with non Steam games use the following command
mangohud supertuxkart
Some games might need the 32 bit version, try this if the normal command fails.
mangohud.x86 %command%
VKBasalt
VKBasalt is a post processing layer for Vulkan which enables you to enhance graphics further. It only works with Vulkan, This includes all Proton games.
git clone https://github.com/DadSchoorse/vkBasalt.git && cd vkBasalt && meson --buildtype=release builddir && ninja -C builddir install
To configure it first you need to create a config file, Run the following command to copy the example to a folder you can edit as the user.
mkdir ~/.config/vkBasalt && cp /usr/share/vkBasalt/vkBasalt.conf.example ~/.config/vkBasalt/vkBasalt.conf
You can tweak all the little things you want here. You can also create different configurations per game by adding a vkBasalt.conf file to the game directory.
To use VKBasalt for any particular game enter this as a launch option.
ENABLE_VKBASALT=1 %command%
You can also start non Steam games this way by typing the following command
ENABLE_VKBASALT=1 supertuxkart
GOverlay
GOverlay is a Graphical User Interface for managing MangoHud and VKBasalt
sudo apt-get install lazarus git
git clone https://github.com/benjamimgois/goverlay.git
cd goverlay
lazbuild -B goverlay.lpi
mesa-demos and vulkan-tools are optional, You need them if you want to show the previews. You can find them in your distros repository
Xbox One Controller
xpad works great, is the default on modern Linux distros and supports a wide range of controllers, But if you are like me and you only Xbox One controllers then using xpadneo is much better.
For Bluetooth to work with xpad and the Xbox One controllers you need to disable ertm (This is not needed for xpadneo)
create the config file
sudo nano /etc/modprobe.d/xbox_bt.conf
Add the following line to the document and save and exit with CTRL + X.
options bluetooth disable_ertm=1
xpadneo supports Xbox One controllers wired and over bluetooth, It enables Force Feedback even the vibration inside the triggers, It supports battery level indication, It also fixes the mapping in many many games that where previously unplayable with a Xbox One controller on Linux.
Install the dependencies
sudo apt-get install dkms linux-headers-`uname -r`
Install xpadneo from Github
git clone https://github.com/atar-axis/xpadneo.git && cd xpadneo && sudo ./install.sh
Now you should be able to reboot and it should be all good, Having the controllers vibrate for a second when connected is a good indicator that it works.
QUESTIONS
Ubuntu 无法关机
$ sudo vim /etc/systemd/system.conf
DefaultTimeoutStartSec=5s
DefaultTimeoutStopSec=5s
$ sudo systemctl reload
DefaultTimeoutStartSec=, DefaultTimeoutStopSec= 设置启动/停止一个单元所允许的最大时长。若仅设置一个整数而没有单位,那么单位是秒。 也可以在整数后面加上时间单位后缀: “ms”(毫秒), “s”(秒), “min”(分钟), “h”(小时), “d”(天), “w”(周) 。 对于 Type=oneshot 类型的 service 单元, 这些选项没有意义(相当于全部被禁用)。 对于其他类型的 service 单元,可以在单元文件中设置 TimeoutStartSec=, TimeoutStopSec=, RestartSec= 以覆盖此处设置的默认值 (参见systemd.service(5))。 对于其他非 service 类型的单元, DefaultTimeoutStartSec= 是 TimeoutSec= 的默认值。
注1:尽量不要使用上面更改。应该在完全清楚自己的更改造成的影响、产生的作用的前提下,做出更改。
注2:作为桌面操作系统,如果有硬件驱动或其他各种莫名问题,可以尝试升级到最新版本来解决。
ACPI ERROR: AE_ALREADY_EXISTS
These kinds of “errors” have been discussed ad nauseam, it’s simply the kernel telling you that the ACPI information received from the system seems to be incomplete in some way, update your BIOS/UEFI in hopes for a proper fix or ignore the error if you don’t notice anything off with your system.
(And please don’t do something dumb like setting acpi=off just to get rid of these messages)
Can’t run CS:GO at fullscreen
- Open Steam
- Go to the “Library”
- Right-click the game which needs to be reconfigured
- Select “Properties” from the menu
- Click the “Set launch options…” button
- type: -full and save
How To Disable Lock In Kubuntu
open Workspace > Desktop Behavior > Screen Locking > uncheck Lock screen option
Gnome 3 displays two icons for same app
No, there’s nothing wrong with your system.
The duplicated launcher icons explained:
The different icons are different commandline options. Some context applications with call the associated *.desktop icon. The exec option of the icon will depend on how the application is called.
Some of the Icons you show in your image may be obvious because of the difference in the way they are named. You can see the difference in the way the app is called by right clicking and clicking on properties to see other differences.
Some of the *.desktop files have a %U argument, used so the application will accept arguments.
Some of the Launchers are different commands that are called differently and are named differently often by a symbolic link.
Some exampes from the list in you image are:
Name: Online Accounts
Command: unity-control-center credentials

Name: Online Accounts
Command: Online account credentials and settings

Name: Personal File Sharing
Command: gnome-file-share-properties

Name: Rhythmbox
Command: rhythmbox %U

Name: Rhythmbox
Command rhythmbox-client --select-source %U
ssh_exchange_identification: Connection closed by remote host
原因是 Clash 开了 TUN 模式。关闭掉就好了。
Disk show 129986 TB
(=ↀωↀ=)橘外猫, [2/7/22 11:16 AM]
这个是怎么回事啊
雪梨, [2/7/22 11:21 AM] 分区表坏了?
(=ↀωↀ=)橘外猫, [2/7/22 11:21 AM] 直接再分区吗?
雪梨, [2/7/22 11:21 AM] 请鸽鱼老师看看诶
雪梨, [2/7/22 11:22 AM] 还能挂载就先备份数据好了
(=ↀωↀ=)橘外猫, [2/7/22 11:22 AM] 好的
Pegion Fish, [2/7/22 11:25 AM] JMS炸了? 建议备份数据重建分区表 先重新插一次USB和硬盘
(=ↀωↀ=)橘外猫, [2/7/22 11:27 AM] 重插了 用fdisk 重建吗?
Pegion Fish, [2/7/22 11:28 AM] 还是不正常? 硬盘也重新插一下
(=ↀωↀ=)橘外猫, [2/7/22 11:28 AM] 恩
雪梨, [2/7/22 11:28 AM] 重建分区表,不是删掉分区再新增分区
(=ↀωↀ=)橘外猫, [2/7/22 11:30 AM] 断电后自动好了 这是怎么回事啊
Thor Luo Bing-, [2/7/22 11:31 AM] 硬盘清空了
(=ↀωↀ=)橘外猫, [2/7/22 11:32 AM] 没有,东西还在
Pegion Fish, [2/7/22 11:32 AM] 啊 这不是争产的吗 1T啊 这就是JMS主控抽风
No Caching mode page found
during early boot, I get following error message:
[sdb] No Caching mode page found
[sdb] Assuming drive cache: write through
If I understand correctly, this is actually just a harmless info message and not an actual error. sdb is my USB disk, and it does not use caching .
Hard disks have a small amount of RAM cache to speed up write operations. The system can write a chunk of data to the disk cache without actually waiting for it to be written to the disk. This is sometimes called “write-back” mode. If there is no cache on the disk, data is directly written to it in “write-through” mode. The Asking for cache data failed warning usually occurs with devices such as USB flash drives, USB card readers, etc. which present themselves as SCSI devices to the system (sdX), but have no cache. The system asks the device: “Do you have a cache?” and gets no response. So it assumes there is no cache and puts it in “write-through” mode.
Certificate verification failed
首先更改源文件,将所有的 https 改成 http :
$ sudo vi /etc/apt/sources.list
deb http://mirrors.tuna.tsinghua.edu.cn/ubuntu/ bionic main restricted universe multiverse
deb http://mirrors.tuna.tsinghua.edu.cn/ubuntu/ bionic-updates main restricted universe multiverse
deb http://mirrors.tuna.tsinghua.edu.cn/ubuntu/ bionic-backports main restricted universe multiverse
deb http://mirrors.tuna.tsinghua.edu.cn/ubuntu/ bionic-security main restricted universe multiverse
1234
然后安装/更新证书 ca-certificates:
sudo apt-get update
sudo apt-get install --reinstall ca-certificates
最后将镜像源文件改回 https:
$ sudo vi /etc/apt/sources.list
deb https://mirrors.tuna.tsinghua.edu.cn/ubuntu/ bionic main restricted universe multiverse
deb https://mirrors.tuna.tsinghua.edu.cn/ubuntu/ bionic-updates main restricted universe multiverse
deb https://mirrors.tuna.tsinghua.edu.cn/ubuntu/ bionic-backports main restricted universe multiverse
deb https://mirrors.tuna.tsinghua.edu.cn/ubuntu/ bionic-security main restricted universe multiverse
$ sudo apt-get update
Move and overwrite subdirectories (and files) to parent directory
You will have to copy them to the destination and then delete the source, using the commands cp -r * .. followed by rm -rf *.
I don’t think you can “merge” directories using mv.
System program problem detected
The error “System program problem detected” comes up when a certain application crashes. Ubuntu has a program called Apport that is responsible for detecting such crashes and upon user consent, report these crashes to developers. This process intends to get the problem fixed by the developers.
However it can be very annoying to common users, and there is no point in showing errors to users when they cannot do anything about it themselves. So you might want to disable them.
Remove crash report files
The apport system creates crash report files in the /var/crash directory. These crash report files cause the error message to appear everytime Ubuntu boots.
$ cd /var/crash
$ ls
_opt_google_chrome_chrome.1000.crash
_usr_lib_chromium-browser_chromium-browser.1000.crash
_usr_sbin_ulatencyd.0.crash
_usr_share_apport_apport-gtk.1000.crash
Just remove the crash report files
sudo rm /var/crash/*
After removing all the crash report files, the error message should stop popping up. However if a new crash takes place then it would appear again in future.
Turn off apport
After removing the old crash reports, if you still get the same error message, then you can completely turn off apport to get rid. Edit the configuration file at /etc/default/apport.
gksudo gedit /etc/default/apport
The file would contain something like this
# set this to 0 to disable apport, or to 1 to enable it
# you can temporarily override this with
# sudo service apport start force_start=1
enabled=1
Just set the value of enabled to 0, and this will disable apport.
enabled=0
Save the file and close it. From the next boot onwards, there should be no error messages ever. If you do not want to restart the system then restart apport from the command line.
sudo restart apport
i915 0000:00:02.0: [drm] ERROR CPU pipe A FIFO underrun
Hi everyone, thanks for the help, after digging into the specific kernel issue page for i915 Intel drivers, I’ve found the problem and the temporary fix.
The problem has to do with issues related to C-States, or Intel’s powersaving states. On kernel’s 5.4 and below, only a max of PC3 is allowed, whereas in kernels 5.4+, deeper states (more powersaving) is used.
As james reports in
https://gitlab.freedesktop.org/drm/intel/-/issues/272
This problem seems to be related to the activity of deep package sleep states (on my hardware PC7 and deeper). I built and booted a 5.4 kernel and the problem went away, but that’s only because it wasn’t allowing package sleep states deeper than PC3. Check in powertop that states deeper than PC6 are actually being used under 5.4 and 5.8.
and
I’ve not found a fix, just worked around it with intel_idle.max_cstate=4.
I have tested this, and adding
intel_idle.max_cstate=4
to the cmdline of my kernel startup, does indeed fix my issues. While this bug is not yet solved in the kernel, I will mark it as solved here, as there’s nothing Arch Devs can really do about it. Please follow these issues for more information on fixes.
Related issue articles: https://gitlab.freedesktop.org/drm/intel/-/issues/2077
Evince Document Viewer(42.0) does not remember last page in 22.04
Somebody added in launchpad that it could be related to apparmor, and I’ve tried temporarily disabling it with sudo apparmor_parser -R /etc/apparmor.d/usr.bin.evince as suggested by the poster. And both issues were solved.
or
sudo ln -s /etc/apparmor.d/usr.bin.evince /etc/apparmor.d/disable/
sudo systemctl restart apparmor.service
sudo syst
How can I create launchers on my desktop?
Note:
gnome-desktop-item-editwas removed fromgnome-panelin 19.10 (see gnome-desktop-item-edit: command not found on Ubuntu 19.10 and later even with the ‘gnome-panel’ package installed). So, this answer is unlikely to work for 19.10 and later.
The old GUI dialog is still available if you still want to use this:
Using ALT+F2 type
gnome-desktop-item-edit --create-new ~/Desktop
This will launch the old GUI Dialog and create a launcher on your Desktop.
解决网易云音乐在 ubuntu 22.04 无法运行的问题
cd /tmp
wget http://security.ubuntu.com/ubuntu/pool/main/g/glib2.0/libglib2.0-0_2.64.6-1~ubuntu20.04.3_amd64.deb
wget http://mirrors.kernel.org/ubuntu/pool/main/p/pango1.0/libpangocairo-1.0-0_1.44.7-2ubuntu4_amd64.deb

dpkg -x libglib2.0-0_2.64.6-1~ubuntu20.04.3_amd64.deb fakeroot
dpkg -x libpangocairo-1.0-0_1.44.7-2ubuntu4_amd64.deb fakeroot

sudo cp fakeroot/usr/lib/x86_64-linux-gnu/libgio-2.0.so.0 fakeroot/usr/lib/x86_64-linux-gnu/libpangocairo-1.0.so.0 /opt/netease/netease-cloud-music/libs/
解决 ubuntu 22.04 无法启动 wps
需要安装旧版 libssl1.1
wget http://security.ubuntu.com/ubuntu/pool/main/o/openssl/libssl1.1_1.1.1f-1ubuntu2.13_amd64.deb
sudo apt install libssl1.1_1.1.1f-1ubuntu2.13_amd64.deb
然后就能启动 wps 了,
或者也可以安装 snap 版 wps 2019
sudo snap install wps-2019-snap
ibus-rime 重复输入拼音
ibus rime在输入框输入中文,但是不按 enter,鼠标点击输入框其他地方,再点击输入框,之前输入的字符就会重新输入一遍。怎样使rime输入中文时候,点击其他地方后清空之前输入的拼音呢?
- 可以在 ibus 设置里取消“多个窗口间共享输入法状态”。但这只能解决多个窗口重复输入问题,单个窗口重复输入无法解决。