
Portage介绍
欢迎使用 Portage
Portage 系统是 Gentoo 在软件管理方面最显著的创新之一。由于 Portage 的高度灵活性和数量庞大的特性,它时常被誉为 Linux 下最好的软件管理工具。
Portage 是用 Python 和 Bash 两种语言编写的。因为它们都是脚本语言所以用户可以直接阅读它的代码。
大多数用户通过 emerge 使用 Portage。本章的内容不是复述 emerge 的 man page。要了解 emerge 的所有可用选项,请查阅 emerge 的 man page(emerge 中文手册):
# man emerge
Gentoo 软件仓库
查询 Portage 的信息
# emerge --info
Ebuild
当 Gentoo 的文档介绍某个软件包的时候,这意味着 Gentoo 的用户们可以在 Gentoo 的软件仓库里找到它。ebuild 是一种包含了所有 Portage 维护软件(比如安装,搜索,查询等等)所需信息的文件,而 Gentoo 的软件仓库是它们的一个集合。这些 ebuild 文件默认储存在 /var/db/repos/gentoo。
Portage 对于软件的行为都是基于本地的 ebuild。为了能收到新的软件包,安全更新等等,时常更新本地 ebuild 是一件很重要的事情。
更新 Gentoo 软件仓库
Gentoo 的软件仓库通常使用 rsync 进行同步,rsync 是一个快速的文件增量传输工具。要使用它很简单,Portage 的命令行前端 emerge 提供了一个调用 rsync 的方法:
# emerge --sync
有时防火墙会干扰 rsync 与镜像的连接。这时,我们可以使用 emerge-webrsync 来自动下载和安装 Portage 树的快照版本:
# emerge-webrsync
使用 emerge-webrsync 的另一个好处是可以只安装由 Gentoo release engineering 团队的 GPG 密钥签名过的快照。与此有关的详细信息可以在 fetching validated Gentoo repository snapshots 找到
维护软件
搜索软件
有很多方法可以在 Gentoo 的软件仓库寻找软件。其中之一是使用 emerge 本身。在默认情况下 emerge –search 会返回所有符合搜索条件的包名。
举个例子,找出所有名字里含有 “pdf” 的包:
# emerge -s <包名>
# emerge --search pdf
如果要根据描述进行搜索,可以使用 --searchdesc (或 -S)选项:
# emerge --searchdesc pdf
需要注意的是它会输出很多信息。不过由于都有很清楚的标识,我们就不再赘述它们的意思了。
安装软件
当你找到了软件包的名字,安装它只需要简单得使用 emerge。举个例子,如果要安装 gnumeric:
# emerge <包名>
# emerge --ask app-office/gnumeric
由于很多软件依赖其它的软件,在安装该软件的同时很可能还会安装它的一些以来。不要担心,Portage 可以很好地处理依赖关系。如果要知道 Portage 会安装什么软件,可以在命令中加入 -p/--pretend选项。举个例子:
# emerge --pretend gnumeric
在安装软件期间,Portage将从Internet下载必要的源代码(如果需要),并将其默认存储在 /var/cache/distfiles/ 中。 之后,它将解压缩,编译和安装包。 要让Portage仅下载源代码而不安装软件,请添加-f/--fetchonly选项到emerge命令:
# emerge --fetchonly gnumeric
恢复上一次失败的 emerge
# emerge -r
其它常用的选项有
-
-1/--oneshot一般用在安装软件包时,不将该包添加到 world 集中 -
-O/--nodeps不计算依赖关系,只操作指定的包(安装时可能会因为依赖不满足而导致安装失败) -
-j/--jobs设置 Portage 同时执行的最大任务数,如果未设置数量,那么 Portage 不会限制最大的任务数。如果要将该选项添加到默认选项下,那么建议配合-l/--load-average使用,-l/--load-average用于配置 emerge 的负载阈值,当当前负载到达设定值后, emerge 将不再开启新任务,以避免负载过高,这在 CPU 不够强悍或者内存不宽裕的机器上很需要。比如在一个 8 核 16 线程 16G 内存的机器上,可以设置成-j -l 12,这样的设定使 portage 的并行任务数不由硬性规定的数目来限制,而是通过动态负载来进行限制。 -
--keep-going它会在安装出错时,跳过安装失败的包,并重新计算依赖后继续安装剩余包 -
-n/--noreplace不重复安装已经安装的包(默认会忽略掉 USE 的改动以及升级的查询,除非对应加上-D/-U和-u选项) -
-t/--tree显示给定包的安装依赖树 -
--autounmask类这是一组在新装软件包时便于解除安装限制的选项。之前有介绍,在 Portage 安装软件的过程中,可能会因为 USE/License/Keywords 等因素导致无法直接安装,需要配置后再进行,而这组选项可以自动化这个过程。个人建议的相关选项组合为
--autounmask --autounmask-keep-masks --autounmask-write=n,此组合不会完全自动写入配置到系统下,但是提示了如何配置,方便手动写入,既简化了处理限制的流程,又能保证掌握每次安装包时的改动。
查找已安装软件的文档
许多软件包中包含有自己的文档,有些时候,doc的USE标记决定了软件包中的自带文档是否会被安装。您可以通过 emerge -vp category/包名命令来检查是否存在doc USE 标志:
# emerge -vp media-libs/alsa-lib
These are the packages that would be merged, in order:

Calculating dependencies... done!
[ebuild   R    ] media-libs/alsa-lib-1.1.3::gentoo  USE="python -alisp -debug -doc" ABI_X86="(64) -32 (-x32)" PYTHON_TARGETS="python2_7" 0 KiB
最好的启用 doc USE 的方式是在 /etc/portage/package.use里对想要启用的包单独启用,这样你就能只获得你想要的软件文档。了解更多信息请阅读 USE flags chapter。
当一个软件包安装结束后,它的文档通常会存放在/usr/share/doc/目录下的,以软件包名命名的子目录中:
$ ls -l /usr/share/doc/alsa-lib-1.1.3
total 16
-rw-r--r-- 1 root root 3098 Mar  9 15:36 asoundrc.txt.bz2
-rw-r--r-- 1 root root  672 Mar  9 15:36 ChangeLog.bz2
-rw-r--r-- 1 root root 1083 Mar  9 15:36 NOTES.bz2
-rw-r--r-- 1 root root  220 Mar  9 15:36 TODO.bz2
列出已安装文档文件的更可靠方法是使用 equery 的 --filter 选项。 equery 用于查询Portage的数据库,并作为 app-portage/gentoolkit 包的一部分:
$ equery files --filter=doc alsa-lib
 * Searching for alsa-lib in media-libs ...
 * Contents of media-libs/alsa-lib-1.1.3:
/usr/share/doc/alsa-lib-1.1.3/ChangeLog.bz2
/usr/share/doc/alsa-lib-1.1.3/NOTES.bz2
/usr/share/doc/alsa-lib-1.1.3/TODO.bz2
/usr/share/doc/alsa-lib-1.1.3/asoundrc.txt.bz2
--filter 选项可与其他规则一起使用,以查看许多其他类型文件的安装位置。可以在 equery 的手册中查看其他功能: man 1 equery。
卸载软件
当您想把一个软件包从系统中移除的时候,使用 emerge –unmerge命令。命令执行完成后,Portage将会移除此软件包安装到您系统中的所有文件,除了那些在安装软件后您修改过的配置文件。保留这些修改过的配置文件是为了便于您今后再次使用它。
# emerge --unmerge gnumeric
# emerge -C <包名>
当您从系统中移除一个软件包时,之前那些为了满足其依赖关系而被自动安装的软件包将会被保留在系统中。要使Portage找到现在可以删除的所有依赖项,可以使用 --depclean 功能。
自动清理系统下的软件包
# emerge --ask --depclean
# emerge -ac
默认选项
emerge 支持配置一组默认选项,用于在每次运行 emerge 时采用。这个储存默认选项的变量名为 EMERGE_DEFAULT_OPTS ,在 /etc/portage/make.conf 文件下设置。
这里一组比较推荐的默认选项配置为
EMERGE_DEFAULT_OPTS="--autounmask --autounmask-keep-masks --autounmask-write=n --keep-going -v -j -l 12"
其中的 12 请根据实际情况修改,如果配置了上文的 binhost ,那么对应选项也添加进入。
Understanding Portage’s Formatted and Colored Output
Output from portage is compactly formatted to indicate a plethora of information.
Emerge “Pretend” Output
- N = new (not yet installed)
- S = new SLOT installation (side-by-side versions)
- U = updating (to another version)
- D = downgrading (best version seems lower)
- R = replacing (re-merging same version)
- F = fetch restricted (must be manually downloaded)
- f = fetch (already downloaded)
- B = blocked by an already installed package
USE Flags
- An unmarked USE flag is unchanged and enabled.
- - A dash preceding a USE flag (yellow, green or blue) shows that it is disabled.
- % A percent symbol following a USE flag indicates that it is new for this package. Identical to yellow output.
- ***** An asterisk following a USE flag indicates that its meaning/scope has been updated. Identical to green output.
- () Parentheses around a USE flag indicate that it is currently masked by your profile. This is usually because the USE flag can not be supported on the given platform (for example, the win32codecs on amd64 with non-binary packages) or is irrelevant (for example, sse is available on all amd64 CPU’s, so there’s no point being able to disable it in a 64-bit environment).
Color Output
Portage returns information to you using both symbols and colors. While the combination makes for a pretty output it also may appear confusing on first glance. Note that the color information is not required, so it repeats the symbolic output.
- red - The USE flag is enabled and has not changed.
- yellow - The USE flag has been added since the package was last installed.
- green - The USE flag has changed since the last time the package was installed, as the asterisk after it indicates.
- blue - The USE flag is disabled, as the dash before it indicates.
Example
If you run the command
# emerge --update --verbose --deep --newuse world
you might get something similar to
[ebuild   R    ] sys-kernel/linux-headers-2.6.11-r2  USE="-gcc64%" 36,470 kB
[ebuild    U   ] sys-process/psmisc-22.2  USE="X* ipv6 nls (-selinux)" 238 kB
In this example the sys-kernel/linux-headers package would be reinstalled as indicated by the “R” at the beginning of the line. The sys-process/psmisc package is being updated, as shown by the “U” at the beginning of the line.
- The gcc64 USE flag is colored yellow and followed by “%” showing that that option has been added since the package was last installed. The “-” shows that it will be disabled during this update.
- The X USE flag will be green and followed by “*” because that USE flag has changed since the last time the package was installed, as the asterisk after it indicates. No “-” shows that it will be enabled during this update.
- The ipv6 and nls USE flags would appear red since they are enabled (No “-") and have not changed (No “*****").
- The selinux USE flag will be blue because the flag is disabled, as the dash before it indicates. The parentheses also show that it is an unavailable or irrelevant option.
更新系统
要保持您的系统在最佳状态(更不用说安装那些最新的安全更新),您需要定期的更新您的系统。由于Portage只能检查本地已有文件,因此您首先应该更新您的Portage树。当您的Portage树更新后,您可以用 emerge –update @world命令来更新系统。在下一个例子里,我们还会使用 --ask 选项来控制Portage显示它要更新的软件包列表, 并让您决定是否继续更新。
# emerge --update --ask @world
Portage将搜索已安装的程序的新版本。 然而,它只会验证明确安装的应用程序(在 /var/lib/portage/world 列出的应用程序)的版本,却不会检查它们的依赖项。若要更新这些包的依赖项,请添加 --deep 选项:
# emerge --update --deep @world
但是,这并不意味着会更新所有的软件包:某些系统上的软件包,会在编译和构建软件的过程中需要,但是一旦安装完软件,就不再需要这些依赖项。 Portage 称这些依赖为“构建依赖”。 若要在更新时包含这些构建依赖,请添加 --with-bdeps=y 选项:
# emerge --update --deep --with-bdeps=y @world
因为有时那些没有明确安装的包(但作为其他软件包的依赖而装入系统中)会推出安全更新,所以推荐偶尔运行一下这个命令。
每当您改变了系统中任何的 USE 标记后,最好加入 --newuse 选项。这样 Portage 将会验证这个 USE 标记变动后,是否需要安装新的软件包或者将现有的软件包重新编译。
# emerge --update --deep --with-bdeps=y --newuse @world
Meta软件包
Gentoo中的一些软件包并没有包含任何实际的内容,而只是用来安装一系列软件包的集合。例如,kde-plasma/plasma-meta 包就是一个包含了一系列与Plasma相关的互相依赖的软件包的集合,您可以通过安装它来在系统中搭建起一个完整的KDE Plasma 桌面环境。
如果您试图从系统中移除一个这样的软件包的集合体,只是单纯地使用 emerge –unmerge 命令并不能完成您的要求,原因在于这些包的依赖关系仍然保留在系统中。
不用担心,Portage也提供了移除孤立依赖的软件包的功能,但由于软件包间的依赖关系是动态的,您首先需要充分地更新您的整个系统,包括更改USE标记设定而导致的变化。在这之后您可以运行emerge –depclean来移除那些完全没有被其他包依赖的软件包。移除之后你需要重新编译那些曾经与刚刚移除的这些包动态连接过的应用程序,因为实际上这些程序不需要那些包。
所有这些可以用以下三个命令来实现:
# emerge --update --deep --newuse @world
# emerge --depclean
# revdep-rebuild
关于配置文件的更新
有时候在更新了某些软件包后你会发现出现了一个类似如下的提示信息:
* IMPORTANT: 2 config files in '/etc' need updating.
* See the CONFIGURATION FILES and CONFIGURATION FILES UPDATE TOOLS
* sections of the emerge man page to learn how to update config files.
一般出现这种情况的直接原因是你通过归属于一个软件包的文件修改了其默认配置,导致新安装的文件与现存文件不符,于是 Portage 出于保护现存文件的目的,将新文件重命名为了对应目录下的 ._cfgxxxx_<原名> 文件,这是一个很常见的情况。
而每当出现这种情况后,需要做的操作就是人工介入,判断一下保留哪个文件,还是将两个文件合并。而自带用于进行此操作的对应命令有 dispatch-conf 与 etc-update 。
以 dispatch-conf 为例,root 权限下执行后,它会逐个文件列出改动,然后提示你进行操作,比如按 z 保留旧的配置文件,按 u 使用新安装的配置文件替换旧的,等等。
改变桌面环境/ Change Profile
-
首先修改
/var/lib/portage/world文件,这个文件记录了用户主动安装的软件,换句话说,整个系统的构建就是围绕这 world 来创建的。将这个文件中不再需要的包删除,比方说 KDE 的软件和一些后续可以再安装,而目前保留可能造成构建麻烦的软件,比方说 htop,megasync,telegram-desktop,fcitx5 之类的,尽量减少到保留必须的就可以了,比方说内核,zfs 之类的。另外可以使用emerge --deselect xxxx命令清理 world 。 -
然后是修改或是删除暂时不需要的 USE 配置文件。这里需要强调一下,world 文件是我们手动安装的软件,这些软件用
/etc/portage/package.use/定义了其他附带安装的软件包和组。里面不再需要的包,就需要精简,甚至是删除。 -
其次使用 eselect profile 修改配置文件到需要的 Profile 。
-
再次就是运行
emerge --sync; emerge --depclean来清理系统。一般情况下,这个步骤会删除数百个包,耐心等它完成。 -
最后就是一些收尾工作,清理结束后,运行一些小工具来解决一些新老软件依赖的问题,运行下面的命令一波清:
# emerge -avj @preserved-rebuild; perl-cleaner --all; emerge --sync; emerge -avujDN --with-bdeps=y --autounmask-write=y @world运行以后看看会不会有什么 Block 之类的包,或者循环依赖的包,手动删除下;还有时候解决不了看看是不是 USE 没有清理干净,多试几次就会清理干净,更新没有任何报错就可以开始后续的操作了。
-
这个时候一般会来一次全系统重构。命令如下:
# emerge -ej --keep-going @world -
清理
/home/<user>/下的各种配置文件,安装新的桌面环境。
Licenses
从Portage版本2.1.7开始,可以根据其授权协议接受或拒绝安装软件。 portage 树中的所有包在其ebuild中包含一个LICENSE选项。 运行emerge –search package/category 将显示软件包的许可证。
Important:ebuild 中 的 LICENSE 变量仅是为 Gentoo 开发人员和用户准备的一份指南。它既不是法律声明,也不保证其真实性。因此不要过度依赖它,您需要深入检查软件包的本身,以及您使用的所有文件。
默认情况下,Portage允许自由软件基金会,开源计划或遵循自由软件定义明确批准的许可。
控制允许的许可证的变量称为ACCEPT_LICENSE,可以在/etc/portage/make.conf文件中设置。 在下一个示例中,将显示他的默认值:
ACCEPT_LICENSE="-* @FREE"
使用此配置,可以安装具有自由软件或文档许可证的软件包。非自由软件将无法安装。
可以在ACCEPT_LICENSE中全局设置 ACCEPT_LICENSE,或者在/etc/portage/package.license 文进行配置。
举个例子,要允许www-client/google-chrome 包的google-chrome的授权协议, 把下面的内容添加到 /etc/portage/package.license:
<类>/<名> <许可名称>
www-client/google-chrome google-chrome
# 亦可指定版本,比如对 20210818 及以上版本的 sys-kernel/linux-firmware 进行配置
>=sys-kernel/linux-firmware-20210818 linux-fw-redistributable no-source-code
这允许安装www-client/google-chrome 程序包,但禁止安装www-plugins/chrome-binary-plugins 程序包,即使它具有相同的 授权协议。
重要:授权协议存储在 /var/db/repos/gentoo/licenses/ ,授权协议组在/var/db/repos/gentoo/profiles/license_groups 里面。CAPITAL字母中每行的第一个条目是许可证组的名称,之后的每个条目都是单独的许可证。
在 ACCEPT_LICENSE 变量中定义的许可证组前缀为@ 符号。一种可能的设置(以前的Portage默认设置),是允许除“最终用户许可协议(EULA)”以外所有的许可证,“最终用户许可协议(EULA)”中的许可证需要阅读并签署接受协议。要完成此操作,请接受所有许可证(使用*),然后删除EULA组中的许可证,如下所示:
ACCEPT_LICENSE="* -@EULA"
请注意,此设置也将接受非自由软件和文档。
Masking & Unmasking packages
package.mask中指定的软件将会不被安装(可以将其看成黑名单),当新版本的软件出现一些问题的时候(或者是不兼容)可以在这个文件中添加对应的记录。
/etc/portage/package.unmask 文件的作用将会覆盖package.mask的效果(安装白名单)。
屏蔽特定的包版本
如果它不存在,请创建/etc/portage/package.mask 文件:
# echo ">x11-drivers/ati-drivers-12.6_beta_pre897" >> /etc/portage/package.mask
或者,创建/etc/portage/package.mask/ 目录:
# mkdir -p /etc/portage/package.mask/
# echo ">x11-drivers/ati-drivers-12.6_beta_pre897" > /etc/portage/package.mask/ati-drivers
从 ebuild 存储库中屏蔽包
创建一个文件以从名为“larry”的 ebuild 存储库中屏蔽名称为www-client/firefox 的包
# echo "www-client/firefox::larry" > /etc/portage/package.mask/firefox
常规操作都是enable repository 后把所有包都mask 掉,要用的时候单独一个个开,加上 autounmask 也不用自己写。
*/*::overlay_name
ACCEPT_KEYWORDS
ACCEPT_KEYWORDS 变量告诉包管理器哪个 ebuild 的 KEYWORDS 允许接受。
变量在哪里设置?
这个变量通常通过 Gentoo 的 profile 设置。但是可以在用户的 /etc/portage/make.conf 文件里进行覆盖,以及在 /etc/portage/package.accept_keywords 文件/目录下的每个包里或者甚至在命令行中进行覆盖。
Important:通过命令行覆盖 ACCEPT_KEYWORDS 变量通常被认为是个坏主意,因为设置不会被包管理器保存而且可能导致不必要的行为。
稳定与不稳定的 keywords
在绝大多数的 profile 中 ACCEPT_KEYWORDS 变量的默认值即系统架构本身,例如 ACCEPT_KEYWORDS="amd64" 或者 ACCEPT_KEYWORDS="arm"。在此情况下,包管理器只接受那些KEYWORDS 变量包含此架构的 ebuild。如果用户希望能够安装那些还未被认为适合生产环境使用的 ebuild,可以在架构前添加 ~ 前缀,例如:
# nano -w /etc/portage/make.conf
ACCEPT_KEYWORDS="~amd64"
由于ACCEPT_KEYWORDS变量是增量的,在添加测试关键字 (~amd64)的时候,不应当指定稳定的关键字(amd64)。
如果不是进行系统全局设置,那么可以在 /etc/portage/package.accept_keywords 文件或目录中对每个包进行单独设置:
<类>/<名> [可选的关键字配置]
# games
games-fps/doomsday ~amd64
# 亦可指定版本,比如对 21.04.3 及以上版本的 kde-apps-meta 进行配置
>=kde-apps/kde-apps-meta-21.04.3
除了 ACCEPT_KEYWORDS 的通常值以外, package.accept_keywords 还支持三个特殊值:
*— 如果包在任何系统架构是稳定的,那么它可见~*— 如果包在任何系统架构是测试的,那么它可见**— 这个包总是可见的 (KEYWORDS 被完全忽略)
最后一个选项对于版本经常改变的包 (当前 svn/git/mercurial/… 版本的包, 他们通过 live ebuild 来支持,并且没有 KEYWORDS 变量。
当Portage报错的时候
简介
正如我们之前指出的那样,Portage是一个非常强大并支持许多特性的软件包管理工具,而这是其他类似工具所欠缺的。为了理解这一点,我们为您粗略地解释一些Portage的面貌。
通过使用Portage,一个软件的不同版本可以共存于一个系统中。其他发行版倾向于直接在软件包名字中包含版本号(例如freetype 和 freetype2),Gentoo的Portage使用一种我们称之为SLO的技术来实现这种并存。一个ebuild为它自身的版本声明了一个确切的SLOT。具有不同SLOT的同一软件的Ebuild可以共存于同一个系统中。例如,上例中那个freetype包就拥有不同的ebuilds,里面分别有 SLOT=“1” 和SLOT=“2"的标志
有一些不同的软件包提供了类似的功能。比如metalogd,sysklogd和syslog-ng都是系统日志记录工具。那些依赖于“系统日志记录工具”的程序并不能随便的依赖于其中之一,比如metalogd。因为其他的系统日志工具可能也是很好的选择。好在Portage允许使用虚拟包:每一个系统日志记录工具都可以提供virtual/logger包,因此应用程序们可以设定成仅仅依赖于virtual/syslog即可。
Portage树中的软件可以存在于不同的分支中。您的系统默认只会接受那些Gentoo认为稳定的软件包。绝大多数新提交的软件会被添加到测试分支里。这意味着在此软件被标示为稳定版前需要进行更多的测试。尽管您可以看到那些软件的ebuilds已经加入Portage数据库,在它们未被加入稳定分支前Portage将不会安装它们。
有些软件只能在某几个体系结构上使用。或者在其他体系结构中还不能运行,或者仍需要对其进行更多的测试,或者将软件提交到Portage树中的开发者还不能确定这个软件能否运行于其他体系结构。
每一个Gentoo安装都依附于一个确定的profile,此文件里除了其他信息外还包含了一个正常工作的系统需要的软件包的列表。
被阻挡的包
Portage关于被阻挡的包的警告(使用 –pretend参数)
[blocks B ] mail-mta/ssmtp (is blocking mail-mta/postfix-2.2.2-r1)
Portage关于被阻挡的包的警告(不使用 –pretend参数)
!!! Error: the mail-mta/postfix package conflicts with another package.
!!!        both can't be installed on the same system together.
!!!        Please use 'emerge --pretend' to determine blockers.
Ebuilds文件中包含了特定的字段,里面为Portage提供了此软件的各种依赖关系的信息。总计有两种可能的依赖关系:一种是编译依赖,在 DEPEND 区域进行声明;另一种是“运行时”依赖,在 RDEPEND 区域中进行声明。如果上述两种依赖关系中任何一个明确指明某个实体或者虚拟包(译注:可能已安装和正要安装)与要安装的包不相容的时候,就会阻挡软件的安装。
虽然Portage的最新版本足够聪明,可以在没有用户干预的情况下解决轻微的问题,但偶尔也需要手动解决此类问题。
为了使安装得以继续进行,您可以选择不安装这个软件包,或者先将发生冲突的包卸载。例如,在我们给出的这个例子中,您可以选择不安装postfix,或者先卸载ssmtp。
你也可能会遇到某些特定版本的包被屏蔽的情况,比如<media-video/mplayer-1.0_rc1-r2。在这种情况下,升级到一个更新的版本就能解决问题。
也有可能两个需要安装的包互相阻挡。这种少见的情况下,您应该明确自己为什么需要同时安装它们。绝大多数时候您只需要安装它们之中的一个就可以了。如果不是这样,请您到 Gentoo’s bugtracking system 中提交一个bug。
被屏蔽的包
Portage关于被阻挡的包的警告
!!! all ebuilds that could satisfy "bootsplash" have been masked.
PPortage关于被屏蔽的包的警告——原因
!!! possible candidates are:

- gnome-base/gnome-2.8.0_pre1 (masked by: ~x86 keyword)
- lm-sensors/lm-sensors-2.8.7 (masked by: -sparc keyword)
- sys-libs/glibc-2.3.4.20040808 (masked by: -* keyword)
- dev-util/cvsd-1.0.2 (masked by: missing keyword)
- games-fps/unreal-tournament-451 (masked by: package.mask)
- sys-libs/glibc-2.3.2-r11 (masked by: profile)
- net-im/skype-2.1.0.81 (masked by: skype-eula license(s))
当您想安装一个对于您系统不可用的软件包。您会收到类似这样的屏蔽错误提示。您应该试着安装那些对于您系统可用的程序或者等待那些不可用的包被置为可用的。通常一个软件包被屏蔽的原因在于:
| Reason for mask | Description |
|---|---|
| ~arch keyword | 这个软件没有经过充分的测试,不能进入稳定分支,请等待一段时间后在尝试使用它。 |
| -arch keyword or -* keyword | 这个软件不能工作在您机器的体系结构中。如果您确信它能工作那么请到我们的bugzilla网站提交一个bug报告。 |
| missing keyword | 这个软件还没有在您机器的体系结构中进行过测试。您可以咨询相应体系结构移植小组是否能对它进行测试,或者您自己为他们进行这样的测试并将您得到的结论提交到我们的bugzilla网站。 |
| package.mask | 这个软件被认为是损坏的,不稳定的或者有更严重的问题,它被故意标识为“不应使用”。 |
| profile | 这个软件不适用于您的profile。安装这样的应用软件可能会破坏您的系统,或者只是不能与您使用的profile相兼容。 |
| license | 这个包的许可证的ACCEPT_LICENSE值不正确。 通过设置许可证或正确的许可证组来允许其许可证:/etc/portage/make.conf或 /etc/portage/package.license |
USE必要的更改
Portage 提示 USE 标志需要进行更改
The following USE changes are necessary to proceed:
#required by app-text/happypackage-2.0, required by happypackage (argument)
>=app-text/feelings-1.0.0 test
如果未使用--autounmask参数,则错误消息也可能显示如下:
emerge: there are no ebuilds built with USE flags to satisfy "app-text/feelings[test]".
!!! One of the following packages is required to complete your request:
- app-text/feelings-1.0.0 (Change USE: +test)
(dependency required by "app-text/happypackage-2.0" [ebuild])
(dependency required by "happypackage" [argument])
当请求安装包时,发生这种警告或错误,这不仅取决于另一个包,而且还要求该包使用特定的USE标志(或一组USE标志)构建。 在给定的示例中,包应用文本/感觉需要使用 USE=“test"构建,但此系统上未设置此USE标志。
要解决这个问题, 到/etc/portage/make.conf编辑里面的USE标志, 或者去/etc/portage/package.use设置一个特殊的包.
缺失依赖
Portage提示依赖性不满足
emerge: there are no ebuilds to satisfy ">=sys-devel/gcc-3.4.2-r4".

!!! Problem with ebuild sys-devel/gcc-3.4.2-r2
!!! Possibly a DEPEND/*DEPEND problem.
这表示您正尝试安装的应用程序依赖于您的系统不可用的另外一些软件包。请到bugzilla查看是否有此问题的记录,如果没有查找到相关信息的话请提交一个报告。除非您的系统混用了不同分支,否则这类问题不应该发生,若发生了那就是一个bug。
意指不明的软件包
Portage对于意指不明的Ebuild名称的警告
[ Results for search key : listen ]
[ Applications found : 2 ]

*  dev-tinyos/listen [ Masked ]
      Latest version available: 1.1.15
      Latest version installed: [ Not Installed ]
      Size of files: 10,032 kB
      Homepage:      http://www.tinyos.net/
      Description:   Raw listen for TinyOS
      License:       BSD

*  media-sound/listen [ Masked ]
      Latest version available: 0.6.3
      Latest version installed: [ Not Installed ]
      Size of files: 859 kB
      Homepage:      http://www.listen-project.org
      Description:   A Music player and management for GNOME
      License:       GPL-2

!!! The short ebuild name "listen" is ambiguous. Please specify
!!! one of the above fully-qualified ebuild names instead.
您要安装的应用程序对应有多个同名的包。您需要同时指定类别的名称。Portage会列出所有可供选择的名称匹配的包。
循环依赖
Portage关于循环依赖问题的警告
!!! Error: circular dependencies:

ebuild / net-print/cups-1.1.15-r2 depends on ebuild / app-text/ghostscript-7.05.3-r1
ebuild / app-text/ghostscript-7.05.3-r1 depends on ebuild / net-print/cups-1.1.15-r2
两个(或多个)您想安装的包由于循环依赖而不能安装。这很可能源于Portage树中的bug。请等一段时间后重新sync再尝试安装。您也可以去 Bugzilla 看看是否已经有此问题的报告,或者提交一个关于它的报告。
当然,最后它也会有类似如下提示的解决方案
It might be possible to break this cycle
by applying the following change:
下载失败
Portage关于下载失败的警告
!!! Fetch failed for sys-libs/ncurses-5.4-r5, continuing...
(...)
!!! Some fetch errors were encountered.  Please see above for details.
当Portage下载指定软件的源代码失败时,它会尝试继续安装其它(若适用)的应用程序。源代码下载失败可能源于镜像服务器没有正确同步,也可能因为ebuild文件给出了错误的下载地址。那些保存源代码的服务器也可能因为某些原因宕机。
一小时后重试一次,看看问题是否仍然存在。
系统Profile保护
Portage关于profile中保护的包的警告
!!! Trying to unmerge package(s) in system profile. 'sys-apps/portage'
!!! This could be damaging to your system.
您要求移除系统核心软件包中的一个。它是您的profile中所列出的必需的软件,因此不能从系统中移除。
Digest验证失败
Digest验证失败
>>> checking ebuild checksums
!!! Digest verification failed:
这是Portage树中出现了错误的迹象,通常是由于将ebuild提交到Gentoo ebuild存储库时出错造成的。
当digest校验失败的时候,请不要尝试自己去为此软件包重新产生digest。使用ebuild foo manifest 并不能修复问题,反而很可能会使问题变得更糟。
取而代之的应该是等待一至两个小时以便让软件仓库安定下来。一般来说错误很有可能马上就会被注意到,但是修复程序可能需要一点时间来逐步扫描rsync镜像。当您等待的时候,到Bugzilla或者#gentoo (webchat) (IRC)看看是否已经有人报告了这个问题。如果没有,那就为那个损坏的ebuild提交一个bug报告吧。
修复错误后,重新同步Gentoo ebuild仓库以获取修复的digest。
重要:值得注意的是:不要每天多次同步Gentoo ebuild repository 仓库。正如(当您运行emerge –sync时)Gentoo官方网络礼节策略所指出的那样,那些短时间内过于频繁进行多次sync的用户将会被更新服务器软封禁一段时间,一再不遵守这一政策的滥用者可能会被硬封禁。除非绝对必要,否则通常最好等待24小时再进行同步,因为这样您不会使Gentoo的rsync镜像服务器过载而影响其他用户的正常使用。
其他工具
单纯 Portage 自带的工具对于日常管理其会显得有些吃力,这里推荐几个比较有用的软件用于辅助管理 Portage。
app-portage/eix
这个可以说是非常有用的软件,主要用于查询 Portage 数据库,其优势在于更快的速度、更人性化的显示格式以及更方便的查询模式。
使用前需执行 eix-update 以更新 eix 数据库,安装它之后,可以使用 eix-sync 命令来更新 Portage 数据库,更新完毕后会自动更新 eix 数据库,并显示更新前后的软件包对比情况。
使用 eix 查询所需软件,最基本的命令为
# eix <包名匹配字符串>
也可只查询已安装的包
# eix -I <包名匹配字符串>
也可查询属于一个特定分类下的所有包
# eix -C <类名>
等等,执行 man eix 查看更多用法。
app-portage/gentoolkit
包含了 Gentoo 的一些管理脚本,常用的命令有用于查询依赖关系,文件归属,软件包内容的 equery ,以及用于清理 distfile 的 eclean-dist 。比如
可以查询依赖 vim-core 的软件包(仅根据 ebuild 文件内容查询)
# equery d vim-core
可以查询 vim 下属的依赖关系图
# equery g vim
可以查询 vim 安装了哪些文件到系统下
# equery f vim
可以查询这个文件属于哪个包
# equery b /usr/bin/vim
eclean
eclean 是一个清理仓库源文件和二进制包的工具。它是 app-portage/gentoolkit 包的一部分,并由 Portage-Tools 项目维护。
安装
安装 eclean:
# emerge --ask app-portage/gentoolkit
附注:关于 app-portage/gentoolkit 包中其他工具的信息请参看 Gentoolkit article。
使用
默认情况下,源文件存储在 /var/db/repos/gentoo/distfiles 目录下, 二进制包存储在 /var/db/repos/gentoo/packages 目录下;可以通过修改 /etc/portage/make.conf 中的 DISTDIR 和 PKGDIR 变量更改对应的存储位置。如果不定期清理,这两个目录可能会悄然无声地变得非常巨大;这就是创建eclean的原因。
使用 eclean –help 来查看全部的命令简介、参数列表和使用介绍:
# eclean --help
通过 distfiles 参数清理源文件存放目录:
# eclean distfiles
或者使用更简短的命令:
# eclean-dist
使用下面的命令清理二进制包:
# eclean packages
或者使用更简短的命令:
# eclean-pkg
选项
默认情况下,当前存储库中的任何ebuild相对应的源文件和二进制包都不会被删除。这样,只要程序包仍在当前存储库树中,系统管理员就可以轻松地降级程序包或安装以前删除的程序包。
举个例子,比如包 foo-1.0 和 foo-1.1 都在存储库中。在从 foo-1.0 升级到 foo-1.1 之后,运行 elcean distfiles,两个版本的源文件依然被保留,因此如果 foo-1.1 出现问题,用户可以很方便的重新安装 foo-1.0,而不必重新下载。
另一个可能的情况是安装之前删除的包。假设系统安装了 foo 包(任一版本)。在(不经意地)删除了这个包并运行了 eclean disfiles 之后,foo 的源文件依然被保留,可以重新安装而无需再次下载。
对二进制包同样的例子也一样适用。
为节省更多磁盘空间,请添加--deep选项:这将删除与某些当前安装的软件包(版本无关紧要)不对应的每个源文件或二进制软件包。请注意,这种方式当用户需要降级安装某个包或者重新安装之前删除的包的时候都必须重新下载。
# eclean --deep distfiles
# eclean --deep packages
一个替代方案是,同时使用 --deep 和 --package-names 选项:对于某些非当前安装的包(不管版本号是什么)的每个源文件或者二进制包都会被删除。这种方式当用户需重新安装之前删除的包的时候都必须重新下载,但是要降级安装某个包则不需要。
更多细节请参阅 eclean(1) man page:
# man 1 eclean
app-portage/portage-utils
包含了 Portage 的帮助工具,与上面 gentoolkit 的功能有重合,他们具有互补性,常用的命令有用于分析 emerge 日志的 qlop 。它是用 C 写的,速度更快。
app-portage/pfl
Portage File List,可用于在线查询文件所归属的包,命令为 e-file <文件名> 。
多版本管理
Gentoo Linux 支持同一软件多版本同时存在于系统上,这归功于 Portage 系统的 slotting 机制。当你执行命令 eix dev-lang/python 会发现它有好多行可用版本,最前圆括号内的内容即对应的 slot 名,不同 slot 下的版本可同时安装到系统上( slot 名内 / 符号后的内容表示其 sub-slot,同 slot 但不同 sub-slot 的版本无法共存)。比如,sys-devel/gcc , sys-devel/clang , dev-lang/lua 等等都支持多版本共存。
对于一些多版本共存的工具, Gentoo Linux 准备了对应的 eselect 命令以方便用户选择使用。其会在对应的 $PATH 目录下创建一个指向当前选定版本命令的软链接。比如,列出当前所有已经安装的 lua 版本
# eselect lua list
设定了系统下用户交互环境的默认 lua 版本
# eselect lua set {序号}
其它的类似,执行 eselect help 以查看当前所有支持的模块。不是所有的多版本共存的包都会有 eselect 模块,它们并不存在强制的依赖关系。执行 eix -I2 可以显示当前系统下安装的可多版本共存的包。
为 Portage 包管理器设置代理
开门见山,本文介绍在 Gentoo Linux 下如何正确地对其包管理器 Portage 设置代理,即日常使用的 emerge 命令。这里介绍软件下载安装时需要的配置;对于同步 Portage 树,则是部分适用。
Gentoo 的默认设置
- 代理: 无
- 工具: 默认使用
wget作为下载工具,但对于绝大部分的 live 包,会有针对的 eclass 使用对应的版本控制工具从远程仓库抓取,这里仅以git为例。
live 包:即版本号带 9999* 的这些包;用于匹配 live ebuild 文件名的正则表达式为 9999*(-r[0-9]{1,3})?.ebuild$ ,可还是有一些包使用了这种版本命名规则却并非真正的 live 包,比如 openjfx/openjfx-8.999.ebuild ;这里不会通过版本号来判断是否需要配置 git 参数,所以并不影响,仅作介绍。
持久性地修改代理
通用配置
$ man make.conf 可以看到里面有说明如何配置代理,但是过于简要,这边详细说明。
对于一般情况,在 /etc/portage/make.conf 文件下配置如下三个变量,就完全足够:
http_proxy="[protocol://][user[:password]@]proxyhost[:port]"
https_proxy="[protocol://][user[:password]@]proxyhost[:port]"
ftp_proxy="[protocol://][user[:password]@]proxyhost[:port]"
这些变量会在 emerge 命令运行时,传递给预配置的 FETCHCOMMAND 即 wget 命令。但,该命令有一个问题是不支持 socks 协议;所以,对于不同的协议需要有不同的代理服务,这样子很麻烦。
修改以支持 socks 协议有一个应变的方法,即修改默认的获取命令为 curl ,同样是在 /etc/portage/make.conf 文件下配置变量,如下:
FETCHCOMMAND="curl --retry 3 --connect-timeout 60 --ftp-pasv -Lfo \"\${DISTDIR}/\${FILE}\" \"\${URI}\""
RESUMECOMMAND="curl -C - --retry 3 --connect-timeout 60 --ftp-pasv -Lfo \"\${DISTDIR}/\${FILE}\" \"\${URI}\""
其中 RESUMECOMMAND 是用于恢复意外中断的下载命令,保存后即完成修改,此时,就可以给不同协议配置同样的 socks 类协议的代理服务,均可生效。如:
https_proxy="socks5h://127.0.0.1:1080"
单独配置 git 抓取
对于 live 包,它们目前大多数直接使用 git 命令从远程仓库抓取。其它版本控制工具(目前支持的大致有 bzr, cvs, darcs, mercurial, subversion)同理,请自行修改后套用;当然也有直接使用 wget|curl 下载 live 包的情况,那么这种情况如上「一」述。
git 命令支持 socks 协议,并且除了能吃上述配置的环境变量外,
配置 https_proxy 时也配好 http_proxy ,否则可能出现 SSL_ERROR_SYSCALL 错误。
还能独立于其它包单独配置 git 自身的代理,方法有两种:
-
git 能配置针对整个 Linux 系统的参数,运行:
$ git config --system http.proxy '[protocol://][user[:password]@]proxyhost[:port]'此命令会将配置写入到
/etc/gitconfig文件内,并生效于系统级别,会被用户/项目级别的配置覆盖。 -
通过 Portage 的全局 bashrc 文件
/etc/portage/bashrc来配置临时的 git 代理这种方式会对系统配置造成最少的干扰,只略微繁琐一点,需要将下述脚本代码写入上述的 bashrc 文件内:
if [[ ${EBUILD_PHASE} == "unpack" && ${INHERITED} =~ git\-r3 ]]; then
  git config --global http.proxy '[protocol://][user[:password]@]proxyhost[:port]'
fi
这个 bashrc 只被 Portage 引用,会在进入每一个安装阶段时被导入。目前,Portage 下抓取 git 项目是通过
git-r3.eclass实现,该 eclass 定义了 git 项目是在 src_unpack 阶段被更新,所以这里只需要在此阶段时设置即可。且,因为该目录不是被抓取包的 git 目录,所以只能设置用户级别的配置以生效,配置文件会被存放于 Portage 安装过程中沙盒的家目录下,即对应 安装软件临时目录 (这个目录是 Portage 在编译/安装软件过程中临时建立的,会在成功安装软件后被删除,所以不用担心会有文件残留。具体位置是可以自定义的,详情看 make.conf(5) 手册下 PORTAGE_TMPDIR 条目)下的homedir/目录。
临时添加代理
对于需要临时添加代理以使用的情况,目前我知道两种方式:
推荐:ProxyChains
ProxyChains is a UNIX program, that hooks network-related libc functions in dynamically linked programs via a preloaded DLL and redirects the connections through SOCKS4a/5 or HTTP proxies.
使用 net-misc/proxychains 软件适用所有下载方式。
配置文件可以放在 ~/.proxychains/proxychains.conf,也可以放在 /etc/proxychains.conf,但是放在 etc 下更好,因为有时候要通过sudo安装软件。
# emerge net-misc/proxychains
# vi /etc/proxychains.conf
...
socks5 127.0.0.1 7891
配置好代理列表后,通过如下命令使用:
# proxychains -q emerge [<args>...]
临时指定环境变量
{ftp,http,https}_proxy 的方式,适用性同持久性配置。
即如下命令:
# export http_proxy="..." https_...
# emerge [<args>...]
或
# http_proxy="..." https_... emerge [<args>...]
Project:Portage/Sync
The new plug-in sync system is the next step in that migration. Using PORTDIR and PORTDIR_OVERLAY in make.conf could only list where the repository was location. Users could not specify other important attributes about that repository. The repos.conf style configuration allows for settings to be added on a per sync-type basis. Along with this new expandability and the plug-in sync system, it will be much easier to change to new repository syncing methods.
General help
Note: While Portage can handle repos.conf as either a file or a directory of files. The preferred method is to be used as a directory. Other tools like layman and mirrorselect require and expect it to be a directory. Layman creates and manages its own layman.conf file to register installed overlays with Portage. mirrorselect looks for repos.conf/gentoo.conf file in order to modify the sync-uri parameter for the gentoo repository.
Migration
Portage configuration
If the /etc/portage/repos.conf directory does not exist:
# mkdir /etc/portage/repos.conf
# cp /usr/share/portage/config/repos.conf /etc/portage/repos.conf/gentoo.conf
Then edit the file for your installation and desired settings, continue as needed with the remaining migration instructions. Edit all repos.conf/*.conf files, add the auto-sync option to each defined repository.
For sync-type, edit it to one of the installed supported types.
Current supported sync types include:
rsyncgitsvnwebrsyncorwebsync(equivalent to running emerge-webrsync separately).cvslaymansync(if installed by Layman)
Example local overlay sync-able from a git backup:
# nano -w /etc/portage/repos.conf/gentoo.conf
[DEFAULT]
main-repo = gentoo

[gentoo]
location = /var/db/repos/gentoo
sync-type = git
sync-uri = https://github.com/gentoo-mirror/gentoo.git
auto-sync = yes
priority = 1000
The above overlay can be synced with
# emaint sync -r gentoo
Operation
Primary control of all sync operations has been moved from emerge to emaint. emerge –sync now runs the emaint sync module with the --auto option. This --auto option performs a sync on only those repositories with the auto-sync setting set to yes or true. If the auto-sync option is not set to yes or is absent, then emerge –sync may not sync any repositories.
Note: As a result of the default auto-sync = True/Yes setting, commands like eix-sync, esync -l, emerge –sync && layman -S will cause many repositories to be synced multiple times in a row. Please adjust configuration files or scripts as necessary for the new operation.
Warning: Due to the above default. For any repositories (repos) that you EXPLICITLY do not want to be synced. You MUST set auto-sync = no
Examples
# emaint sync -a
Equivalent to emerge –sync. Sync all repositories where auto-sync = true is set.
Note: Due to the default auto-sync = true setting, this command will sync all repositories that do not have auto-sync = no explicitly set.
# emaint sync -r foo
Sync the foo repo (ignores auto-sync setting):
# emaint sync --allrepos
Sync all repositories with a valid sync-type and sync-url defined. (ignores auto-sync setting)
USE标记
什么是USE标志
USE标志的指导思想
你在安装gentoo(或者是其他发行版,甚至于其他特定操作系统)的时候,你要依据你工作的环境做出选择。服务器跟工作站的组织结构不同,游戏机跟3D工作站也会不一样。
不单只是选择你想要安装的包时如此,选择某一个包需要的特性时同样如此。如果你不需要OpenGL,为什么还要花费时间安装OpenGL并在其他包中加入对OpenGL的支持?如果你不用KDE,而且软件包没有KDE也能完美运行,为什么还要在编译这些包的时候加入KDE支持?
为了帮用户判断什么需要安装或激活,什么不需要;我们希望用户能用简单的方式设定他们自己的环境。这能促使用户判断他真正需要的东西,并让Portage做出有用的决定的过程变得简单。
USE标志的设定
我们来具体看看USE标志。每一个标志都是代表对某特定概念的支持和依赖关系信息的关键字。如果你设定了某个USE标志,Portage会明白他们需要支持所选关键字。当然这同时也改变了这个包的依赖关系信息。
让我们看一个特殊示例:关键字 kde 。如果你的 USE 变量里面没有这个关键字,所有具有可选KDE支持的包在编译时都 不会 编译KDE支持。所有具有可选KDE依赖关系的包在安装时都 不会 (做为一个依赖关系而)安装KDE库。如果你设定了kde关键字,这些包在安装时都 会 编译KDE支持,而且KDE库也 会 (作为一个依赖关系而)被安装。
通过正确设定关键字,你会得到一个根据你的需要而定制的系统。
使用USE标志
声明永久USE标志
就像前面提到的,所有USE标志都声明在 USE 变量里面。为了让用户能方便地查找和选择USE标志,我们提供了一份默认的USE设定。这些设定是我们觉得Gentoo用户通常都要用到的USE标志的集合。这个默认设置在make.defaults 文件──你的profile声明。
你的系统使用的profile是符号链接 /etc/portage/make.profile 所指向的目录。每个profile叠加于某个更大的profile之上,最终的结果是这些profile的并集。初始profile是base profile( /var/db/repos/gentoo/profiles/base)。
要查看当前正在使用的USE标志(全部),请使用 emerge –info:
# emerge --info | grep ^USE
USE="a52 aac acpi alsa branding cairo cdr dbus dts ..."
就像你看到的那样,这个变量已经包括了非常多的关键字。不要通过修改make.defaults 文件里的 USE 变量来满足你的需要:在升级Portage的时候,这个文件将会被覆盖。
要改变这个默认设置,你需要在 USE 变量里添加或移去关键字。这是通过在/etc/portage/make.conf里定义USE全局变量来实现的。在这个变量里,添加你需要的额外的USE标志,或者移去你不需要的USE标志。后者可通过在标记前面加个负号 (-).前缀来实现。
例如,要移除对 KDE 和 QT 的支持,并添加对 LDAP 的支持,可以在/etc/portage/make.conf里声明USE如下:
USE="-kde -qt4 -qt5 ldap"
为单个包声明USE标志
如果你不是想为整个系统声明USE标志,而是想要为一个(或者几个)程序声明USE标志,你需要编辑/etc/portage/package.use文件。package.use 通常是一个文件,不过它也可以是一个充满子文件的目录;请看下面的提示和 man 5 portage 以获得更多如何使用这个约定的信息。下面的例子假设 package.use 是一个文件。
比如说,如果你不想全局的启用 Blu-ray 支持,你只想把它应用到 VLC 包,你可以这样做:
<类>/<名> <USE>
media-video/vlc bluray
Tip:如果 package.use 是一个已经存在的“目录”(而不是一个单文件),只需简单地在 package.use/ 目录下创建文件,就可以修改软件包的本地USE标记。虽然任何文件命名规范都行,但是更明智的做法是统一命名方案。
有一种规范是简单地使用包名作为子文件的标题。比如说,可以用如下方式为 media-video/vlc 软件包在本地设置 bluray USE 标记。
# echo "media-video/vlc bluray" >> /etc/portage/package.use/vlc
你当然也可以直接为某一个程序禁用USE标志。比如说,禁用PHP的bzip2支持(但通过make.conf中的USE标志为其他包提供支持):
dev-lang/php -bzip2
-* 代表去除该匹配的包的所有已经添加的以及默认的 USE
>=kde-apps/kde-apps-meta-21.04.3 -* admin
Portage 有一个 USE Expand 功能,即把指定变量的值扩展成 USE,这些指定的变量被设置在 Portage 数据库路径下的 profiles/base/make.defaults 文件的 USE_EXPAND 变量中。这个功能很实用,简化了配置值,还能进行归类,更便于管理。上文有一个 显卡的配置 其实就是一个 USE_EXPAND 值。其它会使用到它的地方不多,但也有,比如配置全局的本地化配置,就可以在 make.conf 文件下配置
L10N="zh-CN zh-TW zh en-GB-oxendict en"
这样,那么以后当有包支持上述的本地化配置时,就会自动添加。
其它比如可以对 qemu 这个虚拟机添加额外的模拟平台, 可以往 /etc/portage/package.use/qemu 文件写
app-emulation/qemu QEMU_SOFTMMU_TARGETS: aarch x86_64
以支持 arm64 及 x86_64 平台。等等
声明临时USE标志
有时,你只想暂时改变一个USE设置。你可以仅仅把USE 变量声明成一个环境变量,而不必两次修改/etc/portage/make.conf 。但是要记住,当你重新emerge或者升级这个程序的时候(不管是单独地还是作为系统升级的一部分),你的修改会被重置。
下面的例子我们将在安装 SeaMonkey 的时候临时从 USE 变量中移去pulseaudio 值。
# USE="-pulseaudio" emerge www-client/seamonkey
优先级
当然,USE设置有一定的优先级。按优先级排序(第一优先级最低):
- make.defaults 里面的USE默认设定
- 用户在/etc/portage/make.conf里面的USE默认设定
- 用户在 /etc/portage/package.use里面的USE默认设定
- 用户作为环境变量的USE设定
运行 emerge –info可以看到Portage识别的最终的USE设定。它会列出Portage使用的所有相关变量(包括 USE 变量)。
# emerge --info
在整个系统上应用新的USE标志
如果你已经修改了你的USE标志,而且你想用新的USE标志更新你的系统,可以使用emerge的 --newuse选项:
# emerge --update --deep --newuse @world
然后运行Portage的depclean来移除已经安装到你的"旧"系统里但是在新USE标志中被废除的条件依赖关系。
警告:运行emerge –depclean是一项危险的操作,必须小心。请反复检查要删除的包的列表里确定没有你仍然需要的包。下面这个例子里,我们添加了 -p 选项──来只列出这些包而不删除他们:
# emerge -p --depclean
depclean完成之后, emerge会针对可能是已经删除的软件包提供的共享对象动态链接的应用程序提示重新构建。此操作完成前,为了防止破坏应用程序,Portage 将会保存必要的库。它存储着需要在 preserved-rebuild 设置的重建内容。若要重建必要的包,请运行:
# emerge @preserved-rebuild
这些都完成之后,你的系统就已经应用上了新的USE标志的设定。
软件包特有的USE标志
查看可用USE标志。
让我们以seamonkey来作例子,看看它接收什么USE标志。我们可以以--pretend和 --verbose为选项执行 emerge来查看:
# emerge --pretend --verbose www-client/seamonkey
These are the packages that would be merged, in order:

Calculating dependencies... done!
[ebuild  N     ] www-client/seamonkey-2.48_beta1::gentoo  USE="calendar chatzilla crypt dbus gmp-autoupdate ipc jemalloc pulseaudio roaming skia startup-notification -custom-cflags -custom-optimization -debug -gtk3 -jack -minimal (-neon) (-selinux) (-system-cairo) -system-harfbuzz -system-icu -system-jpeg -system-libevent -system-libvpx -system-sqlite {-test} -wifi" L10N="-ca -cs -de -en-GB -es-AR -es-ES -fi -fr -gl -hu -it -ja -lt -nb -nl -pl -pt-PT -ru -sk -sv -tr -uk -zh-CN -zh-TW" 216,860 KiB

Total: 1 package (1 new), Size of downloads: 216,860 KiB
emerge 并不是做这件事的唯一工具。事实上,我们有一个专门的包信息工具叫equery,它属于app-portage/gentoolkit。
# emerge --ask app-portage/gentoolkit
现在以为参数执行 equery 来查看指定包的USE标志。例如:gnumeric包:
# equery --nocolor uses =gnumeric-1.12.31
[ Legend : U - final flag setting for installation]
[        : I - package is installed with flag     ]
[ Colors : set, unset                             ]
 * Found these USE flags for app-office/gnumeric-1.12.31:
 U I
 + + introspection            : Add support for GObject based introspection
 - - libgda                   : Enable database support through gnome-extra/libgda.
 - - perl                     : Enable perl plugin loader.
 + + python                   : Enable python plugin loader.
 + + python_targets_python2_7 : Build with Python 2.7
满足 REQUIRED_USE
一些 ebuild 需要或禁止 USE 标志的某些组合才能正常工作。 这通过放置在 REQUIRED_USE ,用一组条件来表示。此条件确保所有功能和依赖性都已完成,并且构建将成功并按预期执行。 如果任何一个不符合,emerge 会提醒你,并要求你解决这个问题。
下面是 REQUIRED_USE 的一个例子:
| 示例 | 描述 |
|---|---|
REQUIRED_USE="foo? ( bar )" |
如果设定 foo,则必须设定 bar。 |
REQUIRED_USE="foo? ( !bar )" |
如果设定 foo,则不得设定 bar。 |
| `REQUIRED_USE=“foo? ( | |
REQUIRED_USE="^^ ( foo bar baz )" |
必须在 foo、bar 或 baz 中设定一个。 |
| `REQUIRED_USE=” | |
REQUIRED_USE="?? ( foo bar baz )" |
Portage功能特性
Portage特性
Portage有几个附加的特性,它们能够令您的Gentoo之旅更加愉快。这些特性中的大多数依赖于某些能够提高性能、可靠性、安全性等的软件工具。
为了打开或者关闭某一Portage特性您需要编辑 /etc/portage/make.conf中的 FEATURES变量,这个变量包含不同的特性关键字,用空格分开。在一些情况下您可能还需要额外的安装被这个特性所依赖的工具。
并不是所有Portage所支持的特性都在这里列出。完整的概述,请查阅make.conf手册页:
# man make.conf
查看 FEATURES 的默认设置,运行emerge –info并且查找FEATURES变量或者用grep 显示它:
# emerge --info | grep ^FEATURES=
分布式编译
使用distcc
distcc 是一个分布式编译程序,可以把编译任务分配给同一网络中的不同机器,这些机器的配置不必完全相同。distcc客户端发送所有必须的信息给所有可利用的distcc服务器(运行distccd的机器)。这样它们每一个都能为客户端编译一部分源码。所获得的效果就是更短的编译时间。
您可以在Gentoo Distcc文档里找到更多的关于Distcc的信息(包括如何让它在Gentoo上工作)。
安装 distcc
Distcc使用一个图形化监视器来监视您的机器发送出去的编译工作。请把 USE=gnome 或 USE=gtk放进您的USE设置中。
# merge --ask sys-devel/distcc
激活Portage的distcc支持
将 distcc 添加到/etc/portage/make.conf中的 FEATURES </ var>变量中。 接下来,编辑MAKEOPTS变量,并增加系统允许的并行构建的数量。 一个已知的方法是填写 -jN 其中N 是运行distccd(包括当前主机)的CPU数量+1(或者核心数+1),但这只是一个建议。
现在运行 distcc-config并输入已有的DistCC服务器。作为一个简单例子,我们假设已有的DistCC服务器是192.168.1.102(当前主机)、192.168.1.103和192.168.1.104(两个远端服务器):
# distcc-config --set-hosts "192.168.1.102 192.168.1.103 192.168.1.104"
当然,也不要忘了运行distccd系统服务:
# rc-update add distccd default
# /etc/init.d/distccd start
缓冲编译结果
关于ccache
ccache是一个快速编译器缓存。 无论何时编译应用程序,它都将缓存中间结果,以便每当重新编译相同的程序时,编译时间大大减少。 第一次运行ccache时,它会比正常编译慢得多。 但是后续的重新编译应该更快。 ccache只有在相同的应用程序将被重新编译多次(或相同应用程序的升级频繁发生)时才有用; 因此它通常只对软件开发人员有用。
如果您对ccache的工作机制有兴趣,请访问homepage主页.
警告:已知ccache会导致大量的编译失败。 有时ccache会保留旧代码对象或损坏的文件,这可能导致无法破损的源码。 如果发生这种情况(例如"File not recognized: File truncated"出现在构建日志中),请尝试重新编译ccache导致错误的应用程序 。添加FEATURES="-ccache" 到/etc/portage/make.conf或者
# FEATURES="-ccache" emerge <category/package>
安装 ccache
要安装ccache,只需要:
# emerge --ask dev-util/ccache
激活Portage ccache 支持
打开 /etc/portage/make.conf并添加ccache到FEATURES变量:
FEATURES="ccache"
CCACHE_SIZE="2G"
要检查ccache是否运行,只需让它提供给您它的统计数据。因为Portage使用一个不同的ccache主目录,您需要设定CCACHE_DIR变量:
# CCACHE_DIR="/var/tmp/ccache" ccache -s
/var/tmp/ccache/是Portage的默认ccache主目录;为了修改这个设置,您可以设定/etc/portage/make.conf中的CCACHE_DIR参数。
不过,如果您运行 ccache ,它使用的默认目录是${HOME}/.ccache/。这就是为什么当您查询(Portage)ccache统计数据的时候您需要设定 CCACHE_DIR参数的原因。
非Portage编译中使用ccache
如果您需要在非Portage编译中使用ccache,添加 /usr/lib/ccache/bin/到您 PATH参数里靠前的位置(在/usr/bin之前)。这一点可以通过编辑在您用户主目录中的~/.bash_profile文件来实现。使用~/.bash_profile是定义 PATH参数的一个方式
PATH="/usr/lib/ccache/bin:${PATH}"
二进制包支持
创建预编译包
Portage 也支持安装预编译软件包。尽管 Gentoo 本身并不提供预编译包,但 Portage 依然能够处理预编译包。
如果某个包已经被安装在您的系统上,您可以用 quickpkg 来创建预编译包。也可以用带有 --buildpkg 或 --buildpkgonly 选项的 emerge 命令。
如果您希望 Portage 为您所安装的每一个软件包创建预编译软件包,那么请在 FEATURES 中添加 buildpkg 变量。
预编译包的更多扩展支持可以用 catalyst 得到。关于catalyst的更多信息请参阅 Catalyst FAQ。
安装预编译包
尽管Gentoo并不提供,但是您可以自己建立一个“中心仓库”来存放预编译包。如果您希望使用这个仓库,您需要设定PORTAGE_BINHOST参数使Portage能够知道它。例如,如果预编译包在 ftp://buildhost/gentoo 上:
# nano -w /etc/portage/make.conf
PORTAGE_BINHOST="ftp://buildhost/gentoo"
当您需要安装预编译包的时候,在emerge命令后的 --getbinpkg选项旁加入 --usepkg 选项。前者让emerge命令从预定的服务器上下载预编译包,后者让emerge首先试图安装预编译包,如果预编译包不存在,那么才下载并编译源码。
例如:用预编译包安装gnumeric
# emerge --usepkg --getbinpkg gnumeric
关于emerge的预编译包的更多信息请参阅emerge手册页:
# man emerge
将预构建的软件包分发给他人
如果预构建的软件要分发给其他人,请确保这样做是被允许的。 检查上游软件包的分发要求。 例如,对于在GNU GPL协议下发布的软件,源代码必须与二进制文件一起提供。
如果构建的二进制程序不可分发,则Ebuild可以在其RESTRICT 变量中定义 bindist限制。 有时,此限制取决于一个或多个USE标志。
默认情况下,Portage将不会屏蔽任何包,因为有限制。 这可以通过在/etc/portage/make.conf中设置ACCEPT_RESTRICT变量来全局更改。 例如,要掩盖具有bindist 限制的软件包,请将以下行添加到make.conf:
ACCEPT_RESTRICT="* -bindist"
还可以通过将ACCEPT_RESTRICT选项用于emerge命令,来覆盖--accept-restrict 变量。 例如, --accept-restrict=-bindist将临时屏蔽带有bindist 限制的包。
还可以考虑在分发包时设置ACCEPT_LICENSE变量。 请参阅 授权许可。
重要:每个 用户完全有责任遵守软件许可条款和每个用户国家的法律。 ebuilds(RESTRICT或LICENSE)定义的元数据变量可以为禁止预编译文件分发提供指导。但是Portage的输出或Gentoo开发人员的回答 不是 法律声明,不应该依赖他们。 谨慎遵守您的当地的法律。
下载文件
并行下载
Portage 通常是以root 用户运行的, FEATURES="userfetch"可以让Portage在下载源码包的时候弃用 root 权限,并以 portage:portage 的用户/组权限运行。这是一个小小的安全性的提高方法。
如果在 FEATURES 设置了 userfetch,请确保在 root 权限下,使用 chown 命令更改在 /var/db/repos/gentoo 下所有文件的所有者:
# chown --recursive --verbose portage:portage /var/db/repos/gentoo
验证源文件
要重新验证完整性并(可能)重新下载当前所有安装的软件包以前删除或损坏的 distfiles,请运行:
# emerge --ask --fetchonly --emptytree @world
环境变量
环境变量
简介
环境变量是一个具有特定名字的对象,它包含了一个或者多个应用程序所将使用到的信息。通过使用环境变量,你可以很容易的修改一个牵涉到一个或多个应用程序的配置信息。
重要的例子
下表展示了一些Linux系统使用的变量并说明了它们的用处。在表格后面将列举一些变量例值。
| Variable | Description |
|---|---|
| PATH | 这个变量包含了一系列由冒号分隔开的目录,系统就从这些目录里寻找可执行文件。如果你输入的可执行文件(例如 ls, rc-update或者 emerge)不在这些目录中,系统就无法执行它(除非你输入这个命令的完整路径,如/bin/ls)。 |
| ROOTPATH | 这个变量的功能和 PATH相同,但它只罗列出超级用户(root)键入命令时所需检查的目录。 |
| LDPATH | 这个变量包含了一系列用冒号隔开的目录,动态链接器将在这些目录里查找库文件。 |
| MANPATH | 这个变量包含了一系列用冒号隔开的目录,命令 man 会在这些目录里搜索man页面。 |
| INFODIR | 这个变量包含了一系列用冒号隔开的目录,命令 info 将在这些目录里搜索info页面。 |
| PAGER | 这个变量包含了浏览文件内容的程序的路径,比如(less 或者 more) |
| EDITOR | 这个变量包含了修改文件内容的程序(文件编辑器)的路径(比如 nano 或 vi). |
| KDEDIRS | 这个变量包含了一系列用冒号隔开的目录,里面放的是KDE相关的资料。 |
| CONFIG_PROTECT | 这个变量包含了一系列用空格隔开的目录,它们在更新的时候会被Portage保护起来。 |
| CONFIG_PROTECT_MASK | 这个变量包含了一系列用空格隔开的目录,它们在更新的时候不会被Portage保护起来。 |
下面你可以找到所有这些变量定义的范例:
PATH="/bin:/usr/bin:/usr/local/bin:/opt/bin:/usr/games/bin"
ROOTPATH="/sbin:/bin:/usr/sbin:/usr/bin:/usr/local/sbin:/usr/local/bin"
LDPATH="/lib:/usr/lib:/usr/local/lib:/usr/lib/gcc-lib/i686-pc-linux-gnu/3.2.3"
MANPATH="/usr/share/man:/usr/local/share/man"
INFODIR="/usr/share/info:/usr/local/share/info"
PAGER="/usr/bin/less"
EDITOR="/usr/bin/vim"
KDEDIRS="/usr"
CONFIG_PROTECT="/usr/X11R6/lib/X11/xkb /opt/tomcat/conf \
                /usr/kde/3.1/share/config /usr/share/texmf/tex/generic/config/ \
                /usr/share/texmf/tex/platex/config/ /usr/share/config"
CONFIG_PROTECT_MASK="/etc/gconf"
全局变量的定义
env.d目录
Gentoo采用了/etc/env.d/目录来集中定义全局变量。在这个目录里,你会发现很多类似 00basic, 05gcc等等这样的文件,它们包含了文件名中提到的应用程序需要的变量。
举个例子,当你安装 gcc时,一个名为 05gcc 的文件就会被ebuild所创建,里面包含了如下一些变量:
PATH="/usr/i686-pc-linux-gnu/gcc-bin/3.2"
ROOTPATH="/usr/i686-pc-linux-gnu/gcc-bin/3.2"
MANPATH="/usr/share/gcc-data/i686-pc-linux-gnu/3.2/man"
INFOPATH="/usr/share/gcc-data/i686-pc-linux-gnu/3.2/info"
CC="gcc"
CXX="g++"
LDPATH="/usr/lib/gcc-lib/i686-pc-linux-gnu/3.2.3"
其他的发行版会让你到/etc/profile或者其他地方修改和添加这些变量的定义。而Gentoo为用户(还有为Portage)提供了更加便捷的方式来维护和管理环境变量,以后你不再需要把精力放在那些众多的包含环境变量的文件身上了。
比如,当你更新完gcc 的时候, /etc/env.d/05gcc也会被同时更新,而不需要你手工来完成。
这不仅对Portage有益,作为用户,你也是受益者。有时候你需要设置某个系统范围的环境变量。我们拿http_proxy变量来做例子,为了避免http_proxy 搞乱,你只要新建一个文件/etc/env.d/99local然后添加你的定义:
http_proxy="proxy.server.com:8080"
通过使用同一个文件来定义你所有的变量,你对如何定义自己的变量有了个大概的了解。
env-update
/etc/env.d/ 中的好几个文件都定义了PATH变量。这并没有错:当你运行env-update的时候,它会在更新环境变量之前把这些定义都追加到PATH里,因此对于软件包(或者用户)来说将会很容易地设置他们自己的环境变量,而不影响到现有变量的值。
env-update 脚本会根据 /etc/env.d/ 里文件的字母顺序来附加变量的值。这些文件名必须要以两位数字开头。
00basic        99kde-env       99local
     +-------------+----------------+-------------+
PATH="/bin:/usr/bin:/usr/kde/3.2/bin:/usr/local/bin"
变量并不总是被串联起来,只有下列变量才会被串联: ADA_INCLUDE_PATH, ADA_OBJECTS_PATH, CLASSPATH, KDEDIRS, PATH, LDPATH, MANPATH, INFODIR, INFOPATH, ROOTPATH, CONFIG_PROTECT, CONFIG_PROTECT_MASK, PRELINK_PATH, PRELINK_PATH_MASK, PKG_CONFIG_PATH,和PYTHONPATH。对于( /etc/env.d/) 里的文件中按照字母顺序排列后)其他所有变量,最新定义的值才会被使用到。
可以通过将变量名添加到 COLON_SEPARATED or SPACE_SEPARATED (也在 /etc/env.d/ 文件)。
当你运行 env-update的时候,它会在文件/etc/profile.env 里(会被/etc/profile使用)创建所有的环境变量。它也会从变量 LDPATH 中获取信息用来建立/etc/ld.so.conf。这些完成以后,它将运行 ldconfig来重建动态链接器需要的文件/etc/ld.so.cache。
如果你想在运行env-update后立即看到效果,执行下面的命令来更新你的环境。自己安装过Gentoo的用户可能已经记住了这个安装指南中提到过的命令:
# env-update && source /etc/profile
附注:上面的命令只会更新你当前终端里的环境变量、新控制台以及它们的子程序。因此,假如你正在X11里工作,你要么在每一个你打开的终端里输入source /etc/profile ,要么重新启动X,这样所有新的终端才能引用到新的变量。如果你使用了登录管理器,登陆成root然后输入 /etc/init.d/xdm 。如果不是这样,你需要注销然后重新登录回X这样才能产生使用新变量值的子程序。
重要:你在定义其他变量时不能使用shell变量。这意味着这样的定义 FOO="$BAR"(此处$BAR 是另外一个变量)是不允许的。
本地变量的定义
特定用户
你并不是一直都想定义全局变量。比如你想把/home/my_user/bin和当前目录(你当前所在的目录)添加到PATH 变量中,但又不想让其他用户的PATH变量中也有这个。如果你想定义一个本地变量,可以使用 ~/.bashrc 或者~/.bash_profile:
PATH="${PATH}:/home/my_user/bin:"
当你重新登录的时候,你的PATH变量将被更新。
特定会话
有时候甚至需要更加严格的定义。你可能要使用一个你临时创建的目录里面的程序,而又不想输入它的路径或者为此短时间内内修改 ~/.bashrc。
在这种情况下,你只需要在当前会话中使用export来定义 PATH 变量。只要你不注销,PATH变量将保持这个临时的设置。
# export PATH="${PATH}:/home/my_user/tmp/usr/bin"
ebuild
Gentoo Development Guide Chinese
Ebuild 编写基本指南
一个 ebuild 文件是一个文本文件,供 Gentoo 包管理器使用,它标识一个特定的软件包以及 Gentoo 包管理器应该如何处理它。它使用一个 bash 类似语法风格,并通过 EAPI 版本进行标准化。
Gentoo Linux 使用 ebuild 作为单个软件的包管理格式。这些 ebuild 包含相关软件的元数据(软件的名称和版本、软件使用的许可证和主页)、依赖信息(构建时和运行时依赖)以及有关如何处理的说明使用软件(配置、构建、安装、测试…)。
Gentoo 中 ebuild 的默认位置是 /var/db/repos/gentoo/,该位置由repos.conf文件确定。自定义ebuild建议放在自定义库中,比如/var/db/repos/larry。
ebuild 也是运行各种 ebuild 函数 的 Portage 命令。通过运行以下命令在本地找到相关信息:
# man 1 ebuild
# man 5 ebuild
实时 ebuild
如果源代码是从修订控制系统 (VCS) 获取的,那么此 ebuild 就是“实时 ebuild”。它们往往(但不一定)具有版本号 9999,以便可以轻松将其与基于上游版本的普通 ebuild 区分开来。
如果 ebuild 有一个变量 PROPERTIES,其中的值是“live”,那么它就是“实时的”。如果一个 ebuild 继承了一个 VCS eclass(例如 git-r3、mercurial、darcs),它将是实时的,因为这些 eclass 中有一行 PROPERTIES+="live"。
在 packages.gentoo.org 站点中,实时 ebuild 具有标志 L 。在 eix 的输出中,它用 *l 标记。
如何创建一个 ebuild
vim 的用户自动获取基本骨架(由 app-vim/gentoo-syntax 提供):
# vim ./foobar.ebuild
模板
# Copyright 1999-2022 Gentoo Authors
# Distributed under the terms of the GNU General Public License v2

EAPI=7

DESCRIPTION=""
HOMEPAGE=""
SRC_URI=""

LICENSE=""
SLOT="0"
KEYWORDS="~amd64 ~x86"
IUSE=""

DEPEND=""
RDEPEND="${DEPEND}"
BDEPEND=""
GNU Emacs 或 XEmacs 用户可以使用类似的工具(分别由 app-emacs/ebuild-mode 或 app-xemacs/ebuild-mode 提供)。
其他编辑器的用户从 skel.ebuild 手动复制:
# cp /var/db/repos/gentoo/skel.ebuild ./foobar.ebuild
应该知道新包的基本信息,并将其添加到 ebuild-defined variables。
给定源压缩包示例
为 Scrub 创建一个 ebuild:
# mkdir -p /var/db/repos/larry/app-misc/scrub
# cd $_
# vim ./scrub-2.6.1.ebuild
模板
# Copyright 1999-2022 Gentoo Authors
# Distributed under the terms of the GNU General Public License v2

EAPI=7

DESCRIPTION="Some words here"
HOMEPAGE="https://github.com/chaos/scrub"
SRC_URI="https://github.com/chaos/scrub/releases/download/2.6.1/scrub-2.6.1.tar.gz"

LICENSE="GPL-2"
SLOT="0"
KEYWORDS="~amd64 ~x86"
IUSE=""

DEPEND=""
RDEPEND="${DEPEND}"
BDEPEND=""
允许在SRC_URI中使用${PN} variable,但不建议。虽然它可能会缩小这条线,但一些 reasoning why not to use it也值得考虑。
SRC_URI="https://github.com/chaos/${PN}/releases/download/${PV}/${P}.tar.gz"
可以使用ebuild命令来测试它:
# ebuild ./scrub-2.6.1.ebuild clean unpack
这应该下载并解压源压缩包。在极少数情况下,包应该可以工作,并且不需要在 ebuild 中进一步调整。
打补丁
如果源代码需要打补丁,可以从 patches文章中解释的解压源代码创建补丁。
补丁将被列在一个名为PATCHES的数组中,正如devmanual中所解释的那样。
PATCHES=(
	"${FILESDIR}"/${P}-foo.patch
	"${FILESDIR}"/${P}-bar.patch
)

src_prepare() {
    default
    ...
}
初探 ebuild
2015-10-05
无论你使用过多少/多久其他的 Linux 发行版,初次接触 Gentoo 时,极有可能会觉得它在软件包的安装方面很神奇。若要在 Gentoo 中安装一个软件包,通常要定义如何进行软件源代码包的下载、解包、打补丁、编译、安装以及合并。为了实现对软件包进行细微的定制,还需要定义一些有用的元数据(即 USE 旗标)、补丁文件以及一些操控软件包编译与安装的过程。Gentoo 是通过 GNU Bash shell 脚本来定义这一切,这种脚本就是所谓的 ebuild 文件。
ebuild 在哪里?
我们在安装 Gentoo 时,一个必须的步骤是下载一个 Portage 树的镜像包,解包后通常安置于 /var/db/repos/gentoo 目录,之后每次执行 emerge --sync 时,便会根据官方远程网站上的 Portage 树来更新你本地的 Portage 树。
粗枝大叶的看,Portage 树有四层结点。根结点便是 /var/db/repos/gentoo 目录,第 2 层结点是软件包所属分类目录,第 3 层结点是软件包的名称目录,叶子结点则是 ebuild 文件以及其他辅助性文件或目录。以 gnome-shell-3.12.2.ebuild 文件为例,它在 Portage 树中的完整路径是 /var/db/repos/gentoo/gnome-base/gnome-shell/gnome-shell-41.1.ebuild。
对于我们期望的软件包,如果 Portage 树未提供针对它的 ebuild 文件,那么我们需要自己动手丰衣足食。一般是不建议将我们所写的 ebuild 文件放在 Portage 树中的,因为它们可能会在 emerge --sync 期间被冲刷(比如被官方的同名文件替换)。
Portage 树支持一种被称为 Overlay 的技术。简单来说,就是我们可以另行建立一棵新的 Portage 树,这棵树的规模虽然比官方的 Portage 树小很多,但是 Portage 树的管理系统可以将这可新的 Portage 树与官方 Portage 树『合并』。如果新的 Portage 树中某些结点与官方的 Portage 树存在重叠,那么 Portage 树的管理系统会以前者覆盖后者,因此我们新建的 Portage 树通常被直呼为『Overlay』。
建立自己的 Overlay
在 /var/db/repos/ 目录中创建自己的 Overlay:
# mkdir -p /var/db/repos/localrepo/{metadata,profiles}
# chown -R portage:portage /var/db/repos/localrepo
在该 /var/db/repos/localrepo/profiles/ 内添加 repo_name 文件。我们可以在这份文件中设置 Overlay 名称,只需将 Overlay 名称写入该文件即可。例如,我将我的 Overlay 命名为 localrepo:
# echo 'localrepo' > /var/db/repos/localrepo/profiles/repo_name
为了让我们的 Overlay 能够被 Portage 管理系统所接受,需要在 /var/db/repos/localrepo/metadata/layout.conf 内添加:
masters = gentoo
auto-sync = false
需要将 Overlay 路径告知 Portage 管理系统,即在 /etc/portage/repos.conf/localrepo.conf 文件中添加以下代码:
[localrepo]
location = /var/db/repos/localrepo
今后,就在这个 Overlay 中学习 ebuild 文件的编写。
Hello World!
下面通过写一个非常简单的 ebuild 文件来获取一些直观的认识。假设在 app-misc 这个分类中有一个名为 hello-world 的软件包,现在我们要为这个软件包的 1.0 版的安装写一份 ebuild 文件。
注意:软件包的分类名并不是随意的,它必须要与
/var/db/repos/gentoo中的某个子目录名一致。
首先在 Overlay 中建立软件包所在的分支:
# mkdir -p /var/db/repos/localrepo/app-misc/hello-world
可从 /var/db/repos/gentoo/header.txt 文件中获得 ebuild 文件默认的文件头,即:
# Copyright 2021 Gentoo Authors
# Distributed under the terms of the GNU General Public License v2
只不过是一些 Bash 脚本注释形式的文件描述信息而已,但它们是必须的。可以直接将 /var/db/repos/gentoo/header.txt 文件复制为 hello-world-1.0.ebuild 文件,这样便可获得一个含有上述内容的空 ebuild 文件。ebuild 文件的名称必须符合 Portage 所认可的格式,即:软件包名称-版本号.ebuild。这一点很重要。
# cp /var/db/repos/gentoo/header.txt /var/db/repos/localrepo/app-misc/hello-world/hello-world-1.0.ebuild
下面,为这份 ebuild 文件增加以下内容:
SLOT="0"
这样,我们便建立了一份最为简单的 ebuild 文件。接下来就是在这份文件上签个字……也就是为之生成一份签名文件,表示这个 ebuild 的是我们做的,出了事我们负责。
# cd /var/db/repos/localrepo/app-misc/hello-world
# ebuild ./hello-world-1.0.ebuild manifest
若签名成功,会在 ebuild 文件同一目录中生成一份名为 Manifest 的文件。将来发布这份 ebuild 文件时,需要将数字签名文件一起发出,这样他人便可以验证这份 ebuild 是不是我们做的。因为非常有可能我们在向朋友们发送 ebuild 文件的过程中会被坏人拦截,然后篡改 ebuild 文件。由于 ebuild 是可被系统执行的脚本,因此很有可能变成『病毒』。因此,ebuild 文件的数字签名非常有必要。不过,这里为了简单起见,没有涉及如何用自己的密钥实现对 ebuild 的签名,所得 Manifest 文件仅仅是为了让 ebuild 能够被 Portage 管理系统所认可。
下面,继续向这份 ebuild 加入一些内容,使之变为:
# Copyright 2021 Gentoo Authors
# Distributed under the terms of the GNU General Public License v2

EAPI="7"
SLOT="0"
DESCRIPTION="A classical example to use when starting on something new."
HOMEPAGE="http://wiki.gentoo.org/index.php?title=Basic_guide_to_write_Gentoo_Ebuilds"

LICENSE="MIT"
KEYWORDS="~alpha ~amd64 ~arm ~hppa ~ia64 ~ppc ~ppc64 ~s390 ~sh ~sparc ~x86"
基本上就是在原来那份最简单的 ebuild 文件的基础上增加了几个变量:
EAPI:Portage 系统已经为我们编写了许多有用的 Bash 函数,将EAPI的值设为7表示我们要用目前最新的 Bash 函数。这个变量必须要在 ebuild 文件头之后进行设定。DESCRIPTION:这个变量存储了hello-world这个软件包的简介信息。HOMEPAGE:定义了hello-world这个软件包的项目主页。LICENSE:定义了hello-world这个软件包所使用的许可证,例如 LGPL,GPL V2,GPL V3,MIT 等。KEYWORDS:如果你期望hello-world这个软件包能够安装在你的机器上,那么KEYWORDS变量的值必须要包含你在/etc/make.conf中所设定的ACCEPT_KEYWORDS值。
一旦改动了 ebuild 文件内容,那么必须重新生成 Manifest 文件:
# ebuild ./hello-world-1.0.ebuild manifest
现在,便可以使用 emerge 命令安装这个目前依然是子虚乌有的软件包了。
# emerge -a hello-world

These are the packages that would be merged, in order:

Calculating dependencies... done!
[ebuild  N    ~] app-misc/hello-world-1.0::localrepo  0 KiB

Total: 1 package (1 new), Size of downloads: 0 KiB
虽然到现在为止,还是什么也没有做出来,但是看着 emerge 神奇的发现了我写的 ebuild,心底还是蔓生了一些幸福。
emerge 与 ebuild 有什么联系?
简单的说,就是 emerge 这个 Python 脚本会调用 ebuild.sh 这个 Bash 脚本,让后者去执行 ebuild 文件定义的软件包的下载、编译及安装过程。
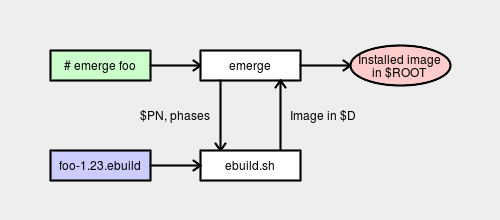
ebuild.sh 所操控的软件包安装过程是在一个沙箱(Sandbox)中进行的。这一过程结束后,emerge 脚本需要将沙箱中的成果转移到真实世界,即 / 目录。
SLOT
SLOT, 即「槽」, 和具体某个包相关的概念, 是Gentoo实现多版本共存的基础。
0 是默认的slot名, 表示没有使用slot;
slot名是空字符串表示彻底禁止使用slot;
带有slot的包, 包名后面会有:冒号分隔, 并带上slot, 如:
dev-python/dnspython-1.12.0-r200:py2
dev-python/dnspython-1.12.0-r300:py3
表示dnspython这个包分别有py2和py3两个slot。
相关的一些命令:
eix 可以直接查看包的所有slot:
$ eix dnspython
* dev-python/dnspython
     Available versions:
     (py2)  1.12.0-r200
     (py3)  1.12.0-r300
       {examples test PYTHON_TARGETS="python2_7 python3_3 python3_4"}
     Homepage:            http://www.dnspython.org/ https://pypi.python.org/pypi/dnspython
     Description:         DNS toolkit for Python
equery list -p:
$ equery l -po dnspython
 * Searching for dnspython ...
[-P-] [  ] dev-python/dnspython-1.12.0-r200:py2
[-P-] [  ] dev-python/dnspython-1.12.0-r300:py3
[-P-] [ ~] dev-python/dnspython-1.12.0-r301:py3
equery keywords:
$ equery keywords dnspython
Keywords for dev-python/dnspython:
            |                                 | u     |
            | a a   a         n   p r     s   | n     |
            | l m   r h i m m i   p i s   p   | u s   | r
            | p d a m p a 6 i o p c s 3   a x | s l   | e
            | h 6 r 6 p 6 8 p s p 6 c 9 s r 8 | e o   | p
            | a 4 m 4 a 4 k s 2 c 4 v 0 h c 6 | d t   | o
------------+---------------------------------+-------+-------
1.12.0-r200 | + + + ~ + + o o o + + o ~ ~ + + | o py2 | gentoo
------------+---------------------------------+-------+-------
1.12.0-r300 | + + + ~ + + o o o + + o ~ ~ + + | o py3 | gentoo
1.12.0-r301 | ~ ~ ~ ~ ~ ~ o o o ~ ~ o ~ ~ ~ ~ | o     | gentoo
真实的 Hello World!
在一个遥远的地方,真的存在着 hello-world 的源码包。我们只要通过 ebuild 文件将这个源码包的位置告诉 ebuild.sh 脚本,ebuild.sh 便会不远万里将其擒来。所以,我们需要在 hello-world-1.0.ebuild 文件中添加以下内容:
SRC_URI="https://gitlab.com/alogim/gentoo-basic-ebuild/-/raw/master/update1/hello-world-1.0.tar.gz?inline=false"
SRC_URI 这个变量便是存储源码包的下载地址的。
在重新生成 Manifest 时,ebuild.sh 便会自动将源码包下载到 /var/cache/distfiles/ 目录,并为这个源码包也生成一个数字签名存储在 Manifest 文件中。
既然有了 hello-world 的源码包,那么下一步就该思考如何在 ebuild 文件中定义这个源码包的编译过程了。不过,解开刚才下载的 hello-world-1.0.tar.gz 包看一下,发现包里只有一份 Bash 脚本 hello-world,其内容为:
#!/bin/sh

echo "Hello world!"
所以,这个源码包就没必要编译了,直接安装到系统中即可。从而,我们在 ebuild 文件中获得了第一次编写 ebuild 函数的机会。在现有的 hello-world-1.0.ebuile 的文件中继续添加以下内容:
src_install() {
    dobin hello-world
}
src_install 是 ebuild.sh 脚本能够识别并执行的函数名。也就是说,从 ebuild.sh 脚本的角度来看,你若想让我替你将软件包安装至系统中,那么你必须得按照我的习惯来。我的习惯就是在你提供给我的 ebuild 文件中寻找 src_install 这个函数,如果有这个函数,我就执行它,否则我就什么也不做。这就是 ebuild.sh 与 ebuild 文件之间达成的一个约定。
现在我们在 ebuild 文件中向 ebuild.sh 提供了 src_install 这个函数。这个函数只包含一条命令:dobin hello-world 。这个命令的意思是为 hello-world 这个脚本设置可执行权限,然后将其安装至系统默认的可执行文件目录中,即 /usr/bin 目录。
src_install 只是 ebuild.sh 与 ebuild 文件之间众多约定函数中的一个而已,并且这些约定函数是顺次被 ebuild.sh 执行的,如下图所示:

这里存在一个问题,hello-world 这个 Bash 脚本是包含在 hello-world-1.0.tar.gz 这个包内的,而我们只在 hello-world-1.0.ebuild 文件中定义了 src_install 函数,那么 hello-world-1.0.tar.gz 何时被解包的呢?这个问题的答案是,Portage 管理系统中已经为这些约定的函数定义了默认行为。比如,用于为源码包解包的 src_unpack 函数,其默认的定义是:
src_unpack() {
    if [ "${A}" != "" ]; then
        unpack ${A}
    fi
}
如果在 ebuild 文件中没有重新定义 src_unpack 函数,那么 ebuild.sh 便会按照上面图示的管线调用默认的 src_unpack 函数。所以 hello-world 脚本得以从 hello-world-1.0.tar.gz 中解出。
对现在的 hello-world-1.0.ebuild 再次生成 Manifest,然后就可以用它将 hello-world 脚本安装至 /usr/bin 目录中了。
这就是我们用自己写的 ebuild 安装的第一个『软件包』。
ebuild repository
An ebuild repository, colloquially known as an overlay, is a structure of directories and files used to add and extend software packages for a Gentoo-based system.
Ebuild repositories contain ebuilds, eclasses, and other types of descriptive metadata files. These files inform the package manager of software available for installation, news items, and profile targets. An ebuild repository should conform to one or more Ebuild APIs as detailed in Gentoo’s Package Manager Specification.
The Gentoo ebuild repository, as Gentoo’s primary and “official” repository, is the source for all the information needed to build and install Gentoo packages, contained in ebuilds.
Administrators of Gentoo systems can add additional ebuild repositories by using various utilities and methods described below.
The Gentoo ebuild repository
The Gentoo ebuild repository will sometimes be called by shorter, or even colloquial, names, such as the Gentoo repository, the Gentoo repo, ::gentoo, gentoo.git, or occasionally just the “repo”. It was historically known within the Gentoo community as the Portage tree, rsync tree, or sometimes just “the tree”.
Repositories in general
Repositories are handled through /etc/portage/repos.conf (which, like many other Portage configuration locations, can be a file or a directory), and the eselect repository is is a tool to manage this configuration.
Repository definitions inside /etc/portage/repos.conf also inform Portage if and how the repository can be updated. With it, calling emaint sync –auto will automatically update the enabled repositories as well.
A deprecated, yet still supported method is to use the PORTDIR_OVERLAY variable inside /etc/portage/make.conf. This variable can point to one or more additional locations on the file system where additional repositories are available. The use of the /etc/portage/repos.conf/ directory is highly preferred.
For more information, see /etc/portage/repos.conf and the Portage/Sync article.
Priorities
Ebuilds from repositories with higher priority numbers (for example 60) will take precedence over ebuilds from repositories with lower priorities (such as 50).
The list of ebuild repositories with their priorities can be obtained through the output of the following commands (look for the “Repositories” string):
# emerge --info --verbose
# portageq repos_config /
The Gentoo ebuild repository will have a priority of -1000 which means that all other repositories generally take precedence if they are assigned a higher priority. This is the default behaviour, because ebuild repositories are designed to “lay over” or “on top” of the Gentoo repository. To set the priority of other repositories, manually edit the relevant repos.conf section and set priority = to the desired value. For example:
# nano -w /etc/portage/repos.conf/eselect-repo.conf

[guru]
location = /var/db/repos/guru
sync-type = git
sync-uri = https://github.com/gentoo-mirror/guru.git
priority = 100
Repositories that do not have a priority set default to 0.
Repository synchronization
Repository synchronization is generally managed with the emaint sync command. See the Portage sync article, and man emaint for information on how to use the portage synchronization commands.
The emerge –sync command is now only a compatibility command, calling the emaint module. eix-sync is a wrapper using emerge –sync, followed by eix-update. For further details see the Eix article and man eix.
The emerge-webrsync tool can be used to download and install the daily Gentoo Repository snapshot. This may help with firewall restrictions.
Repository management tools
eselect-repository
eselect repository maintains /etc/portage/repos.conf entries for Portage to access and synchronize.
Layman
eselect repository supersedes layman for most uses.
Usage
Emerging a duplicate package
When working with ebuild repositories it is possible to encounter a situation where multiple versions of the same package are available from different ebuild repositories. Instruct Portage to install a specific package from a specific ebuild repository with the :: version specifier:
# emerge --ask category/atom::repository-name
The same notation can be used for different emerge instructions, including uninstalling a package through --depclean.
Best practices
Cache generation
When large ebuild repositories are installed, Portage may take a long time to perform operations like dependency resolution. This is because ebuild repositories do not usually contain a metadata cache.
Generate a local metadata cache by running emerge –regen after syncing the ebuild repositories:
# emaint sync --allrepos
# ( ulimit -n 4096 && emerge --regen )
Be careful, because emerge –regen takes a lot of time and it’s not recommended for rsync users as rsync updates the cache using server-side caches (most of users of portage are rsync users). Rsync users should simply run emerge –sync (or eix-sync) to regenerate the cache. It’s probably only users of very large ebuild repositories should try emerge –regen.
Masking enabled ebuild repositories
When using large ebuild repositories or those with unknown/low quality code, it is best practice to hard mask the whole ebuild repository and only accept specific ebuilds on a case-by-case basis. For example, for an overlay named “repository-foobar”:
# nano -w /etc/portage/package.mask/repository-foobar
*/*::repository-foobar
Then add the specific package(s) from the repository-foobar overlay so that they will be available visible to Portage for installation:
# nano -w /etc/portage/package.unmask/bar
foo-category/bar::repository-name
After the above unmask the package named “foo-category/bar” should be available and none of the other packages from the repository-foobar overlay will be available, which is by design.
Gentoo on ZFS
备份
初始化硬盘
这里的初始化硬盘是为了将原来的数据全部清除并且重新建立LUKS和文件系统。出于安全的考虑,备份不应该直接在硬盘上分区创建文件系统后备份在上面,应该做一层加密再去创建文件系统和备份。
将硬盘插入需要备份的电脑上
查看新增的设备
$ fdisk -l
Disk /dev/sda: 232.9 GiB, 250055122432 bytes, 488388911 sectors
Disk model: 00AAJS-00B4A0
Units: sectors of 1 * 512 = 512 bytes
Sector size (logical/physical): 512 bytes / 512 bytes
I/O size (minimum/optimal): 512 bytes / 512 bytes
Disklabel type: dos
Disk identifier: 0x80f01a9c

Device     Boot Start       End   Sectors   Size Id Type
/dev/sda1        2048 488388910 488386863 232.9G 83 Linux
这里可以看到新添加的磁盘,上面是有以前的东西,这里为了安全起见用随机数据覆盖掉这个分区。 这里会清除可能存在的任何没有加密的旧数据,如果遭受攻击这会让攻击者更难确定数据位置,这一步会很慢(取决于你的接口速度和硬盘速率)。
$ sudo dd if=/dev/urandom of=/dev/sda bs=1M status=progress && sync
完成之后,我们需要重新对这个硬盘进行分区
$ sudo fdisk /dev/sda

Welcome to fdisk (util-linux 2.35.2).
Changes will remain in memory only, until you decide to write them.
Be careful before using the write command.


Command (m for help): n
Partition type
   p   primary (0 primary, 0 extended, 4 free)
   e   extended (container for logical partitions)
Select (default p):

Using default response p.
Partition number (1-4, default 1):
First sector (2048-488388910, default 2048):
Last sector, +/-sectors or +/-size{K,M,G,T,P} (2048-488388910, default 488388910):

Created a new partition 1 of type 'Linux' and of size 232.9 GiB.

Command (m for help): w
The partition table has been altered.
Calling ioctl() to re-read partition table.
Syncing disks.
这样就创建了一个分区,接下来我们要在这个分区上创建LUKS
创建 LUKS
我们这里可以使用cryptsetup这个命令来初始化我们的LUKS分区
如果你没有这个命令可以运行这条命令进行安装:
$ emerge -av cryptsetup
然后初始化分区
$ sudo cryptsetup luksFormat /dev/sda1
WARNING!
========
This will overwrite data on /dev/sda1 irrevocably.

Are you sure? (Type 'yes' in capital letters): YES
Enter passphrase for /dev/sda1:
Verify passphrase:
这里会提示这个操作将会将这个分区里面的内容全部删掉,输入大写的YES确认,然后输入两次密码,注意密码是没有回显的。
打开 LUKS 和创建文件系统
现在是LUKS已经做好了,但是我们还需要在上面格式化分区才能够挂载使用,我们首先要打开LUKS分区:
$ sudo cryptsetup luksOpen /dev/sda1 backup
Password:
Enter passphrase for /dev/sda1:
我这里是想打开这个LUKS卷,为了区分和其他的我给这个名字叫做backup,然后会提示你输入LUKS的密码,正确输入之后就可以在/dev/mappaer下面看到一个backup的设备了
现在对这个分区进行格式化,这次用的是ext4的分区
$ sudo mkfs.ext4 -v /dev/mapper/backup
创建挂载点和挂载
在完成了分区初始化之后我们还需要创建一个挂载点用于挂载这个备份的分区:
$ sudo mkdir -pv /backup
挂载分区:
$ sudo mount -v /dev/mapper/backup /backup
备份系统
下载就可以备份系统了,这次使用的是rsync工具来进行备份系统:
$ sudo rsync -aAXv --exclude={"/dev/*","/proc/*","/sys/*","/tmp/*","/run/*","/mnt/*","/media/*","/lost+found","/backup/*","/swapfile"} / /backup
这里使用的-aAXv选项的意思是:文件将会以归档模式传输,保留符号设备,文件权限,修改时间,ACL和扩展属性,并且将备份的过程打印在屏幕上。
--exclude就是排除特定的文件类似于/dev、/proc之类的,/backup是我们的备份分区不需要再去搞一份防止出现奇奇怪怪的后果。
这会耗费很多时间可以休息一下做其他的事情。
等待这个备份完成之后我们就可以卸载这块硬盘进行保存了。
卸载挂载点
$ umount /backup
关闭LUKS分区
$ cryptsetup luksClose backup
迁移到 ZFS
分区
首先我需要把之前的分区全部干掉,然后创建如下表的分区:
| 分区 | 文件系统 | 大小 |
|---|---|---|
| /dev/nvme0n1p1 | fat32 | 128M |
| /dev/nvme0n1p2 | swap | 64G |
| /dev/nvme0n1p3 | ZFS | ALL |
直接在系统里面丢swapfile是不合理的,最好是有个单独的分区给swap。
初始化分区
创建完成分区之后我们还需要对分区进行初始化:
$ mkfs.vfat -F32 /dev/nvme0n1p1
$ mkswap /dev/nvme0n1p2
创建 pool
这里需要注意一点是像是我们之前分区的/dev/nvme0n这种设备或者是/dev/sda这样的,如果插拔U盘之类的可能盘序会发生变化,但是ZFS池是不会意识到这个变化的,这样就会产生zfs池不可用的问题,我们需要一些方法来获取到磁盘的id并以此来创建我们的zfs池。
$ ls -l /dev/disk/by-id
lrwxrwxrwx 1 root root 13 Feb 13 12:29 nvme-KXG50PNV2T04_KIOXIA_Y9IS103FTHDM -> ../../nvme0n1
lrwxrwxrwx 1 root root 15 Feb 13 12:32 nvme-KXG50PNV2T04_KIOXIA_Y9IS103FTHDM-part1 -> ../../nvme0n1p1
lrwxrwxrwx 1 root root 15 Feb 13 12:29 nvme-KXG50PNV2T04_KIOXIA_Y9IS103FTHDM-part2 -> ../../nvme0n1p2
KXG50PNV2T04_KIOXIA_Y9IS103FTHDM-part3 -> ../../nvme0n1p3
...
这里的KXG50PNV2T04_KIOXIA_Y9IS103FTHDM就是我们的硬盘,nvme-KXG50PNV2T04_KIOXIA_Y9IS103FTHDM-part1就是我们创建作为未来的/boot分区。
当我们创建zfs池的时候尽可能选择用这种id的方式去创建。现在我们创建一个加密的zpool:
$ zpool create -f -o ashift=12 -o cachefile=/etc/zfs/zpool.cache -O compression=lz4 -O xattr=sa -O relatime=on -O acltype=posixacl -O dedup=off -O encryption=on -O keyformat=passphrase -m none -R /mnt/gentoo rock /dev/disk/by-id/nvme-eui.000000000000001000080d0200600f01-part3
ashift=ashift: Pool sector size exponent, to the power of 2 (internally referred to as ashift). The typical case for setting this property is when performance is important and the underlying disks use 4KiB sectors but report 512B sectors to the OS (for compatibility reasons); in that case, set ashift=12 (which is 1«12 = 4096).cachefile=path|none: Controls the location of where the pool configuration is cached. Setting this property caches the pool configuration in a different location that can later be imported withzpool import -c.
根据提示输入密码(注意密码不会有回显,并不是键盘坏了)。
这条命令创建了一个名为 rock的zfs池 使用的压缩算法为lz4。
如果说你想创建一个不带加密的zpool可以去掉-O encryption=on -O keyformat=passphrase这两个选项。
创建 datasets
接下来我们要创建自己的rootfs,并且在上面打开加密功能:
$ zfs create -o mountpoint=none -o canmount=off rock/os
$ zfs create -o mountpoint=/ rock/os/gentoo
安装系统
这次安装系统的话,是打算直接从硬盘恢复的,首先插上备份好的硬盘:
$ fdisk -l
........
Disk /dev/sdc: 232.88 GiB, 250055122432 bytes, 488388911 sectors
Disk model: 00AAJS-00B4A0
Units: sectors of 1 * 512 = 512 bytes
Sector size (logical/physical): 512 bytes / 512 bytes
I/O size (minimum/optimal): 4096 bytes / 33553920 bytes
Disklabel type: dos
Disk identifier: 0x80f01a9c

Device     Boot Start       End   Sectors   Size Id Type
/dev/sdc1        2048 488388910 488386863 232.9G 83 Linux
这里看到我们的备份硬盘。我们要创建一个目录用来挂载这个分区:
$ mkdir -pv /backup
打开LUKS分区:
$ cryptsetup luksOpen /dev/sdc1 backup
Enter passphrase for /dev/sdc1:
输入之前设置的密码。挂载分区:
$ mount -v /dev/mapper/backup /backup
还有一个分区我们要注意一下就是/boot分区,创建boot分区的挂载点:
$ mkdir -pv /mnt/gentoo/boot
挂载分区:
$ mount -v /dev/nvme0n1p1 /mnt/gentoo/boot
将所有文件同步到zfs的dataset里面:
$ rsync -aAXv --exclude={"/dev/*","/proc/*","/sys/*","/tmp/*","/run/*","/mnt/*","/media/*","/lost+found","/backup/*","/swapfile"} /backup/ /mnt/gentoo
这个复制需要一定的时间,耐心等待完成,期间不要断开硬盘或者是拔掉电源。
chroot
等到复制原来的系统完成之后我们就需要进入chroot环境,然后完成其他的必要配置了。
拷贝ZFS池缓存文件:
$ mkdir -pv /mnt/gentoo/etc/zfs
$ cp -v  /etc/zfs/zpool.cache /mnt/gentoo/etc/zfs
拷贝网络的DNS:
$ cp --dereference /etc/resolv.conf /mnt/gentoo/etc/
挂载必要的文件系统:
$ mount --types proc /proc /mnt/gentoo/proc
$ mount --rbind /sys /mnt/gentoo/sys
$ mount --make-rslave /mnt/gentoo/sys
$ mount --rbind /dev /mnt/gentoo/dev
$ mount --make-rslave /mnt/gentoo/dev
我们不是在官方的Livecd下面还需要执行:
$ test -L /dev/shm && rm /dev/shm && mkdir /dev/shm
$ mount --types tmpfs --options nosuid,nodev,noexec shm /dev/shm
$ chmod 1777 /dev/shm
进入chroot:
$ chroot /mnt/gentoo /bin/bash
$ source /etc/profile
$ export PS1="(chroot) $PS1"
ZFS 安装和配置
首先是要给原来的系统安装上ZFS的支持,确保内核打开了Zlib的支持:
General Architecture Dependent Options --->
  GCC plug ins  --->
    [ ]   Randomize layout of sensitive kernel structures
Cryptographic API --->
  <*> Deflate compression algorithm
Security options  --->
  [ ] Harden common str/mem functions against buffer overflows
我们还需要调整portage让ZFS包接收测试分支的包:
$ echo "sys-fs/zfs-kmod ~amd64" >> /etc/portage/package.accept_keywords/zfs-kmod
$ echo "sys-fs/zfs ~amd64" >> /etc/portage/package.accept_keywords/zfs
如果你想要使用实时的包可以:
$ echo "=sys-fs/zfs-kmod-9999 **" >> /etc/portage/package.accept_keywords/zfs-kmod
$ echo "=sys-fs/zfs-9999 **" >> /etc/portage/package.accept_keywords/zfs
但是不推荐用最新的,要到处找patch。
安装ZFS:
$ emerge -av zfs
有一个很重要的点,每次更新内核或者是编译内核之后最好是重新构建一下模块,否则有可能遇到zpool无法正常初始化的问题:
$ emerge -va @module-rebuild
将zfs加入到开机启动项和对应的启动级别:
$ systemctl enable zfs.target
$ systemctl enable zfs-import-cache
$ systemctl enable zfs-mount
$ systemctl enable zfs-import.target
生成和验证zfs hostid文件,这个文件是用于genkernel生成initramfs和zfs导入池的时候验证完整性时候需要的:
$ zgenhostid
$ file /etc/hostid
Bootload fstab and Initramfs
GRUB
修改grub的配置文件,内容如下:
GRUB_CMDLINE_LINUX="dozfs root=ZFS=rock/os/gentoo"
安装bootload:
$ grub-install --target=x86_64-efi --efi-directory=/boot --bootloader-id=Gentoo
生成配置文件:
$ grub-mkconfig -o /boot/grub/grub.cfg
fstab
挂载的工作这次交给zfs来去完成,我们这里还需要修改一下fstab
首先查看分区的id:
$ blkid
/dev/nvme0n1p1: UUID="129F-3405" BLOCK_SIZE="512" TYPE="vfat" PARTUUID="537bd932-cc1f-5643-a297-feebaeb6a5ea"
/dev/nvme0n1p2: LABEL="rock" UUID="7999529021869478878" UUID_SUB="11607083434113154920" BLOCK_SIZE="4096" TYPE="zfs_member" PARTUUID="d68d6b86-a407-4141-a1a7-1379cbe1e049"
可以看到我们的/boot分分区UUID是129F-3405,现在可以修改/etc/fstab
$ nano -w /etc/fstab
内容如下
# /dev/nvme0n1p1
/dev/nvme0n1p1      	/boot     	vfat      	rw,relatime,fmask=0022,dmask=0022,codepage=437,iocharset=iso8859-1,shortname=mixed,errors=remount-ro	0 2
initramfs
重新生成initramfs,之前的initramfs没有zfs的支持这次要加上,为了保证工作正常还需要将genkrenel切换到testing分支
$ echo "=sys-kernel/genkernel-9999 **" > /etc/portage/package.accept_keywords/genkernel
更新genkernel
$ emerge -av genkernel
重新生成initramfs文件
$ genkernel initramfs --zfs --compress-initramfs
重启
在重启验证之前我们需要先做一些清理工作
首先退出chroot环境
$ exit
卸载备份分区
$ umount -R /backup
关闭backup卷
$ cryptsetup luksClose backup
然后就可以重启啦
$ reboot
重启之后第一次可能还是没办法正常进入系统,需要进入到shell里面导入一下zpool
$ zpool import -f rock
设置一下分区挂载点
$ zfs set mountpoint=/ rock/os/gentoo
然后再重启一下就可以正常进入系统了。
使用ZFS备份
创建备份ZFS池
首先进入livecd,查看设备:
$ fdisk -l
Disk /dev/nvme0n1: 1.86 TiB, 2048408248320 bytes, 4000797360 sectors
...

Disk /dev/sda: 233.76 GiB, 251000193024 bytes, 490234752 sectors
...

Disk /dev/sdc: 57.81 GiB, 62075699200 bytes, 121241600 sectors
...
这里的设备分别为:
| 物理位置 | 说明 |
|---|---|
| /dev/nvme0n1 | 系统盘 |
| /dev/sda | 备份盘 |
| /dev/sdc | 启动盘 |
首先在备份盘上创建一个分区(分配所有空间到这个分区上):
$ fdisk /dev/sda
Welcome to fdisk (util-linux 2.36).
Changes will remain in memory only, until you decide to write them.
Be careful before using the write command.

Device does not contain a recognized partition table.
Created a new DOS disklabel with disk identifier 0x108318f9.

Command (m for help): n
Partition type
   p   primary (0 primary, 0 extended, 4 free)
   e   extended (container for logical partitions)
Select (default p):

Using default response p.
Partition number (1-4, default 1):
First sector (2048-490234751, default 2048):
Last sector, +/-sectors or +/-size{K,M,G,T,P} (2048-490234751, default 490234751):

Created a new partition 1 of type 'Linux' and of size 233.8 GiB.

Command (m for help): w
The partition table has been altered.
Calling ioctl() to re-read partition table.
Syncing disks.
查看硬盘ID
$ ls -l /dev/disk/by-id
...
lrwxrwxrwx 1 root root 10 Feb 27 14:53 usb-ACASIS_MAC3E_000000000001-0:0-part1 -> ../../sda1
...
usb-ACASIS_MAC3E_000000000001-0:0-part1这里就是我们所需要的硬盘ID,我们使用这个来创建备份池子:
$ zpool create -f -o ashift=12 -o cachefile=/etc/zfs/zpool.cache -O compression=lz4 -O xattr=sa -O relatime=on -O acltype=posixacl -O dedup=off -m none -R /mnt/backup backup /dev/disk/by-id/usb-ACASIS_MAC3E_000000000001-0:0-part1
备份池也可以加密。
创建快照
首先导入原来的zpool
$ zpool import -f rock
给之前的系统创建一个快照:
$ sudo zfs snapshot rock/os/gentoo@2021-02-27-0000-01-install
查看
$ zfs list -r -t snapshot -o name,creation rock/os/gentoo
rock/os/gentoo@2021-02-27-0000-01-install  Sat Feb 27 14:16 2021
发送快照
我们需要打开原来的rock/os/gentoo数据集
但是首先要设置一下挂载点:
$ zfs set mountpoint=/mnt/gentoo rock/os/gentoo
打开rock/os/gentoo数据集
$ zfs mount -l -a
发送快照到backup/os/gentoo
$ zfs send rock/os/gentoo@2021-02-27-0000-01-install | zfs recv backup/2021-02-27-0000-01-backup
这个会花很长的时间,取决于你使用的接口速度,可以通过这条命令查看io情况:
$ zpool iostat 2
这条命令是查看所有的zpoolio情况,2秒刷新一次。
备份/boot分区
设置挂载点
$ zfs set mountpoint=/mnt/backup backup/2021-02-27-0000-01-backup
备份
$ mkdir -pv /mnt/boot
$ mount -v /dev/nvme0n1p1 /mnt/boot
$ cp -rv /mnt/boot/* /mnt/backup/boot/
恢复快照
卸除挂载:
$ zfs umount backup/2021-02-27-0000-01-backup
现在就可以恢复快照了:
$ zfs send backup/2021-02-27-0000-01-backup | zfs recv -F -x encryption rock/os/gentoo
定期备份
在Gentoo的Portage Tree中提供了一个sys-fs/zfs-auto-snapshot的包,这个包可以帮我们创建一个定时任务周期性的备份我们的ZFS
$ sudo emerge -av sys-fs/zfs-auto-snapshot
可以根据需要配置备份的周期:
$ sudo zfs set com.sun:auto-snapshot:daily=true rock/os/gentoo
$ sudo zfs set com.sun:auto-snapshot:weekly=true rock/os/gentoo
问题排查
grub 救援
grub rescue> set prefix=(hd0,1)/boot/grub
grub rescue> set root=(hd0,1)
grub rescue> insmod normal
grub rescue> normal
grub rescue> insmod linux
grub rescue> linux /boot/vmlinuz-3.13.0-29-generic dozfs root=ZFS=rock/os/gentoo
grub rescue> initrd /boot/initrd.img-3.13.0-29-generic
grub rescue> boot
通过 livecd 修复
导入 zpool
$ zpool import -f rock
$ zfs set mountpoint=/mnt/gentoo rock/os/gentoo
挂载 dataset
$ zfs mount -la
挂载 boot 分区
$ mount /dev/nvme0n1p1 /mnt/gentoo/boot/
挂载必要的文件系统
$ mount --types proc /proc /mnt/gentoo/proc
$ mount --rbind /sys /mnt/gentoo/sys
$ mount --make-rslave /mnt/gentoo/sys
$ mount --rbind /dev /mnt/gentoo/dev
$ mount --make-rslave /mnt/gentoo/dev
# 我们不是在官方的Livecd下面还需要执行:
$ test -L /dev/shm && rm /dev/shm && mkdir /dev/shm
$ mount --types tmpfs --options nosuid,nodev,noexec shm /dev/shm
$ chmod 1777 /dev/shm
进入 chroot
$ chroot /mnt/gentoo /bin/bash
$ source /etc/profile
$ export PS1="(chroot) $PS1"
退出 chroot
$ exit
卸除挂载
$ umount -R /mnt/gentoo
改回 rootfs 挂载点
$ zfs set mountpoint=/ rock/os/gentoo
重启
$ reboot
LUKS
数据的安全,保密性在现在的生活中显得越来越重要。随着数字化的时代的来临,越来越多的数据被数字化,特别是更多有关于我们隐私的数据在不断生成,甚至还有我们需要离线保存的密钥等。而且通常我们使用磁盘,USB 闪存,SD 卡等存储介质进行存储,即便我们已经离线存储,仍然不能保证该存储介质不会丢失,如果丢失那么对于我们来说有可能是灾难性的事件。因此对这些离线存储的重要数据,再次进行进行加密是非常有必要的,本文将告诉你如何加密你的移动存储介质。
在此之前先介绍一下 LUKS:
LUKS (Linux Unified Key Setup)是 Linux 硬盘加密的标准。 通过提供标准的磁盘格式,它不仅可以促进发行版之间的兼容性,还可以提供对多个用户密码的安全管理。 与现有解决方案相比,LUKS 将所有必要的设置信息存储在分区信息首部中,使用户能够无缝传输或迁移其数据。
内核配置(可选)
通常来说,大部分发行版的内核都已经配置了相关的加密部分,因此非 gentoo 用户可以跳过此部分。
配置 device mapper 和 crypt target:
    [*] Enable loadable module support
    Device Drivers --->
        [*] Multiple devices driver support (RAID and LVM) --->
            <*> Device mapper support
            <*>   Crypt target support
配置加密 API:
    [*] Cryptographic API --->
        <*> XTS support
        <*> SHA224 and SHA256 digest algorithm
        <*> AES cipher algorithms
        <*> AES cipher algorithms (x86_64)
        <*> User-space interface for hash algorithms
        <*> User-space interface for symmetric key cipher algorithms
编译新内核并配置应用,然后重启:
# make -j9 && make modules_install && make install
安装软件
通常的发行版已经预装了该软件包,可以直接使用,下面是 Gentoo 的安装方法
# emerge --ask sys-fs/cryptsetup
创建加密分区
注意,该操作会清空你选择分区或设备上的所有数据,请谨慎操作,输入大写的 YES 确认
# cryptsetup -s 512 luksFormat /dev/sdd

WARNING!
========
This will overwrite data on /dev/sdd irrevocably.

Are you sure? (Type uppercase yes): YES
Enter passphrase:
Verify passphrase:
利用密钥文件加密分区
除了密码之外,还可以选择使用密钥文件解密你的硬盘,也就是相当于一个密钥,当然可以也可以只使用密钥文件或者同时使用密码与密钥文件。
生成随机密钥文件
# dd if=/dev/urandom of=/root/enc.key bs=1 count=4096
添加密钥文件作为密码之一
# cryptsetup luksAddKey  /dev/sdd /root/enc.key
Enter any existing passphrase:
移除解密密码
移除普通密码:
# cryptsetup luksRemoveKey /dev/sdd
Enter LUKS passphrase to be deleted: ...
移除 key file 密码:
# cryptsetup luksRemoveKey -d /root/enc.key /dev/sdd
注意:千万不要将所有密码移除,至少需要留有一个密码访问设备,移除操作不可撤销
解密与挂载
密码解密
# cryptsetup luksOpen /dev/sdd myusb
Enter passphrase for /dev/sdd:
key file 解密
# cryptsetup luksOpen -d /root/enc.key /dev/sdd myusb
创建文件系统
在挂载使用之前,我们仍然需要对设备创建文件系统才可以使用,可以选择任何你喜欢的文件系统,例如 btrfs,ext4,vfat,ntfs 等
# mkfs.ext4 /dev/mapper/myusb
mke2fs 1.43.6 (29-Aug-2017)
Creating filesystem with 488448 4k blocks and 122160 inodes
Filesystem UUID: 995e172a-2bc6-432c-a60f-2d4d7093e748
Superblock backups stored on blocks:
32768, 98304, 163840, 229376, 294912
Allocating group tables: done
Writing inode tables: done
Creating journal (8192 blocks): done
Writing superblocks and filesystem accounting information: done
挂载
现在可以像正常分区一样挂载我们的加密分区设备了
# mount /dev/mapper/myusb /mnt/
# df -h
/dev/mapper/myusb  1.9G  5.7M  1.7G   1% /mnt
卸载挂载点并关闭加密分区
# umount /mnt
# cryptsetup luksClose myusb
总结
在完成整个步骤以后,您现在需要做的就是妥善保管您的加密存储,可采用同样的方式加密多个设备进行备份,因为谁也不能保证这移动设备会不会在什么时候丢掉。
双显卡笔记本独显直通
介绍
双显卡笔记本中直通独显(dGPU)到 win10 虚拟机。
环境:
- 联想 Legion R7000P 2020 笔记本
- RTX2060 笔记本显卡
- libvirt+qemu
- Host: Gentoo Linux
- Guest: Windows 10 LTSC 2019
MUXed
MUXed 结构的笔记本才容易实现独立显卡直通,Legion R7000P 应该就是 MUXed 的。关于什么是 MUXed 的,可以看下图的解释。
关于如何检测笔记本是否是 MUXed 的,目前没有什么好的办法。有一种说法是运行 lspci,查找有关 Intel HD Graphics/AMD GPU 和 NVIDIA 的设备:
- 如果独显设备名以 3D Controller 开头,那你的电脑就是第二种 MUXless(核显直连显示器)。
- 如果独显设备名以 VGA Controller 开头,并且有一个 HD Graphics/AMD GPU 核显,那你的电脑是第三种 MUXed(核显、独显切换)。
启用 IOMMU 和 vfio 模块
IOMMU
- intel CPU:添加内核参数
intel_iommu=on iommu=pt,BIOS 开启 VT-d - amd CPU:添加内核参数
iommu=pt,BIOS 开启 AMD-Vi
vfio
添加模块 vfio_pci vfio vfio_iommu_type1 vfio_virqfd 到 initramfs 中。如果是像我一样使用 dracut 生成 initramfs,则在 /etc/dracut.conf 中添加配置 add_drivers+=" vfio_pci vfio vfio_iommu_type1 vfio_virqfd " ,之后重新生成 initramfs。
隔离 GPU
#!/bin/bash
shopt -s nullglob
for g in `find /sys/kernel/iommu_groups/* -maxdepth 0 -type d | sort -V`; do
    echo "IOMMU Group ${g###*/}:"
    for d in $g/devices/*; do
        echo -e "\t$(lspci -nns ${d###*/})"
    done;
done;
运行上述脚本,查看显卡所在的 IOMMU Group,并得到显卡相关设备的 device id。
IOMMU Group 10:
        01:00.0 VGA compatible controller [0300]: NVIDIA Corporation TU106M [GeForce RTX 2060 Mobile] [10de:1f15] (rev a1)
        01:00.1 Audio device [0403]: NVIDIA Corporation TU106 High Definition Audio Controller [10de:10f9] (rev a1)
        01:00.2 USB controller [0c03]: NVIDIA Corporation TU106 USB 3.1 Host Controller [10de:1ada] (rev a1)
        01:00.3 Serial bus controller [0c80]: NVIDIA Corporation TU106 USB Type-C UCSI Controller [10de:1adb] (rev a1)
如上所见,device id 分别为 10de:1f15 、 10de:10f9 、 10de:1ada 、 10de:1adb 。再将以上 deivce id 作为参数添加到内核参数或 /etc/modprobe.d/vfio.conf 中。
- 内核参数:vfio-pci.ids=10de:1f15,10de:10f9,10de:1ada,10de:1adb
/etc/modprobe.d/vfio.conf:options vfio-pci ids=10de:1f15,10de:10f9,10de:1ada,10de:1adb
dracut 必须将 device id 添加到内核参数中,并且添加参数 rd.driver.pre=vfio_pci 。
最后重启电脑。开机后通过命令 lspci -k 确认上述 device id 对应的设备在使用 vfio-pci 驱动。如果有各别设备没有使用 vfio-pci 驱动,则可以通过手动 unbind 和 bind 驱动的方式加载 vfio-pci 驱动。比如如果 0000:01:00.2 仍在使用 xhci_hcd 驱动,则:
# run as root
echo -n "0000:01:00.2" > /sys/bus/pci/drivers/xhci_hcd/unbind
echo -n "0000:01:00.2" > /sys/bus/pci/drivers/vfio-pci/bind
创建虚拟机
首先使用 libvirt 创建一个非显卡直通的虚拟机,如果你有多余的显示器和键鼠,也可以直接创建显卡直通的虚拟机。这里我们假设没有多余的设备,并且之后使用 RDP 连接虚拟机。
首先下载windows 10 LTSC 2019和 virtio windows驱动镜像。
创建虚拟机:
Overview:Firmware 选择 UEFI x86_64:/usr/share/edk2-ovmf/OVMF_CODE.fdCPUs:选择 Topology,Manually set CPU topology,Sockets 设为 1,Cores 按需要来,我设为 4,Threads 设置为 2。这样一共就分配了 4 核 8 线程的 CPUMemory:内存我设置为 32GSATA Disk:Disk Bus 选择 Virtio,可以最小化磁盘性能损耗NIC:Device model 也选择 virtio- 之后再添加一个
Stroage,选择 Select custom storage 并选中之前下载的 virtio windows 驱动镜像,然后 Device type 选择 CDROM device - 最后在
Boot Options中选中需要启动的设备
开始安装,在 windows 安装进行到选择硬盘的时候,通过之前加载的 virtio win 驱动的 CDROM,安装 virtio 的磁盘和网络驱动。具体参考可见视频 https://www.bilibili.com/video/BV1dQ4y1o78R 的 29 分 35 秒。安装完毕进入 windows,开启远程桌面并记下 IP,之后通过 RDP 连接虚拟机。
配置和优化 RemoteFX
配置 RemoteFX
- 通过
Win+R运行gpedit.msc - 定位到
计算机配置->管理模板->Windows组件->远程桌面服务->远程桌面会话主机->远程会话环境- 开启
对 RemoteApp 使用高级 RemoteFX 图形 - (可选)开启
配置 RemoteFX 自适应图形的图像质量,设置为高 - 开启
为专门针对 Windows Server 2008 R2 SP1 设计的 RemoteFX 客户端启动 RemoteFX 编码 - 开启
配置 RemoteFX 数据的压缩,并设置为不需使用 RDP 压缩算法- 连接压缩会导致编码和解码时产生额外的延迟
- 开启
- 定位到
计算机配置->管理模板->Windows组件->远程桌面服务->远程桌面会话主机->远程会话环境->RemoteFX for Windows Server 2008 R2- 开启
配置RemoteFX - (可选)开启
使用RemoteFX时优化视觉体验,并都设置为最高
- 开启
解除 30-ish fps 限制
- 启动注册表编辑器
- 定位并单击以下注册表子键:
HKEY_LOCAL_MACHINE\SYSTEM\CurrentControlSet\Control\Terminal Server\WinStations - 在
编辑菜单中选择新建,然后再选择DWORD(32位)值 - 输入
DWMFRAMEINTERVAL并回车 - 右键
DWMFRAMEINTERVAL,选择修改 - 选择十进制,并输入 15。该设置将最大帧率设置为每秒 60 帧 (FPS)。
显卡直通
先关闭虚拟机。首先我们需要确认 host 和 guest 中的 GPU 硬件 ID 一致的,然而 Legion R7000P 中两者不一致,准确的来说是其中的 Sub ID 部分不一致,所以需要手动修改一下。首先通过命令 lspci -nnk | egrep -A3 "VGA|3D" 查看显卡的 Vendor ID 和 Device ID。
$ lspci -nnk | egrep -A3 "VGA|3D"
01:00.0 VGA compatible controller [0300]: NVIDIA Corporation TU106M [GeForce RTX 2060 Mobile] [10de:1f15] (rev a1)
        Subsystem: Lenovo TU106M [GeForce RTX 2060 Mobile] [17aa:3a43]
        Kernel driver in use: vfio-pci
        Kernel modules: nouveau
--
06:00.0 VGA compatible controller [0300]: Advanced Micro Devices, Inc. [AMD/ATI] Renoir [1002:1636] (rev c6)
        Subsystem: Lenovo Renoir [17aa:3a47]
        Kernel driver in use: amdgpu
        Kernel modules: amdgpu
其中 NVIDIA 独显的 Vendor ID 为 10de,Device ID 为 1f15。再用命令 grep "PCI_SUBSYS_ID=" /sys/bus/pci/devices/0000:01:00.0/uevent 查看 Sub Vendor ID 和 Sub Device ID。
$ grep "PCI_SUBSYS_ID=" /sys/bus/pci/devices/0000:01:00.0/uevent
PCI_SUBSYS_ID=17AA:3A47
其中 Sub Vendor ID 为 17AA,Sub Device ID 为 3A47。将 17AA 和 3A47 转换为十进制 6058 和 14919,并在虚拟机的 XML 中添加配置:
<domain xmlns:qemu="http://libvirt.org/schemas/domain/qemu/1.0" type="kvm">
  ...
  <qemu:commandline>
    <qemu:arg value='-set'/>
    <qemu:arg value='device.hostdev0.x-pci-sub-vendor-id=6058'/>
    <qemu:arg value='-set'/>
    <qemu:arg value='device.hostdev0.x-pci-sub-device-id=14919'/>
  </qemu:commandline>
</domain>
注意 XML 的第一行一定要添加 xmlns:qemu="http://libvirt.org/schemas/domain/qemu/1.0" ,否则后面的配置无法成功添加。
在 libvirt 中添加硬件,选择 PCI Host Device,然后将 0000:01:00.0 NVIDIA Corporation GeForce RTX 2060 Mobile 和 0000:01:00.1 NVIDIA Corporation High Definition Audio Controller 等都添加进去。
最后再在 libvirt 中删除虚拟机的 Display Spice 和 Video QXL ,在 CPUs 中取消 Copy host CPU configuration 并将 Model 选择为 host passthrough。如果你需要直通鼠标和键盘,也可以在这个时候添加。
创建网桥
有线网卡的网桥创建起来较为简单,这里就不详细介绍了,有需要的可以查看我上一篇软路由虚拟机的 BLOG。因为是笔记本,所以这里主要介绍无线网卡的桥接方法。
先开启 proxy_arp 和 ip_forward,修改配置文件 /etc/sysctl.conf ,添加下述配置:
net.ipv4.ip_forward = 1
net.ipv4.conf.all.proxy_arp = 1
再点击 libvirt 菜单栏上的 Edit -> Connection Details ,假设 host 的 ip 为 192.168.3.12,无线网卡为 wlp4s0,新建一个 Network, Name 设置为 proxyArp, Mode 选择 Routed, Forward to 选择 Physical device, Device 设置为 wlp4s0, IPv4 的 Network 设置为 192.168.3.100/28,完成创建。
然后修改 win10 虚拟机的 NIC 配置,将 Network source 改为 Virtual network ‘proxyArp’: Route to wlp4s0,最后重新启动虚拟机与物理机。
远程连接
重新启动虚拟机后,使用 RDP 连接到虚拟机中。到 nvidia 官网下载驱动,并进行安装。如果安装过程中并未出现问题,则至此显卡直通配置完成。另外如果不外接显示器的话,windows 的分辨率似乎会被限制在 640x480,不知道会不会对游戏有影响,所以有条件还是买一个 HDMI 欺骗器接到独显连接的显示接口上。
远程连接方式一共有三种,分别可以适用于不同的情况。
RDP
简单使用方法:
- 确保使用 FreeRDP 2.0
- 获取 windows 虚拟机 IP,比如 192.168.3.108
- xfreerdp /v:192.168.3.108:3389 /w:1600 /h:900 /bpp:32 +clipboard +fonts /gdi:hw /rfx /rfx-mode:video /sound:sys:pulse +menu-anims +window-drag
对于使用 xfreedp 的 RemoteFX 连接的一些问题:
- 只有窗口化的游戏可以运行,全屏将会触发 d3d11 0x087A0001 不能设置分辨率等问题。媒体播放器不受其影响。
- 作为解决方案,使用无边框模式游戏,或其他等效方案
- windows 客户端似乎没有该问题
- 由于 RDSH/RDVH 连接不支持“相对”鼠标,鼠标会乱跑
- 重定向 XBOX 手柄或 USB 摇杆可能会解决这个问题?
- 使用 Synergy (v1) 并启用相对鼠标模式
- 通过 RDP RemoteFX 运行 3D 游戏鼠标不稳定
Looking glass
Looking glass 的优点是低延迟,其并不是通过网络与虚拟机通信,而是直接使用一块共享内存。缺点是只能本地连接,而且似乎需要外接一个显示设备(或 HDMI 欺骗器)才能让键盘、鼠标正常工作,并且似乎不能使用 spice 套娃远程操作 looking glass。
安装 client
首先在 host 系统上安装 looking glass client,在 gentoo 上可以通过如下步骤直接安装我打包的 looking glass。
$ sudo eselect repository enable gig
$ sudo emerge --sync gig
$ sudo emerge -avt looking-glass
计算内存大小
通过以下公式,根据你期望的最大分辨率来计算内存大小。
width x height x 4 x 2 = total bytes

total bytes / 1024 / 1024 = total megabytes + 10
比如,我想要最大使用 4K 分辨率(3840x2160):
3840 x 2160 x 4 x 2 = 66355200 bytes

66355200 / 1024 / 1024 = 63.28 MB + 10 = 73.28
最后要注意内存的大小要上向取整到最接近的 2 的幂,在上面的例子中则应为 128。
配置 libvirt
...
<devices>
    ...
  <shmem name='looking-glass'>
    <model type='ivshmem-plain'/>
    <size unit='M'>128</size>
  </shmem>
</devices>
...
将以上内容添加到虚拟机的 XML 配置中,其中 128 即为上面计算出来的大小。
如果想要通过 spice 实现键盘和鼠标输入与剪贴板共享,则必须添加 spice 设备。
-
在 libvirt 中,选择
Add Hardware,然后再选择Graphics,使用默认的 spice 配置即可,最后完成添加 -
选择
Video设备,然后在Model栏中输入 none,注意必须要完成这一步,否则可能会造成虚拟机不使用直通的显卡渲染 -
如果有
tablet设备,则删除 -
如果没有
Mouse设备,则添加一个 -
如果没有
Keyboard设备,则添加一个- 这里使用 Virtio 的键盘可以更好的提高性能,然而 PS/2 的键盘没办法删掉,不知道被哪个设备依赖了,所以就使用 PS/2 的键盘了
-
还有如果使用 Virtio 的键盘,则需要通过上面加载的 virtio windows 驱动 的 CDROM,以安装驱动
创建共享内存文件
新建文件 /etc/tmpfiles.d/10-looking-glass.conf ,其内容为:
#Type Path               Mode UID  GID Age Argument
f /dev/shm/looking-glass 0660 user kvm -
将其中的 user,改为你自己的用户名。最后使用命令 systemd-tmpfiles --create /etc/tmpfiles.d/10-looking-glass.conf 创建共享内存文件,无需等待下次重启。
安装 host
首先需要在 windows 中安装 IVSHMEM 驱动,windows 不会自己安装 IVSHMEM 设备,相反它只会为该设备安装一个假驱动。先下载需要安装的驱动程序,https://fedorapeople.org/groups/virt/virtio-win/direct-downloads/upstream-virtio/ ,注意必须下载 0.1.161 或更高的版本,最后将其解压。
安装 IVSHMEM 驱动需要打开 设备管理器 ,然后在 系统设备 下,找到 PCI标准内存控制器 ,然后选择 更新驱动程序 ,再选择手动更新,选择我们之前下载并解压好的驱动目录,然后安装驱动即可。
host 需要在 windows 虚拟机中安装,先下载与 client 版本对应的 host 安装文件:https://looking-glass.io/downloads 。下载完成后解压、安装即可,完成后重启虚拟机,然后通过 log 文件查看其是否正常启动,log 在开始菜单里就有。
最后再安装一下 spice guest tools, https://www.spice-space.org/download.html#windows-binaries ,以更好的支持鼠标与剪贴板共享。
配置 client
我使用的配置如下,将配置文件放在 ~/.looking-glass-client.ini 或 /etc/looking-glass-client.ini :
[app]
renderer=egl
shmFile=/dev/shm/looking-glass

[win]
borderless=yes
fullScreen=yes
size=1920x1080

[input]
grabKeyboard=yes
escapeKey=97

[spice]
captureOnStart=yes
由于我的笔记本没有 ScrLk 按键,所以将 escape 键设置为了 右 Ctrl 按键。
至此 looking glass 配置完成,运行命令 looking-glass-client 连接到虚拟机。
配置 Scream
由于 looking glass 不支持传递音频,所以我们还需要使用 Scream 将 VM 的音频传递给 host。
首先,编辑 windows 虚拟机的 XML,添加以下部分:
...
<devices>
    ...
  <shmem name='scream-ivshmem'>
    <model type='ivshmem-plain'/>
    <size unit='M'>2</size>
  </shmem>
</devices>
...
然后再如 looking glass 一样,添加配置文件 /etc/tmpfiles.d/11-scream-ivshmem.conf ,并运行命令 systemd-tmpfiles --create /etc/tmpfiles.d/11-scream-ivshmem.conf 。
f /dev/shm/scream-ivshmem 0660 user kvm -
如果没有安装 IVSHMEM 驱动,则需要安装一下,跟上面一样。然后下载 scream 的 windows 驱动,地址: https://github.com/duncanthrax/scream/releases ,解压并进行安装。
再以管理员权限在 CMD 中运行 REG ADD HKLM\SYSTEM\CurrentControlSet\Services\Scream\Options /v UseIVSHMEM /t REG_DWORD /d 2 。
在 Linux 物理机中安装 scream,然后创建配置文件 ~/.config/systemd/user/scream-ivshmem-pulse.service :
[Unit]
Description=Scream IVSHMEM pulse receiver
After=pulseaudio.service
Wants=pulseaudio.service

[Service]
Type=simple
ExecStartPre=/usr/bin/truncate -s 0 /dev/shm/scream-ivshmem
ExecStartPre=/bin/dd if=/dev/zero of=/dev/shm/scream-ivshmem bs=1M count=2
ExecStart=/usr/bin/scream -m /dev/shm/scream-ivshmem

[Install]
WantedBy=default.target
最后运行以下命令即可:
$ sudo systemctl start --user scream-ivshmem-pulse
$ sudo systemctl enable --user scream-ivshmem-pulse
这样就配置完成了,在 looing glass 里就可以听到声音了。
steam 远程畅玩(流式传输)
因为 RDP 的限制,像 steam 家庭串流或 Geforce Experience 的方式对游戏来说更为推荐。
如果不想每次串流游戏都输入密码解锁屏幕,则可以通过 RDP 以管理员权限运行 cmd,然后运行以下命令,也可以将其保存为脚本,方便以后使用。注意运行完该命令会立马断开 RDP。
@powershell -NoProfile -ExecutionPolicy unrestricted -Command "$sessionid=((quser $env:USERNAME | select -Skip 1) -split '\s+')[2]; tscon $sessionid /dest:console" 2> UnlockErrors.log
benchmark
简单运行了一下 3dmark 的 Time Spy,做虚拟机的图形性能测试。测试了以下几种情况:
- win10 + 物理机直接运行,3dmark 得分 6900
- win10 + 虚拟机显卡直通 + 外接显示器,3dmark 得分 6000
- win10 + 虚拟机显卡直通 + steam 串流,3dmark 得分 5600
- win10 + 虚拟机显卡直通 + looking glass,3dmark 得分 5000,并且在加载的时候,画面延迟近 10 秒
由此可见,想要玩游戏,还是最好外接显示器,或者起码使用 steam 串流吧,个人感觉 looking glass 的性能甚至可能没有 RDP 高,但 RDP 无法运行 3dmark,所以无法比较测试。另外这几种情况中,CPU 得分的差距更大,但一般游戏也不会占用过多 CPU 资源,所以这里并没有记录。
PS:win10 + 虚拟机显卡直通 + looking glass + HDMI 欺骗器,3dmark 得分也是 5600,looking glass 的性能有待进一步测试。
参考链接
- PCI passthrough via OVMF https://wiki.archlinux.org/title/PCI_passthrough_via_OVMF
- [GUIDE] Optimus laptop dGPU passthrough https://gist.github.com/Misairu-G/616f7b2756c488148b7309addc940b28
- Vendor ID & Device ID https://github.com/marcosscriven/ovmf-with-vbios-patch/issues/2
- 笔记本 Optimus MUXless 下的 Intel 和 NVIDIA 虚拟机显卡直通 https://lantian.pub/article/modify-computer/laptop-intel-nvidia-optimus-passthrough.lantian/
- ledis 的单显卡直通教程 https://github.com/ledisthebest/LEDs-single-gpu-passthrough/blob/main/README-cn.md
- Looking glass Installation https://looking-glass.io/docs/676/install
- Bridging Network Connections with Proxy ARP https://wiki.debian.org/BridgeNetworkConnectionsProxyArp
- setup kvm on a wireless interface on a laptop machine https://unix.stackexchange.com/questions/159191/setup-kvm-on-a-wireless-interface-on-a-laptop-machine
- 桥接无线网卡 https://blog.lilydjwg.me/2020/5/19/bridged-wireless-network.215330.html
附录:XML 配置
最后附上我的虚拟机的 XML 配置。
<domain type='kvm' id='1' xmlns:qemu='http://libvirt.org/schemas/domain/qemu/1.0'>
  <name>win10</name>
  <uuid>d5da831a-c1eb-4668-a864-0731557d80a0</uuid>
  <metadata>
    <libosinfo:libosinfo xmlns:libosinfo="http://libosinfo.org/xmlns/libvirt/domain/1.0">
      <libosinfo:os id="http://microsoft.com/win/10"/>
    </libosinfo:libosinfo>
  </metadata>
  <memory unit='KiB'>33554432</memory>
  <currentMemory unit='KiB'>33554432</currentMemory>
  <vcpu placement='static'>8</vcpu>
  <resource>
    <partition>/machine</partition>
  </resource>
  <os>
    <type arch='x86_64' machine='pc-q35-6.0'>hvm</type>
    <loader readonly='yes' type='pflash'>/usr/share/edk2-ovmf/OVMF_CODE.fd</loader>
    <nvram>/var/lib/libvirt/qemu/nvram/win10_VARS.fd</nvram>
    <bootmenu enable='no'/>
  </os>
  <features>
    <acpi/>
    <apic/>
    <hyperv>
      <relaxed state='on'/>
      <vapic state='on'/>
      <spinlocks state='on' retries='8191'/>
    </hyperv>
    <vmport state='off'/>
  </features>
  <cpu mode='host-passthrough' check='partial' migratable='on'>
    <topology sockets='1' dies='1' cores='4' threads='2'/>
  </cpu>
  <clock offset='localtime'>
    <timer name='rtc' tickpolicy='catchup'/>
    <timer name='pit' tickpolicy='delay'/>
    <timer name='hpet' present='no'/>
    <timer name='hypervclock' present='yes'/>
  </clock>
  <on_poweroff>destroy</on_poweroff>
  <on_reboot>restart</on_reboot>
  <on_crash>destroy</on_crash>
  <pm>
    <suspend-to-mem enabled='no'/>
    <suspend-to-disk enabled='no'/>
  </pm>
  <devices>
    <emulator>/usr/bin/qemu-system-x86_64</emulator>
    <disk type='file' device='disk'>
      <driver name='qemu' type='qcow2'/>
      <source file='/var/lib/libvirt/images/win10.qcow2' index='3'/>
      <backingStore/>
      <target dev='vda' bus='virtio'/>
      <boot order='1'/>
      <alias name='virtio-disk0'/>
      <address type='pci' domain='0x0000' bus='0x04' slot='0x00' function='0x0'/>
    </disk>
    <disk type='file' device='cdrom'>
      <driver name='qemu' type='raw'/>
      <source file='/home/petrus/Downloads/iso/cn_windows_10_enterprise_ltsc_2019_x64_dvd_9c09ff24.iso' index='2'/>
      <backingStore/>
      <target dev='sdb' bus='sata'/>
      <readonly/>
      <boot order='2'/>
      <alias name='sata0-0-1'/>
      <address type='drive' controller='0' bus='0' target='0' unit='1'/>
    </disk>
    <disk type='file' device='cdrom'>
      <driver name='qemu' type='raw'/>
      <source file='/home/petrus/Downloads/iso/virtio-win-0.1.185.iso' index='1'/>
      <backingStore/>
      <target dev='sdc' bus='sata'/>
      <readonly/>
      <alias name='sata0-0-2'/>
      <address type='drive' controller='0' bus='0' target='0' unit='2'/>
    </disk>
    <controller type='usb' index='0' model='qemu-xhci' ports='15'>
      <alias name='usb'/>
      <address type='pci' domain='0x0000' bus='0x02' slot='0x00' function='0x0'/>
    </controller>
    <controller type='sata' index='0'>
      <alias name='ide'/>
      <address type='pci' domain='0x0000' bus='0x00' slot='0x1f' function='0x2'/>
    </controller>
    <controller type='pci' index='0' model='pcie-root'>
      <alias name='pcie.0'/>
    </controller>
    <controller type='pci' index='1' model='pcie-root-port'>
      <model name='pcie-root-port'/>
      <target chassis='1' port='0x10'/>
      <alias name='pci.1'/>
      <address type='pci' domain='0x0000' bus='0x00' slot='0x02' function='0x0' multifunction='on'/>
    </controller>
    <controller type='pci' index='2' model='pcie-root-port'>
      <model name='pcie-root-port'/>
      <target chassis='2' port='0x11'/>
      <alias name='pci.2'/>
      <address type='pci' domain='0x0000' bus='0x00' slot='0x02' function='0x1'/>
    </controller>
    <controller type='pci' index='3' model='pcie-root-port'>
      <model name='pcie-root-port'/>
      <target chassis='3' port='0x12'/>
      <alias name='pci.3'/>
      <address type='pci' domain='0x0000' bus='0x00' slot='0x02' function='0x2'/>
    </controller>
    <controller type='pci' index='4' model='pcie-root-port'>
      <model name='pcie-root-port'/>
      <target chassis='4' port='0x13'/>
      <alias name='pci.4'/>
      <address type='pci' domain='0x0000' bus='0x00' slot='0x02' function='0x3'/>
    </controller>
    <controller type='pci' index='5' model='pcie-root-port'>
      <model name='pcie-root-port'/>
      <target chassis='5' port='0x14'/>
      <alias name='pci.5'/>
      <address type='pci' domain='0x0000' bus='0x00' slot='0x02' function='0x4'/>
    </controller>
    <controller type='pci' index='6' model='pcie-root-port'>
      <model name='pcie-root-port'/>
      <target chassis='6' port='0x15'/>
      <alias name='pci.6'/>
      <address type='pci' domain='0x0000' bus='0x00' slot='0x02' function='0x5'/>
    </controller>
    <controller type='pci' index='7' model='pcie-root-port'>
      <model name='pcie-root-port'/>
      <target chassis='7' port='0x8'/>
      <alias name='pci.7'/>
      <address type='pci' domain='0x0000' bus='0x00' slot='0x01' function='0x0' multifunction='on'/>
    </controller>
    <controller type='pci' index='8' model='pcie-root-port'>
      <model name='pcie-root-port'/>
      <target chassis='8' port='0x9'/>
      <alias name='pci.8'/>
      <address type='pci' domain='0x0000' bus='0x00' slot='0x01' function='0x1'/>
    </controller>
    <controller type='pci' index='9' model='pcie-root-port'>
      <model name='pcie-root-port'/>
      <target chassis='9' port='0xa'/>
      <alias name='pci.9'/>
      <address type='pci' domain='0x0000' bus='0x00' slot='0x01' function='0x2'/>
    </controller>
    <controller type='pci' index='10' model='pcie-root-port'>
      <model name='pcie-root-port'/>
      <target chassis='10' port='0xb'/>
      <alias name='pci.10'/>
      <address type='pci' domain='0x0000' bus='0x00' slot='0x01' function='0x3'/>
    </controller>
    <controller type='pci' index='11' model='pcie-to-pci-bridge'>
      <model name='pcie-pci-bridge'/>
      <alias name='pci.11'/>
      <address type='pci' domain='0x0000' bus='0x0a' slot='0x00' function='0x0'/>
    </controller>
    <controller type='pci' index='12' model='pcie-root-port'>
      <model name='pcie-root-port'/>
      <target chassis='12' port='0xc'/>
      <alias name='pci.12'/>
      <address type='pci' domain='0x0000' bus='0x00' slot='0x01' function='0x4'/>
    </controller>
    <controller type='virtio-serial' index='0'>
      <alias name='virtio-serial0'/>
      <address type='pci' domain='0x0000' bus='0x03' slot='0x00' function='0x0'/>
    </controller>
    <interface type='network'>
      <mac address='52:54:00:9c:b1:61'/>
      <source network='proxyArp' portid='dea4d995-d8d9-408d-ac30-ac45bfd5627e' bridge='virbr1'/>
      <target dev='vnet0'/>
      <model type='virtio'/>
      <alias name='net0'/>
      <address type='pci' domain='0x0000' bus='0x01' slot='0x00' function='0x0'/>
    </interface>
    <serial type='pty'>
      <source path='/dev/pts/0'/>
      <target type='isa-serial' port='0'>
        <model name='isa-serial'/>
      </target>
      <alias name='serial0'/>
    </serial>
    <console type='pty' tty='/dev/pts/0'>
      <source path='/dev/pts/0'/>
      <target type='serial' port='0'/>
      <alias name='serial0'/>
    </console>
    <channel type='spicevmc'>
      <target type='virtio' name='com.redhat.spice.0' state='connected'/>
      <alias name='channel0'/>
      <address type='virtio-serial' controller='0' bus='0' port='1'/>
    </channel>
    <input type='mouse' bus='ps2'>
      <alias name='input0'/>
    </input>
    <input type='keyboard' bus='ps2'>
      <alias name='input1'/>
    </input>
    <graphics type='spice' port='5900' autoport='yes' listen='127.0.0.1'>
      <listen type='address' address='127.0.0.1'/>
      <image compression='off'/>
      <gl enable='no'/>
    </graphics>
    <sound model='ich9'>
      <alias name='sound0'/>
      <address type='pci' domain='0x0000' bus='0x00' slot='0x1b' function='0x0'/>
    </sound>
    <audio id='1' type='spice'/>
    <video>
      <model type='none'/>
      <alias name='video0'/>
    </video>
    <hostdev mode='subsystem' type='pci' managed='yes'>
      <driver name='vfio'/>
      <source>
        <address domain='0x0000' bus='0x01' slot='0x00' function='0x0'/>
      </source>
      <alias name='hostdev0'/>
      <address type='pci' domain='0x0000' bus='0x06' slot='0x00' function='0x0'/>
    </hostdev>
    <hostdev mode='subsystem' type='pci' managed='yes'>
      <driver name='vfio'/>
      <source>
        <address domain='0x0000' bus='0x01' slot='0x00' function='0x1'/>
      </source>
      <alias name='hostdev1'/>
      <address type='pci' domain='0x0000' bus='0x07' slot='0x00' function='0x0'/>
    </hostdev>
    <hostdev mode='subsystem' type='pci' managed='yes'>
      <driver name='vfio'/>
      <source>
        <address domain='0x0000' bus='0x01' slot='0x00' function='0x2'/>
      </source>
      <alias name='hostdev2'/>
      <address type='pci' domain='0x0000' bus='0x08' slot='0x00' function='0x0'/>
    </hostdev>
    <hostdev mode='subsystem' type='pci' managed='yes'>
      <driver name='vfio'/>
      <source>
        <address domain='0x0000' bus='0x01' slot='0x00' function='0x3'/>
      </source>
      <alias name='hostdev3'/>
      <address type='pci' domain='0x0000' bus='0x09' slot='0x00' function='0x0'/>
    </hostdev>
    <redirdev bus='usb' type='spicevmc'>
      <alias name='redir0'/>
      <address type='usb' bus='0' port='2'/>
    </redirdev>
    <redirdev bus='usb' type='spicevmc'>
      <alias name='redir1'/>
      <address type='usb' bus='0' port='3'/>
    </redirdev>
    <memballoon model='virtio'>
      <alias name='balloon0'/>
      <address type='pci' domain='0x0000' bus='0x05' slot='0x00' function='0x0'/>
    </memballoon>
    <shmem name='looking-glass'>
      <model type='ivshmem-plain'/>
      <size unit='M'>128</size>
      <alias name='shmem0'/>
      <address type='pci' domain='0x0000' bus='0x0b' slot='0x01' function='0x0'/>
    </shmem>
    <shmem name='scream-ivshmem'>
      <model type='ivshmem-plain'/>
      <size unit='M'>2</size>
      <alias name='shmem1'/>
      <address type='pci' domain='0x0000' bus='0x0b' slot='0x02' function='0x0'/>
    </shmem>
  </devices>
  <seclabel type='dynamic' model='dac' relabel='yes'>
    <label>+77:+77</label>
    <imagelabel>+77:+77</imagelabel>
  </seclabel>
  <qemu:commandline>
    <qemu:arg value='-set'/>
    <qemu:arg value='device.hostdev0.x-pci-sub-vendor-id=6058'/>
    <qemu:arg value='-set'/>
    <qemu:arg value='device.hostdev0.x-pci-sub-device-id=14919'/>
  </qemu:commandline>
</domain>
Apps
中文字体
在应用之前,最好先安装好中文字体和 emojis
# emerge media-fonts/noto-cjk media-fonts/noto-emoji
# eselect fontconfig list
# eselect fontconfig enable 70-noto-cjk.conf
要在系统范围内(对所有用户有效)安装字体,请将文件夹移动到 /usr/share/fonts/ 目录。这些文件需要对每个用户而言都是可读的,使用 chmod 来设置合理的权限 (比如,文件至少为 0444 ,而目录至少为 0555)。要为单个用户安装字体,请使用 ~/.local/share/fonts (~/.fonts/ 现在已经过时了)。
然后更新 fontconfig 的字体缓存:
$ fc-cache -vf
改善字体渲染效果
-
安装字体:改成Sarasa效果和Noto差别很小,倒是换成文泉驿倒是真的字体平滑了许多,模糊边缘也少了点点,但还是有,kde的字体渲染做的真不咋样哦,还是ubuntu的gnome字体渲染最舒服。
-
调整系统字体:系统设置 -> 字体
在系统字体设置那将那些默认的noto sans字体改为更纱黑体即可,前三个最好相应调大一个等级。等距字体可以使用等距更纱黑体,也可以使用你喜欢的等距字体。
-
调整系统缩放:系统设置 -> 显示和监控 -> 显示配置 -> 缩放显示
默认是100%,可以调整到110~120之间,具体数值根据自己效果设定
-
调整字体DPI:系统设置 -> 字体 -> 勾选“固定字体DPI”并调整DPI的值
默认是96,同样也可以调整到110~120之间,具体数值根据自己效果设定
-
调整字体展示优先级
<?xml version="1.0"?>
<!DOCTYPE fontconfig SYSTEM "fonts.dtd">
<fontconfig>
  <alias>
    <family>sans-serif</family>
    <prefer>
      <family>Sarasa Gothic SC</family>
      <family>Sarasa Gothic TC</family>
      <family>Sarasa Gothic J</family>
      <family>Sarasa Gothic K</family>
    </prefer>
  </alias>
  <alias>
    <family>monospace</family>
    <prefer>
      <family>Sarasa Mono SC</family>
      <family>Sarasa Mono TC</family>
      <family>Sarasa Mono J</family>
      <family>Sarasa Mono K</family>
    </prefer>
  </alias>
</fontconfig>
将上述内容保存为:~/.fonts.conf文件
调整完之后注销重新登入
输入法
作为中文用户,肯定需要款输入法,我推荐使用 fcitx (还有一款叫 ibus)。目前稳定维护的 fcitx 版本是 5 ,但是官方仓库 ::gentoo 目前只有 4 (也能用,就是不怎么维护了)。
官方仓库 fcitx4
重要:先配置下 fcitx4 开启对 gtk2 的支持以避免有些程序无法使用(gtk3 默认开启了)
# echo 'app-i18n/fcitx gtk2' >> /etc/portage/package.use/fcitx
然后安装
# emerge app-i18n/fcitx:4 app-i18n/fcitx-configtool:4 app-i18n/fcitx-qt5:4 app-i18n/fcitx-libpinyin:4
其中:
- app-i18n/fcitx 是 fcitx 的主程序
- app-i18n/fcitx-configtool 是它的配置工具
- app-i18n/fcitx-qt5 用于支持在 qt 程序上使用它
- app-i18n/fcitx-libpinyin 是一个输入法
额外仓库 fcitx5
为使用最新的 fcitx5,这里需要使用额外的仓库 ,因为官方仓库目前(2021-11-23)没有。提供 fcitx5 的 Gentoo 仓库(Overlay)推荐 gentoo-zh 。具体方法为:
-
先安装添加额外的仓库必要的工具
# emerge app-eselect/eselect-repository -
然后启用仓库,启用过程中,可能会因为网络原因导致比较慢,请耐心等待
# eselect repository enable gentoo-zh -
更新以获取下仓库内容。
# emerge dev-vcs/git
# emerge --sync gentoo-zh
如果一直卡在这里,那说明当前网络访问 github.com 不流畅。这时候有一种方法是:访问 https://fastgit.org (我不对该网站做任何保证), 修改
/etc/portage/repos.conf/eselect-repo.conf文件,替换对应链接的域名为上述网站内指定值,并再次同步。 -
添加 portage 配置用于安装
# mkdir -p /etc/portage/package.mask/ # nano /etc/portage/package.mask/gentoo-zh */*::gentoo-zh # mkdir -p /etc/portage/package.unmask/ # nano /etc/portage/package.unmask/fcitx5 app-i18n/fcitx5-meta::gentoo-zh app-i18n/fcitx5::gentoo-zh app-i18n/fcitx5-configtool::gentoo-zh app-i18n/fcitx5-chinese-addons::gentoo-zh app-i18n/fcitx5-gtk::gentoo-zh app-i18n/fcitx5-qt::gentoo-zh app-i18n/libime::gentoo-zh x11-libs/xcb-imdkit::gentoo-zh # mkdir -p /etc/portage/package.accept_keywords # nano /etc/portage/package.accept_keywords/fcitx5 app-i18n/fcitx5-meta ~amd64 app-i18n/fcitx5 ~amd64 app-i18n/fcitx5-configtool ~amd64 app-i18n/fcitx5-chinese-addons ~amd64 app-i18n/fcitx5-gtk ~amd64 app-i18n/fcitx5-qt ~amd64 app-i18n/libime ~amd64 x11-libs/xcb-imdkit ~amd64 -
之后安装
# emerge app-i18n/fcitx5-meta或者
# EGIT_OVERRIDE_REPO_FCITX_LIBIME=https://hub.fastgit.org/fcitx/libime.git EGIT_OVERRIDE_REPO_KPU_KENLM=https://hub.fastgit.org/kpu/kenlm.git emerge app-i18n/fcitx5-meta这里安装了 fcitx 的元包,它会自动依赖安装 fcitx5 主体、 RIME 输入法、配置工具等,这个仓库也会默认安装上 fcitx5-chinese-addons ,里面包含有中文输入法。
如果安装的时候长时间停止在校验 manifest,尝试用 eclean 清除 distfiles 和 packages。可能原因是混合使用了 gentoo(官方) 和 gentoo-zh(overlay)。
-
最后安装肥猫百万大词库:
Download latest version of “zhwiki.dict” from https://github.com/felixonmars/fcitx5-pinyin-zhwiki/releases
Copy into
~/.local/share/fcitx5/pinyin/dictionaries/(create the folder if it does not exist)
提示:
-
当使用非官方的 Fcitx5 时,因为没有镜像收录,所以源码需从 Github 下载,这时可能遇到因网络问题导致无法下载的情况(可以从
/var/log/emerge-fetch.log文件查看源码包下载情况),如果遇到这种情况那么请自行通过各种途径下载好对应的.tar.gz格式(或类似)软件包,然后移动到/var/cache/distfiles/目录下。 -
软件包需更名为对应的包名加完整的版本号(执行上述
emerge <包名>命令后可以看到完整的版本号),比如当显示的包名为app-i18n/fcitx-gtk-5.0.8:5::gentoo-zh那么就更名下载的源码包为fcitx-gtk-5.0.8.tar.gz(/符号后以及:符号前的内容),以此类推。 -
或者,在 emerge-fetch.log 可以看到下载链接和类似如下的行
Saving to: ‘/var/cache/distfiles/fcitx5-lm_sc.3gm.arpa-20140820.tar.bz2.__download__’通过下载链接下载文件后,改名为删除
.__download__剩余部分,如fcitx5-lm_sc.3gm.arpa-20140820.tar.bz2,然后删除对应的/var/cache/distfiles/fcitx5-lm_sc.3gm.arpa-20140820.tar.bz2.__download__缓存文件,并把重命名的文件移动到/var/cache/distfiles/。
拥抱Fcitx5
起因
2015年12月,计科杀手 csslayer 创建了fcitx/fcitx5代码库,独自开始了对 Fcitx5 的开发。
如今五年过去了,Fcitx5 也日渐成熟。(个人感觉算法上相当不错
今年年初,我从 fcitx-rime 换到 fcitx5-rime ,感觉并不明显 (毕竟对于 Rime 用户来说从4到5最大的变化是界面
然后,在 Arch Linux CN 众多群友的诱惑下, 我决定尝试一下 Fcitx5 自带的拼音输入法。
首次使用的体验是相当的棒的,Fcitx5 在默认配置下表现良好,云拼音也有百度,Google,Google CN 三种可选尽管我不怎么用云拼音,整句输入也是相当的棒,还有输入预测功能。
但这并不是让我抛弃我在 Rime 积攒下的词库投靠老K输入法Fcitx5自带拼音的理由……真正的原因是最近发生的几件事……
-
首先是非常好的反馈体验,开发者老K对待用户非常友好,而且生产力十足
-
然后是 Felix 爬了维基百科制作了肥猫百万大词库,随后大佬 outloudvi 制作了萌娘百科词库,Fcitx5 的日用词库基本满足(AUR 上皆有打包,且在 Arch CN 源有打包
-
肥猫大词库中的一个讨论促使Fcitx5引入了一项新功能——根据前缀生成候选项,效果如图:
 这个功能我觉得对于长词输入是很棒的
 -
添加了类似搜狗U模式的拆字模式,效果如图:
-
还有一件事是 Fcitx5 可以使用
fcitx,fcitx5,ibus的输入法模块(感觉黑科技 -
我从 rime 移植过来一份符号表,这样输入就方便了很多
优势
- 上述几条个人认为皆为优势
fcitx5-rime支持加载动态库形式的 Rime 插件,在设置中填写插件名称即可使用,注意 octagram 插件名称与文件名并不一样(fcitx-rime无此支持,ibus-rime有此支持但是似乎配置文件有点问题(喜讯:Arch 官方仓库中的librime已经打包了 lua 和 octagram(即语料库)插件- 自带一套 LaTeX 简易输入表(虽然只能输入一小部分特殊字符
- 笔画过滤: 参见 Fcitx5_使用笔画过滤
- 以词定字
- 查看选中文字的 Unicode 编码:选中文字,然后使用快捷键 ctrl + alt + shift + u 可以查看选中文字的编码
- 更好的支持(Fcitx4 已经停止支持
关于设置
推荐以下设置:
- 预测看个人喜好
- 启用颜文字
- 云拼音根据需要来,但是不推荐 Google 后端,原因显然
- preedit 也就是单行显示自己选择
- 安装肥猫百万大词库(墙裂推荐
- Lua 插件!!!自带日期和时间,另外推荐几个,内含进制转换、简易计算器和密码生成器
主题美化
有以下几种选择:
-
kimpanel(KDE)/gnome-shell-extension-kimpanel(Gnome) (同时这也应该是目前 Wayland 下唯一的方案) -
Material Color 主题,有多种颜色以及单行双行两种模式,Arch 官方源有打包
-
-

-
Materia EXP 主题,系统使用暗色主题的用户请谨慎使用

-
-
Adwaita-dark,推荐 Gnome 用户使用
-
经典的Material 主题,这个主题同时支持4和5
我都没注意这个主题更新了 fcitx5 支持(fcitx5 版本有人在 AUR 上打了包,包名:fcitx5-skin-material -
自制主题
(顺便写份主题文档吧
以上主题在 AUR 皆有打包(似乎目前已有主题在 AUR 上都有打包了
fcitx5皮肤制作
这次是 fcitx5 是用搜狗皮肤(无法实现动态)!
下载仓库
$ git clone https://github.com/fkxxyz/ssfconv.git
$ cd ssfconv
下载皮肤
先从搜狗输入法的皮肤官网下载自己喜欢的皮肤,得到ssf格式的文件,例如 【雨欣】蒲公英的思念.ssf
转换皮肤
$ ./ssfconv -t fcitx5 【雨欣】蒲公英的思念.ssf 【雨欣】蒲公英的思念
复制到用户皮肤目录
$ mkdir -p ~/.local/share/fcitx5/themes/
$ cp -r 【雨欣】蒲公英的思念 ~/.local/share/fcitx5/themes/
使用该皮肤
用下面这条命令可以看到该皮肤的名称:
$ grep Name ~/.local/share/fcitx5/themes/【雨欣】蒲公英的思念/theme.conf
直接修改配置文件 ~/.config/fcitx5/conf/classicui.conf,将 Theme 的值改成这个皮肤的名称即可。
fcitx(5)+rime的畅快体验
-
下载词库转换工具:imewlconverter
-
安装 dotnet-runtime
-
寻找词库文件
- 比如从搜狗词库中寻找:搜狗细胞词库词库下载词典_输入法字典
- 或者从qq词库中寻找:QQ输入法-词库平台
-
转换词库文件:以“网络工程词库.scel”为例
$ dotnet ImeWlConverterCmd.dll -ct:pinyin -os:linux -i:scel ./网络工程词库.scel -o:rime ./network.txt- -i:scel对应搜狗的词库文件后缀,如果你要转换qq的词库文件把这里改成qcel
- -o:rime ./network.txt表示按照rime输入法词库文件格式转换,转换出的文件在当前目录下,且名字为network.txt
-
转换完成之后将这个文件拷贝到你的用户资料目录下:
- fcitx4: ~/.config/fcitx/rime
- fcitx5:~/.local/share/fcixt5/rime
文件以luna_pinyin.xxx.dict.yaml的格式命名,如luna_pinyin.network.dict.yaml,之后重启fcitx(5)即可
dict.7z 是我的词库文件,拿去解压到你的用户资料目录下即可使用。
环境配置
无论选择哪个版本、哪个仓库,安装完成后,均执行此配置,这里另开一个终端,以普通用户编辑 ~/.pam_environment 文件(这里为普通用户的家目录下,不存在则创建一个),然后添加以下内容:
GTK_IM_MODULE DEFAULT=fcitx
QT_IM_MODULE  DEFAULT=fcitx
XMODIFIERS    DEFAULT=\@im=fcitx
SDL_IM_MODULE DEFAULT=fcitx
之后,登出 KDE Plasma,后重新登陆,此时只需做最后的配置,以安装的为 fcitx:5 为例,
- 右击托盘区输入法图标,选择
Configure - 点击右下角
Add Input Method - search 框下输入
Pinyin - 选中 Pinyin 后点击右下角的
Add Apply后退出界面- 右击托盘区输入法图标,选择
Restart
Rime
安装 rime 输入法引擎
# fcitx4
$ sudo emerge app-i18n/fcitx-rime
# fcitx5
$ sudo emerge app-i18n/fcitx5-rime
下载 rime-cloverpinyin 最新版本(如clover.schema-build-1.1.4.zip)输入方案(配置方案),解压到用户资料夹:
- fcitx:~/.config/fcitx/rime
- fcitx5:~/.local/share/fcitx5/rime
在用户资料夹下创建 default.custom.yaml ,内容为
patch:
  "menu/page_size": 8
  schema_list:
    - schema: clover
其中 8 表示打字的时候输入面板的每一页的候选词数目,可以设置成 1~9 任意数字。
写好该文件之后,点击右下角托盘图标右键菜单,点“重新部署”,然后再点右键,在方案列表里面应该就有“ 🍀️四叶草拼音输入法”的选项了。
更多访问 Rime 官网。
KDE System Settings
Appearance
- Global Theme: Breeze
Workspace Behavior
- General Behavior
- Clicking files or folders: Selects them
- Screen Locking
- Lock screen automatically: 10 minutes
Startup and Shutdown
- Login Screen
- Breeze
Regional Settings
- Date & Time
- Set date and time automatically
Connections
- IPv4
- Method: Automatic (Only addresses)
- DNS Servers: 114.114.114.114
Settings
- Proxy
- Use manually specified proxy configuration
Display Configuration
-
Night Color
-
Activate Night Color
-
Sunset to sunrise at manual location
Beijin: 39.90403 116.40753
-
Bluetooth
蓝牙默认是无法使用的
# systemctl enable bluetooth
首选编辑器
Gentoo Linux 默认安装的编辑器为 nano ,这是一个初始设置下就很适合新手的编辑器,如果你有其它的要求,比如想使用 vim 或者 emacs ,可以先安装
# emerge -vj app-editors/vim
# emerge -vj app-editors/emacs
列出当前存在的编辑器
# eselect editor list
根据所需要的编辑器对应的序号,设置默认
# eselect editor set 「序号」
# . /etc/profile
mutt
# emerge net-mail/fetchmail mail-filter/procmail mail-client/mutt mail-mta/msmtp
mpv
# emerge media-video/mpv
spotify
# emerge media-sound/spotify
youtube-dl
# emerge dev-python/pip
...
aria2
# echo 'net-misc/aria2 bittorrent' > /etc/portage/package.use/aria2
# emerge net-misc/aria2
Typora
# echo '=app-editors/typora-0.11.18::gentoo-zh=' > /etc/portage/package.unmask/typora
# echo '=app-editors/typora-0.11.18::gentoo-zh ~amd64' > /etc/portage/package.accept_keywords/typora
# cp -av /opt/typora/share/icons/hicolor/* /usr/share/icons/hicolor/
zsh
# emerge app-shells/zsh
$ chsh
Password:
Changing the login shell for kurome
Enter the new value, or press ENTER for the default
        Login Shell [/bin/bash]: /bin/zsh
Clash
clash 需要 root 执行,编写一个 service 就可以了。
cfw 无法设置 port,总是重置为 0。
Browsers
关于浏览器的选择有很多,比如
- www-client/google-chrome (chrome 的官方二进制包)
- www-client/google-chrome-beta (chrome 的官方二进制包, beta 分支)
- www-client/chromium (chromium 源码包,需编译,时间很久很久)
- www-client/firefox-bin (火狐官方二进制包,国际版)
- www-client/firefox (火狐源码包,需编译,时间很久)
- www-client/microsoft-edge-beta (Edge 官方二进制包, beta 分支)
- 等
可以自行选择安装。命令依旧是 emerge <包名> 。安装个别浏览器时,可能会因为许可问题导致无法安装,如何解决看下文的 软件的许可 一节。
其它的应用自行发掘。这里有推荐应用列表:
- https://wiki.gentoo.org/wiki/Recommended_applications
- https://wiki.archlinux.org/title/List_of_applications
至此,桌面配置告一段落。
kio-extras
(only for kde)
MTP (Media Transfer Protocol) is a protocol to allow the transfer of files to external devices. It is provided by several programs, most of them depending on FUSE.
# echo 'kde-apps/kio-extras mtp' > /etc/portage/package.use/kio-extras
# emerge --ask kde-apps/kio-extras
Gwenview
KDE app,看图。
# emerge kde-apps/gwenview
Okular
KDE app,PDF 阅读。
# emerge kde-apps/okular
KTimer
KDE app,类似于 cronie,只不过是GUI。
# emerge kde-apps/ktimer
KClock
KDE app,一个时钟。
# eselect repository enable guru
# emerge --sync guru
# echo '*/*::guru' > /etc/portage/package.mask/guru
# echo '=kde-apps/kclock-21.12::guru' > /etc/portage/package.unmask/kclock
# echo '=kde-apps/kclock-21.12::guru ~amd64' > /etc/portage/package.accept_keywords/kclock
# echo '=kde-frameworks/kirigami-addons-0.2::guru' >> /etc/portage/package.unmask/kclock
# echo '=kde-frameworks/kirigami-addons-0.2::guru ~amd64' >> /etc/portage/package.accept_keywords/kcloc
# emerge kde-apps/kclock
RSIBreak
番茄钟
LibreOffice
# emerge app-office/libreoffice-bin
Flameshot
很棒的截图软件
$ sudo emerge media-gfx/flameshot
Spectacle
KDE app,用的不是很习惯。
# emerge kde-apps/spectacle
KeePassXC
# emerge app-admin/keepassxc
PPSSPP
# echo "games-emulation/ppsspp ~amd64" >> /etc/portage/package.accept_keywords/ppsspp
# emerge games-emulation/ppsspp
papirus-icon-theme
$ sudo emerge -a papirus-icon-theme
Vulkan
# emerge --ask media-libs/vulkan-loader
tree
# emerge app-text/tree
qemu
# echo 'QEMU_SOFTMMU_TARGETS="x86_64"' >> /etc/portage/make.conf
# echo 'QEMU_USER_TARGETS="x86_64"' >> /etc/portage/make.conf
# emerge app-emulation/qemu net-fs/samba
# gpasswd -a kurome kvm
Could not access KVM kernel module: Permission denied
Docker
# emerge --ask --verbose app-emulation/docker
# systemctl enable docker.service
# systemctl start docker.service
# usermod -aG docker <username>
# docker run --rm hello-world
lsusb
# emerge --ask sys-apps/usbutils
p7zip
# emerge app-arch/p7zip
Important: The 7-zip archive format does not store standard Unix file permissions such as owner/group or extended file attributes. Those who desire to use 7-zip as a long-term backup or archiving solution should wrap files in a tar archive before compressing with 7z. Use the following command to archive directories of files, preserving Unix file permissions:
$ tar cf - <directory> | 7za a -si <directory>.tar.7z
To extract:
$ 7za x -so <directory>.tar.7z | tar xf -
zip
# emerge app-arch/zip
Ark
File archiver by KDE
# emerge kde-apps/ark
ADB and Fastboot
Fastboot is included with ADB inside the dev-util/android-tools package::
# emerge --ask dev-util/android-tools
To run adb without root privileges then the unprivileged user account must be added to the plugdev group:
# groupmod -a plugdev -U kurome
no permissions (missing udev rules? user is in the plugdev group)
Each Android device has a USB vendor/product ID. An example for HTC Evo is:
vendor id: 0bb4
product id: 0c8d
Plug in your device and execute:
$ lsusb
It should come up something like this:
Bus 002 Device 006: ID 0bb4:0c8d High Tech Computer Corp.
需添加 udev 规则:使用下面的模板,并用你的 [VENDOR ID] 和 [PRODUCT ID] 替换里面的值;确保你是 adbusers 用户组的成员,以访问 adb 设备。 然后把这些规则复制到 /etc/udev/rules.d/51-android.rules:
SUBSYSTEM=="usb", ATTR{idVendor}=="[VENDOR ID]", MODE="0666", GROUP="adbusers"
SUBSYSTEM=="usb",ATTR{idVendor}=="[VENDOR ID]",ATTR{idProduct}=="[PRODUCT ID]",SYMLINK+="android_adb"
SUBSYSTEM=="usb",ATTR{idVendor}=="[VENDOR ID]",ATTR{idProduct}=="[PRODUCT ID]",SYMLINK+="android_fastboot"
再加载刚定义的规则,运行:
# udevadm control --reload-rules
If adb still does not detect the device after plugging your device back in, kill and restart the adb server as root and check devices again:
# adb kill-server
# adb start-server
$ adb devices
adb: device unauthorized.
请打开手机同意 USB 调试。
File transfer
Push a file
$ adb push mypicture.png /sdcard/on/device
Push a folder
$ adb push myfolder /sdcard/on/device
Push all files in a folder
$ adb push myfolder/ /sdcard/on/device
Pull a file
$ adb pull /sdcard/on/device/mypicture.png
Pull a folder
$ adb pull /sdcard/on/device /home/̩$(whoami)/android-folder/
Flatpak
# cat >> /etc/portage/package.accept_keywords/flatpak
sys-apps/flatpak ~amd64
acct-user/flatpak ~amd64
acct-group/flatpak ~amd64
dev-util/ostree ~amd64
# emerge sys-apps/flatpak
# flatpak remote-add --if-not-exists flathub https://flathub.org/repo/flathub.flatpakrepo
# flatpak remote-modify flathub --url=https://mirror.sjtu.edu.cn/flathub
neofetch
$ sudo emerge app-misc/neofetch
使用自定义图像
默认情况下,Neofetch 将显示你的操作系统 logo 以及系统信息。当然,你可以根据需要更改图像。
要显示图像,Linux 系统应该安装以下依赖项:
- w3m-img(用于显示图像。w3m-img 有时与 w3m 包捆绑在一起),
- Imagemagick(用于创建缩略图),
大多数 Linux 发行版的默认仓库中都提供了 w3m-img 和 ImageMagick 包。因此,你可以使用你的发行版的默认包管理器来安装它们。
现在,运行以下命令以使用自定义图像显示系统信息:
$ neofetch --w3m /home/sk/Pictures/image.png
或者,
$ neofetch --w3m --source /home/sk/Pictures/image.png
或者,你可以指向包含以下图像的目录。
$ neofetch --w3m <path-to-directory>
配置 Neofetch
当我们第一次运行 Neofetch 时,它默认会为每个用户在 $HOME/.config/neofetch/config.conf 中创建一个配置文件。你可以调整此文件来告诉 neofetch 该显示、删除和/或修改哪些详细信息。
还可以在不同版本中保留此配置文件。这意味着你只需根据自己的喜好自定义一次,并在升级到更新版本后使用相同的设置。你甚至可以将此文件共享给你的朋友和同事,使他拥有与你相同的设置。
flaggie
安装flaggie来更加方便的管理单个包的USE变量
$ sudo emerge app-portage/flaggie
用法:比如添加a包的b特性
# flaggie a +b
去掉c包的d特性
# flaggie c -d
Crossover
注意:安装很麻烦,我转用其他方案了。
# nano /etc/portage/package.accept_keywords/crossover
app-emulation/crossover-bin ~amd64
# nano /etc/portage/package.use/crossover
sys-libs/ncurses -gpm
# USE="abi_x86_32 abi_x86_64" emerge app-emulation/crossover-bin
作为环境变量的USE设定特点是,本次安装的所有软件都启用该 USE,区别在 make.conf 中使整个系统都启用该 USE 和在 package.use 中为一个一个的包设置同一个 USE(这种情况每次运行只会提示一个包,特别麻烦)。
ABI_X86 is a USE_EXPAND variable; setting ABI_X86="32 64" or USE="abi_x86_32 abi_x86_64" are equivalent.
Bottles
$ sudo flatpak install flathub com.usebottles.bottleses
deja-dup
$ sudo nano /etc/portage/package.accept_keywords/deja-dup
app-backup/deja-dup ~amd64
$ sudo nano /etc/portage/package.use/deja-dup
gnome-base/gvfs fuse
$ sudo app-backup/deja-dup
dotfiles
General-purpose dotfiles utilities
These are programs that help with managing, syncing, and/or installing your dotfiles.
- chezmoi (6282 stars) makes it easy to manage your dotfiles across multiple machines, securely. chezmoi is easy to install, quick to start with, and is very powerful. You can install chezmoi and your dotfiles with a single command, without needing Python installed, or even git. Read how chezmoi compares to other dotfile managers.
- Dotbot (5173 stars) is a lightweight standalone tool to bootstrap dotfiles, making it easy to have a “one click” installation/upgrade process for your dotfiles.
- yadm (3239 stars) is a dotfile management tool which supports system-specific alternate files/templating, encryption of private data, custom bootstrap actions, and integration with other git-aware tools like vim-fugitive, tig, git-crypt, etc.
- rcm (2742 stars) is a set of well-documented shell scripts that help manage your dotfiles. It is easily installable on macOS with the homebrew package manager, but works on all Unix operating systems.
- Home Manager (2696 stars) by Robert Helgesson is a system built for managing NixOS user environments using the Nix package manager and the Nixpkgs libraries.
- Homesick (2342 stars) by Josh Nichols. Homesick makes it easy to symlink and clone dotfiles repos.
- vcsh (1947 stars) by Richard “RichiH” Hartmann.
vcshmanages all your dotfiles in Git without the need for symlinks. Any number of Git repositories will co-exist in parallel in your$HOMEwithout interfering with each other. Advanced use cases with different branches for different systems are supported by default. An extensive hook system lets you customize your repositories.vcshincludes batch push, pull, and status commands which operate on all your repositories at once. - Homeshick (1827 stars) by Anders Ingemann is like Homesick but written in bash. Great to combine with myrepos.
- fresh (1079 stars) is a tool to source dotfiles from others into your own. It supports shell configuration (aliases, functions, etc.) as well as config files (e.g.
ackrcandgitconfig). Think of it as Bundler for your dotfiles. - dotdrop (1069 stars) makes the management of dotfiles between different hosts easy. It allows to store your dotfiles on git and automagically deploy different versions on different setups.
- shallow-backup (870 stars) lets you easily create lightweight backups of installed packages, applications, fonts and dotfiles, and automatically push them to a remote Git repository.
- dotfiles (539 stars) Dotfile management made easy. Written in Python (available on PyPI) by Jon Bernard.
- Ellipsis (336 stars) is a package manager for dotfiles.
- dotter (325 stars) A dotfile manager and templater written in Rust, with Windows/Linux/Mac support.
- Dotsync (284 stars) utility for syncing dotfiles between multiple machines from a Git repo or push using rsync.
- Ghar (268 stars) by Brandon Philip. Ghar is a standalone Python script for managing Git repos symlinked into your home.
- Homemaker (223 stars) by Alex Yatskov. Homemaker is a standalone tool written in Golang to manage both common and machine-specific dotfile settings. Homemaker can be configured in TOML, YAML or JSON.
- dotfiler (223 stars) is inspired by homesick and Zach Holman’s dotfiles, made using principle of KISS.
- Pearl (186 stars) is a brand new revolutionary package manager that allows to automatically activate dotfiles whenever shells or editors start via a smart hook mechanism. Dotfiles are treated as packages that coexist together seamlessly and can be fully controlled and synced across different systems. There is a wide range of packages already available in the Official Pearl Hub.
- comtrya (155 stars) configuration Management for Localhost / dotfiles.
- dotgit (148 stars) by Kobus van Schoor. A comprehensive and versatile dotfiles manager which helps to synchronize your dotfiles between multiple computers and devices.
- kody (130 stars) is a dotfiles runner/manager written with node inspired by Zach Holman’s popular dotfiles.
- dfm (113 stars) is a utility to manage your dotfiles, lightweight and simple.
- GNU Stow is a symlink farm manager, useful for automatically (and safely) linking your dotfiles folder into your home directory.
使用 GNU stow 管理你的點文件
我昨天偶然間發現一些我覺得值得分享的經驗,就是那種「爲毛我沒有早點知道這個?」那一類的。 我將在這篇文章中介紹如何使用 GNU Stow 管理你的 GNU/Linux 系統中位於用戶家目錄裏的各種配置文件 (通常又叫「點文件(dotfiles)」比如 .bashrc)。
這件事的困難之處在於,如果能用版本管理系統(VCS, Version Control System)比如 Git, Mercurial(hg), Bazaar(bzr) 管理點文件的話會非常方便,但是這些點文件大部分都位於家目錄的頂級目錄下, 在這個位置不太適合初始化一個版本管理倉庫。這些年下來我試過很多程序,設計目的在於解決這個問題, 幫你把這些配置文件安置在某個下級目錄中,然後安裝或者鏈接這些文件到它們應該在的位置。 嘗試下來這些程序沒有一個真正能打動我。它們要麼有很多依賴(比如 Ruby 和一大坨庫), 要麼需要我記住如何用它,考慮到同步配置這種不算經常使用的場合,要記住用法真的挺難。
最近我在用 GNU Stow 來管理我從源代碼在本地編譯安裝到 /usr/local/中的一些程序。 基本上說,在這種常見用法下,是你把這些本地編譯的包配置安裝到 /usr/local/stow/${PKGNAME}-{PKGVERSION} 這樣的位置,然後在 /usr/local/stow/目錄中執行 # stow ${PKGNAME}-${PKGVERSION} ,然後它就會爲程序所有的文件創建符號鏈接放在 /usr/local 中合適的地方。然後當你想用 Stow 卸載這個程序的時候,就不必再考慮會留下什麼垃圾文件, 或者找不到安裝時用的 Makefile 了。這種安裝方式下也可以非常容易地切換一個程序的不同版本 (比如我想嘗試不同配置選項下的 dwm 或者 st 的時候)。
前段時間在我掃郵件列表的時候,看到某個帖子中某人在說使用 Stow 管理安裝他的點文件。 當時我沒特別在意這個帖子,但是大概我大腦潛意識把它歸檔保存爲今後閱讀了。 昨天我想起來試試這種用法,試過後我不得不說,這比那些專門設計用來做這任務的點文件管理器要方便太多了, 雖然表面上看起來這種用法沒那麼顯而易見。
方法很簡單。我建了個 ${HOME}/dotfiles 文件夾,然後在裏面爲我想管理的每個程序配置都 創建一個子文件夾。然後我把這些程序的配置從原本的家目錄移動到這每一個對應的子文件夾中, 並保持它們在家目錄中的文件夾結構。比如,如果某個文件原本應該位於家目錄的頂層文件夾裏, 那它現在應該放在這個程序名子目錄的頂層文件夾。如果某個配置文件通常應該位於默認的 ${XDG_CONFIG_HOME}/${PKGNAME} 位置 ( ${HOME}/.config/${PKGNAME} ), 那麼現在它應該放在 ${HOME}/dotfiles/${PKGNAME}/.config/${PKGNAME} ,如此類推。然後在那個 dotfiles 文件夾裏面,直接運行 $ stow $PKGNAME 命令, Stow 就會爲你自動創建這些配置文件的符號鏈接到合適的位置。接下來就很容易爲這個 dotfiles 目錄初始化版本管理倉庫,從而記錄你對這些配置文件做的修改(並且這也可以極度簡化在不同電腦之間 共享配置,這也是我想要這麼做的主要原因)。
舉個例子,比如說你想管理 Bash, VIM, Uzbl 這三個程序的配置文件。Bash 會在家目錄的頂層文件夾 放幾個文件; VIM 通常會有在頂層文件夾的 .vimrc 文件和 .vim 目錄;然後 Uzbl 的配置位於 ${XDG_CONFIG_HOME}/uzbl 以及 ${XDG_DATA_HOME}/uzbl 。於是在遷移配置前,你的家目錄的文件夾結構應該看起來像這樣:
home/
    brandon/
        .config/
            uzbl/
                [...some files]
        .local/
            share/
                uzbl/
                    [...some files]
        .vim/
            [...some files]
        .bashrc
        .bash_profile
        .bash_logout
        .vimrc
然後遷移配置的方式是,應該建一個 dotfiles 子目錄,然後像這樣移動所有配置文件:
home/
    /brandon/
        .config/
        .local/
            .share/
        dotfiles/
            bash/
                .bashrc
                .bash_profile
                .bash_logout
            uzbl/
                .config/
                    uzbl/
                        [...some files]
                .local/
                    share/
                        uzbl/
                            [...some files]
            vim/
                .vim/
                    [...some files]
                .vimrc
然後執行以下命令:
$ cd ~/dotfiles
$ stow bash
$ stow uzbl
$ stow vim
然後,瞬間,所有你的配置文件(的符號鏈接)就安安穩穩地放入了它們該在的地方,無論原本這些目錄結構 有多麼錯綜複雜,這樣安排之後的 dotfiles 文件夾內的目錄結構立刻整理得有條有理, 並且可以很容易地轉換成版本控制倉庫。非常有用的一點是,如果你有多臺電腦,可能這些電腦並沒有 安裝完全一樣的軟件集,那麼你可以手選一些你需要的軟件配置來安裝。在你的 dotfiles 文件夾中總是 可以找到所有的配置文件,但是如果你不需要某個程序的某份配置,那你就不對它執行 stow 命令,它就不會擾亂你的家目錄。
嗯,以上就是整個用法介紹。希望能有別人覺得這個用法有用!我知道對我來說這個非常有幫助。
Chezmoi
020-04-14 18:36
在 Linux 中,点文件是隐藏的文本文件,从 Bash、Git 到 i3 或 VSCode 等更复杂的许多应用程序,都用它存储配置设置。
这些文件大多数都放在 ~/.config 目录中或用户主目录中。编辑这些文件使你可以自定义也许没有提供设置菜单的应用程序,并且它们可以跨设备甚至是跨其它 Linux 发行版移植。但是,整个 Linux 发烧友社区的讨论焦点是如何管理这些点文件以及如何共享它们。
我们将展示一个名为 Chezmoi 的工具,该工具与其它工具略有不同。
点文件管理的历史
如果你在 GitHub 上搜索“dotfiles”,那么你将看到有超过 10 万个存储库在解决一个目标:将人们的点文件存储在可共享且可重复的领地中。但是,除了都在使用 Git 之外,它们存储文件的方式各有不同。
虽然 Git 解决了代码管理问题,也将其转换为配置文件管理,但它并没有解决如何区分发行版、角色(例如家用计算机与工作计算机)、机密信息管理以及按设备配置的问题。
因此,许多用户决定制定自己的解决方案,多年来,社区已经做出了许多成果。本文将简要介绍已有的一些解决方案。
安装问题
如果将点文件存储在 Git 存储库中,你肯定希望可以让更改轻松地自动应用到主目录之中,乍一看,最简单的方法是使用符号链接,例如 ln -s ~/.dotfies/bashrc ~/.bashrc。这可以使你的更改在更新存储库时立即就绪。
符号链接的问题在于管理符号链接可能很麻烦。Stow 和 RCM 可以帮助你管理这些,但是这些并不是非常舒服的解决方案。下载后,需要对私有文件进行适当的修改和设置访问模式。如果你在一个系统上修改了点文件,然后将存储库下载到另一个系统,则可能会发生冲突并需要进行故障排除。
解决此问题的另一种方法是编写自己的安装脚本。这是最灵活的选项,但要权衡花费更多时间来构建自定义解决方案是否值得。
机密信息问题
Git 旨在跟踪更改。如果你在 Git 存储库中存储密码或 API 密钥之类的机密信息,则会比较麻烦,并且需要重写 Git 历史记录以删除该机密信息。如果你的存储库是公开的,那么如果其他人下载了你的存储库,你的机密信息将不再保密。仅这个问题就会阻止许多人与公共世界共享其点文件。
多设备配置问题
问题不在于如何将配置拉到多个设备,而是当你有多个需要不同配置的设备的问题。大多数人通过使用不同的文件夹或使用不同的复刻fork来处理此问题。这使得难以在不同设备和角色集之间共享配置。
Chezmoi 是如何干的
Chezmoi 是一种考虑了以上问题的用于管理点文件的工具,它不会盲目地从存储库复制或符号链接文件。 Chezmoi 更像是模板引擎,可以根据系统变量、模板、机密信息管理器和 Chezmoi 自己的配置文件来生成你的点文件。
Chezmoi 入门
你可以使用以下命令下载 Chezmoi 的当前版本。
$ curl -sfL https://git.io/chezmoi | sh
让我们继续使用以下方法创建你的存储库:
$ chezmoi init
它将在 ~/.local/share/chezmoi/ 中创建你的新存储库。你可以使用以下命令轻松地切换到该目录:
$ chezmoi cd
让我们添加第一个文件:
chezmoi add ~/.bashrc
这将你的 .bashrc 文件添加到 chezmoi 存储库。
注意:如果你的 .bashrc 文件实际上是一个符号链接,则需要添加 -f 标志以跟随它来读取实际文件的内容。
现在,你可以使用以下命令编辑该文件:
$ chezmoi edit ~/.bashrc
现在让我们添加一个私有文件,这是一个具有 600 或类似权限的文件。我在 .ssh/config 中有一个文件,我想通过使用如下命令添加它:
$ chezmoi add ~/.ssh/config
Chezmoi 使用特殊的前缀来跟踪隐藏文件和私有文件,以解决 Git 的限制。运行以下命令以查看它:
$ chezmoi cd
你可以使用以下方法应用任何更改:
$ chezmoi apply
并使用如下命令检查有什么不同:
$ chezmoi diff
使用变量和模板
要导出 Chezmoi 可以收集的所有数据,请运行:
$ chezmoi data
其中大多数是有关用户名、架构、主机名、操作系统类型和操作系统名称的信息。但是你也可以添加我们自己的变量。
继续,运行:
$ chezmoi edit-config
然后输入以下内容:
[data]
         email = "fedorauser@example.com"
         name = "Fedora Mcdora"
保存文件,然后再次运行 chezmoi data。你将在底部看到你的电子邮件和姓名已经添加成功。现在,你可以将这些与 Chezmoi 的模板一起使用。运行:
$ chezmoi add -T --autotemplate ~/.gitconfig
来将你的 .gitconfig 作为模板添加到 Chezmoi 中。如果 Chezmoi 成功地正确推断了模板,你将获得以下信息:
[user]
         email = "{{ .email }}"
         name = "{{ .name }}"
如果没有,则可以将文件更改为这样。
使用以下方法检查文件:
$ chezmoi edit ~/.gitconfig
然后使用:
$ chezmoi cat ~/.gitconfig
来查看 Chezmoi 为此文件生成什么。我生成的示例如下:
[root@a6e273a8d010 ~]# chezmoi cat ~/.gitconfig
[user]
    email = "fedorauser@example.com"
    name = "Fedora Mcdora"
[root@a6e273a8d010 ~]#
它将在我们的 Chezmoi 配置中生成一个充满变量的文件。你也可以使用变量执行简单的逻辑语句。一个例子是:
{{- if eq .chezmoi.hostname "fsteel" }}
# 如果主机名为 "fsteel" 才包括此部分
{{- end }}
请注意,要使其正常工作,该文件必须是模板。你可以通过查看文件是否在 chezmoi cd 中的文件名后附加 .tmpl 或使用 -T 选项读取文件来进行检查。
让机密信息保持机密
要对设置进行故障排除,请使用以下命令。
$ chezmoi doctor
这里重要的是它还向你显示了所支持的密码管理器。
[root@a6e273a8d010 ~]# chezmoi doctor
 warning: version dev
      ok: runtime.GOOS linux, runtime.GOARCH amd64
      ok: /root/.local/share/chezmoi (source directory, perm 700)
      ok: /root (destination directory, perm 550)
      ok: /root/.config/chezmoi/chezmoi.toml (configuration file)
      ok: /bin/bash (shell)
      ok: /usr/bin/vi (editor)
 warning: vimdiff (merge command, not found)
      ok: /usr/bin/git (source VCS command, version 2.25.1)
      ok: /usr/bin/gpg (GnuPG, version 2.2.18)
 warning: op (1Password CLI, not found)
 warning: bw (Bitwarden CLI, not found)
 warning: gopass (gopass CLI, not found)
 warning: keepassxc-cli (KeePassXC CLI, not found)
 warning: lpass (LastPass CLI, not found)
 warning: pass (pass CLI, not found)
 warning: vault (Vault CLI, not found)
 [root@a6e273a8d010 ~]#
你可以使用这些客户端,也可以使用通用客户端,也可以使用系统的密钥环。
对于 GPG,你需要使用以下命令将以下内容添加到配置中:
$ chezmoi edit-config
[gpg]
   recipient = "<Your GPG keys Recipient>"
你可以使用:
$ chezmoi add --encrypt
来添加任何文件,这些文件将在你的源存储库中加密,并且不会以纯文本格式公开。Chezmoi 会在应用时自动将其解密。
我们也可以在模板中使用它们。例如,存储在 Pass 中的机密令牌。继续,生成你的机密信息。
在此示例中,它称为 githubtoken:
rwaltr@fsteel:~] $ pass ls
 Password Store
 └── githubtoken
 [rwaltr@fsteel:~] $
接下来,编辑你的模板,例如我们之前创建的 .gitconfig 并添加以下行。
token = {{ pass "githubtoken" }}
然后让我们使用检查:
[rwaltr@fsteel:~] $ chezmoi cat ~/.gitconfig
 This is Git's per-user configuration file.
 [user]
           name = Ryan Walter
           email = rwalt@pm.me
           token = mysecrettoken
 [rwaltr@fsteel:~] $
现在,你的机密信息已在密码管理器中妥善保护,你的配置可以公开共享而没有任何风险!
Tips
Petrus.Z
Portage
command
#!/bin/bash
euse -E use-flags	#设置允许use flag(修改/etc/make.conf中的USE)
euse -D use-flags	#设置禁止use flag(修改/etc/make.conf中的USE)
euse -i use-flag	#查询use flag描述

eix RegExp	#搜索软件包
eix -I	#列出系统中已安装的软件包
eix --installed-with-use `use`	#显示哪些已安装的包有`use` flag

equery files `PackageName`	#列出已安装包的文件
equery belongs `FileName`	#查询已安装的指定文件属于哪个包
equery hasuse `use`	#查询哪些已安装的包有use flag
equery uses `PackageName`	#显示packege有哪些use

ebuild xxx.ebuild digest	#生成摘要文件
ebuild /var/db/pkg/xxx/xxx.ebuild config	#初始化配置

equery d package	#查看依赖package的软件
equery g package	#查看package的依赖

qdepends package	# 查询package的依赖
qdepends -rv package	#输出类似ebuild中或与shell兼容并格式化的依赖
qdepends -Q package	# 查询哪些包依赖package
qlist package	# 查看package的所有文件列表
qfile file	# 查看file被哪个package拥有
qcheck package	# 检查package完整性
qgrep -l package	# 查找提及package名称的ebuild
qgrep -JN package	# -J限制仅查找已安装的包,-N将打印atom而不是文件名
qlop -um        # 查看merge和unmerge log
qlop -rt        # 查看那当前emerge还有运行了多长时间
qmanifest
qtegrity

genlop -c         #查看当前正在merge的package的编译时间
genlop -t package	#查看package的编译时间
genlop -u         #查看安装与删除的package历史

e-file

eread
elogv
eclean
epkginfo
apply patches
#!/bin/bash

#1.create dir for patches
mkdir -p /etc/portage/patches/<package_class>/<package_name>-<package_version>
#2.put patches at dir which just created above
#3.test patches
cd $(portageq get_repo_path / gentoo)/<package_class>/<package_name>
ebuild <package_name>-<package_version>.ebuild clean prepare
#4.With the message "User patches applied." all is good and the package needs to be re-emerged as normally.
Kernel
#!/bin/bash

#1.select the kernel will use
eselect kernel list
eselect kernel set <No.>
#2.configure the kernel with old config (and diff with previous config)
zcat /proc/config.gz > /usr/src/linux/.config
diff .config ../linux-x.xx.x-gentoo/.config
make silentoldconfig/syncconfig/oldconfig
#3.compile&install kernel/modules
make -j9
make install
# compile&install out-of-tree module(s)
make modules_prepare
emerge --ask @module-rebuild
# install initramfs
genkernel --install initramfs
#4.clean up old kernel files
eclean-kernel
grub-mkconfig -o /boot/grub/grub.cfg
UpgradeGentoo
How to upgrade gentoo
#!/bin/bash

#1.sync portage tree to lastest
emerge-websync
emerge --sync
#2.upgrade the system
emerge -avutDN --with-bdeps=y @world # -a = --ask, -v = --vebose, -u = --update, -t == --tree, -D = --deep, -N = --newuse
emerge -a @smart-live-rebuild
#3.may be need to update the new config file
dispatch-conf # or etc-update
#4.clean the unused package
emerge -ac # -c = --depclean
#5.rebuild dependency library
emerge @preserved-rebuild
revdep-rebuild
emerge -a @module-rebuild
#6.clean old distfiles
eclean -d distfiles # or eclean-dist -d
How to upgrade python local package
# 通过脚本维护local-python-world列表

# 安装或删除<package>
pip_user install <package>
pip_user uninstall <package>

# 将所有local python package升级
pip_upgrade
Freeing disk space
How to Change & Set the Default crontab Editor
$ EDITOR=nano crontab -e
How to update dolphin file manager in real time
The way in order to refresh Dolphin is to press F5. However, this would be manual.
In order to continuously refresh, an automatic solution, create a bash script that runs on boot. This bash script should press F5 every five seconds if Dolphin is open. Create a file named dolphin-update in /usr/local/bin with the following contents:
#!/bin/bash
while true; do
    PID=$(pgrep "dolphin")
    if [ "$?" -ne "0" ]; then
        xdotool key 'F5'
    fi
    sleep 5
done
You may need to first create it as root and then change the owner to your user:
sudo chown username:username /usr/local/bin/dolphin-update
Ensure that it has executable permissions:
chmod +x /usr/local/bin/dolphin-update
Now we need that to run on boot. To do that run sudo crontab -e and add the following line to the end of the file:
@reboot /usr/local/bin/dolphin-update
This script will run on boot.
You should now have a continuously refreshing Dolphin!
There are some caveats to this script.
- If you open Dolphin, go to another application where F5 triggers something, (eg Chromium refreshes the page), the script will still run and be a constant annoyance. Solution: Close Dolphin when not actively using it.
- As a
cronjob is used, if your computer crashes, the script will not run on boot. However this is a problem withcronnot the script.
What the script means, line by line:
#!/bin/bash- shebang to run with bashwhile true; do- run continuouslyPID=$(pgrep "dolphin")- find the process ID of adolphininstance. This is purely there to check whether there is even a instance of Dolphin running.if [ "$?" -ne "0" ]; then- check the result of whether there is a Dolphin instance running. If there is, then …xdotool key 'F5'- press F5fi- end theifblocksleep 5- wait 5 seconds before repeating the processdone- end the while block
How do I convert a .PNG into a .ICO?
$ ffmpeg -i img.png img.ico
$ ffmpeg -i img.png -vf scale=32:32 img.ico
Crop a photo to fit a circle using ffmpeg
$ ffmpeg -i avatar.png -i mask.png -filter_complex "[0]scale=400:400[ava];[1]alphaextract[alfa];[ava][alfa]alphamerge" output.png
scale=400:400 是 mask.png 的大小。
mask.png is just a circle, example:

Path to KDE Picture of the Day
$ cd $HOME/.cache/plasma_engine_potd
$ file *
apod:             JPEG image data, JFIF standard 1.01, resolution (DPI), density 96x96, segment length 16, comment: "Description: Adobe ImageReady", baseline, precision 8, 960x634, components 3
bing:             JPEG image data, JFIF standard 1.01, resolution (DPI), density 96x96, segment length 16, baseline, precision 8, 1920x1080, components 3
unsplash:1065976: JPEG image data, JFIF standard 1.01, resolution (DPI), density 72x72, segment length 16, baseline, precision 8, 3840x2160, components 3
Baloo
Baloo is the file indexing and file search framework for KDE Plasma, with a focus on providing a very small memory footprint along with with extremely fast searching.
Indexing limitations
Baloo uses the file metadata extractors in KFileMetadata to get information about each file it indexes. This means for a file’s content to be indexed
- the file must have a recognizable MIME type
- KDE must have an extractor for that MIME type
Other limitations:
- Baloo doesn’t index text files (those whose MIME type is detected as “text/something") over 10 MB (source).
- The KFileMetadata extractor for text attempts to convert text to Unicode. If the file uses another encoding, such as iso-8859-1, any file contents after the first character that is invalid in Unicode will not be indexed. You may find the
-ioption to thefilecommand-line utility useful; it tries to infer the character set of a file, e.g. file -i path/to/myfile.txt.
Using Baloo
Baloo is not an application, but a daemon to index files. Applications can use the Baloo framework to provide file search results. For example, Dolphin’s Content search can use Baloo.
KDE System Settings > File Search provides an intentionally limited number of settings. You can make additional adjustments in Baloo’s configuration file.
balooctl
balooctl is a CLI command to perform certain operations on Baloo. Enter balooctl --help in a terminal app such as userbase:Konsole to list its available subcommands.
Baloo File Extractor Crashes on every boot
I find Baloo fragile and a nuisance. Sometimes it works OK on my amd64 and ~amd64 machines, other times not. If you are not interested in file indexing, you can disable it:
$ balooctl disable
这个不好用,菊苣(巨巨、大佬)们都推荐关闭。
KDE Baloo 崩溃问题与调整
Baloo 是 KDE Plasma 的文件索引和文件搜索框架,专注于提供非常小的内存占用以及极快的搜索。KDE 的 Dolphin 和 KRunner 都会调用 Baloo 进行文件搜索。 但是在一些用户的电脑上 Baloo 会崩溃,究其原因,是 Baloo 尝试索引一些奇奇怪怪的文件夹与文件内容所致。解决这个问题也很简单,方法有三。
- 其一是只让 Baloo 索引指定的文件夹,比如
~/文档或~/音乐,索引整个家目录是完全不科学的。在 KDE 的搜索页面即可修改。“未索引”即代表不会索引,“已索引”就是在索引范围内。 - 其二是只索引文件名称,把“同时索引文件内容”给取消勾选。
- 其三就是直接关闭 Baloo 的索引功能,把“启用文件搜索”给取消勾选(只是取消索引)。
前两种措施采取一个应该就可以解决崩溃问题。 不推荐用户强行卸载 Baloo 相关包,或者直接砍掉相关服务,因为 Dolphin 的 KDE 的搜索都会依赖 Baloo,直接砍掉的话这些功能会异常。
更多相关信息参见 KDE 社区维基:Baloo
内核升级一般步骤
升级内核
建议在make.conf中添加USE='symlink',然后更新系统。
$ sudo emerge --ask --verbose --update --deep --newuse @world
Configuration
$ sudo make menuconfig
Build
$ sudo make -j4
Install
$ sudo make modules_install
$ sudo make install
BootLoader
$ sudo grub-mkconfig -o /boot/grub/grub.cfg
重启以应用新的内核。
Clean
$ sudo eclean-kernel -n 1
仅保留当前内核。
Questions
Problem with transparencies and windowing ghosting out
Anyhow, I now applied the “force smoothest animations” in the KDE compositor settings and it seems to have done the trick!Telegram not launching from the browser xdg-open
Telegram not launching from the browser xdg-open
I am receiving the following message:
Unable to create io-slave. klauncher said: Unknown protocol 'tg'.
Hey! So it’s easy to solve
- Open the folder
\~/.local/share/applications - find some files about telegram desktop, like an example, my is
userapp-Telegram Desktop-FXJ6T0.desktop - Add the line at the end of file
MimeType=application/x-xdg-protocol-tg;x-scheme-handler/tg; - Reload your browser (maybe do not need…)
- Enjoy!
我的该目录下有两个与telegram相关的desktop文件,都改了之后就行了。
How to reset KDE / display settings after a move to a new machine
I had to remove .local/share/kscreen on plasma5
How can I reset my display settings through terminal?
Removing ~/.config/monitors.xml should do it:
cfw 在gentoo下用不了,设置端口总为0;
clash 在gentoo下需要root权限,最好用 systemd service 运行。