
The goals of the FreeBSD Project are to provide software that may be used for any purpose and without strings attached. Many of us have a significant investment in the code (and project) and would certainly not mind a little financial compensation now and then, but we are definitely not prepared to insist on it. We believe that our first and foremost “mission” is to provide code to any and all comers, and for whatever purpose, so that the code gets the widest possible use and provides the widest possible benefit. This is, I believe, one of the most fundamental goals of Free Software and one that we enthusiastically support.
That code in our source tree which falls under the GNU General Public License (GPL) or Library General Public License (LGPL) comes with slightly more strings attached, though at least on the side of enforced access rather than the usual opposite. Due to the additional complexities that can evolve in the commercial use of GPL software we do, however, prefer software submitted under the more relaxed BSD license when it is a reasonable option to do so.
Jordan Hubbard - FreeBSD Handbook
Install FreeBSD
BIOS
Disable unused and unwanted options.
Install
-
To put the image on the pendrive we will use the dd tool available on almost any Mac OS X (macOS) and Linux system. For Windows You will have to download it from here – dd for windows( bs=1M on Linux/Windows ).(可用 Rufus 替代)
sudo dd if=FreeBSD-11.1-RELEASE-amd64-memstick.img of=/dev/da1 bs=1m -
When we have a new machine there is always a problem with new name for it. The RFC 1178 Choosing a Name for Your Computer from 1990 year tries to address that issue
-
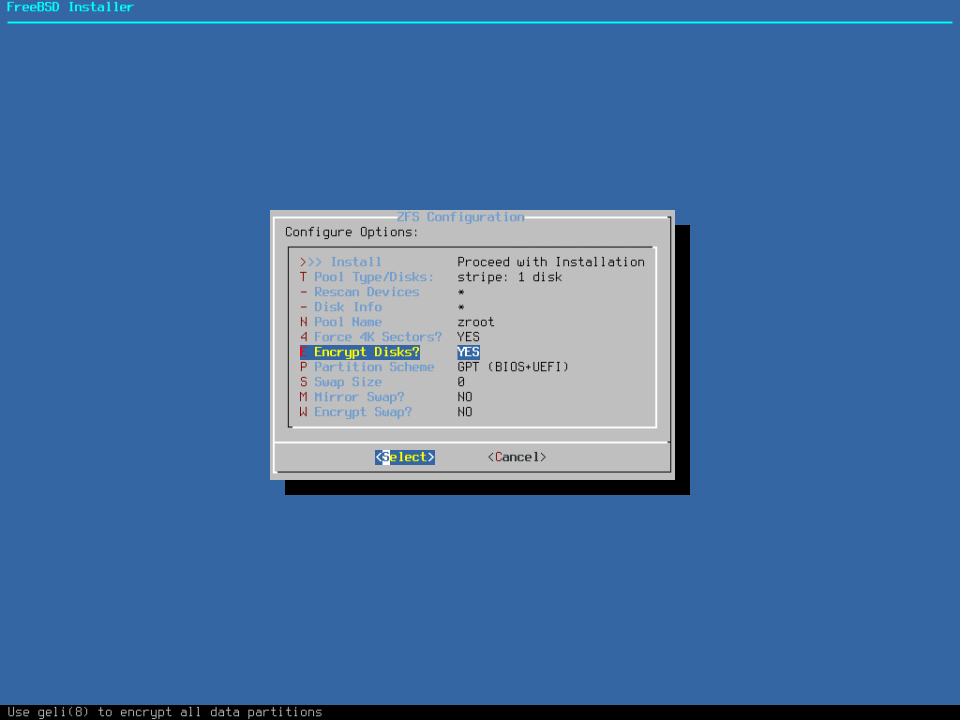
We will use ZFS because we want to use Boot Environments with sysutils/beadm port.
- Hit [ENTER] on the
Pool Type/Disksto select target disk to install FreeBSD on. - Now (in FreeBSD 12.x) it is possible to install FreeBSD on GELI encrypted root on ZFS pool without any additional partitions or filesystems. You need to select is
Yesfor theEncryptionpart . - I advice using
GPT (BIOS+UEFI)as it will support both system types so when you are running BIOS system now and will move the disk to other system that boots with UEFI it will also just work out of the box. - We will set SWAP size to
0(no SWAP) as it will not be needed. If we will need SWAP in the future, then we will create ZVOL on ZFS and use it as a SWAP device.
- Hit [ENTER] on the
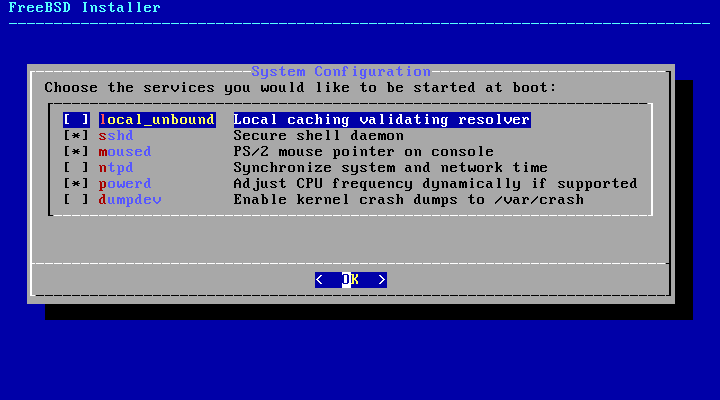
- Select services as shown below.
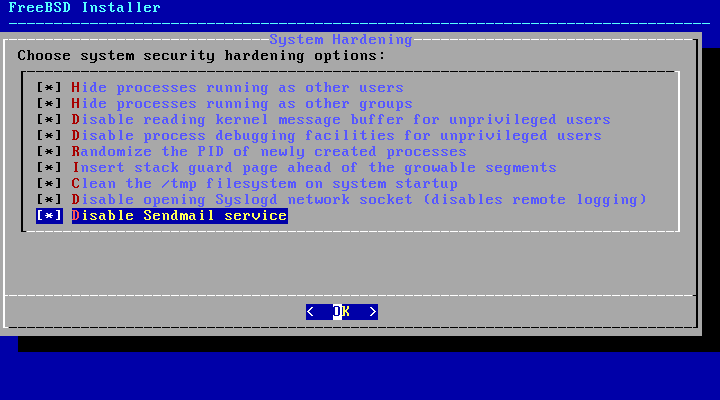
- Enable all security hardening features as shown below.
X11 Window System
X 最初設計是以網路為中心,採用 “client-server” 架構。在此架構下 “X 伺服器” 在有鍵盤、螢幕、滑鼠的電腦上運作。該伺服器負責的工作包含管理顯示、處理來自鍵盤、滑鼠的輸入及來自其他設備)的輸入或輸出。
每個 X 應用程式,如 XTerm、Firefox 都是 “客戶端”。
視窗管理程式規定螢幕上的視窗該長什麼樣、要如何移動滑鼠指標、 要用什麼鍵來在視窗切換、每個視窗的標題列長相,及是否該有關閉按鈕,等等。視窗管理程式負責滑鼠指標的聚焦政策。 聚焦政策指的是如何決定使用中及接收鍵盤輸入的視窗。通常較為人熟悉的聚焦政策叫做 “click-to-focus”,這個模式中,滑鼠點選到的視窗便會處於作用中 (Active) 的狀態。
KDE 與 GNOME 會被稱作桌面環境是因為包含了完整常用桌面作業的應用程式。
BIOS or UEFI
If you find a device that is not supported by any ‘accelerated’driver like intel or nvidia. You would use vesa driver (Video Electronics Standards Association) while booting in BIOS mode and You will use scfb driver (System Console Frame Buffer) while booting on UEFI mode. This can be checked by
sudo sysctl machdep.bootmethod
Packages
sudo pkg install xorg
Xorg Configuration
-
顯示卡、顯示器以及輸入裝置會自動偵測,無須任何手動設置。除非自動設置失敗,否則請勿建立 xorg.conf 或執行 -configure 步驟。
-
加入要執行 Xorg 的使用者到
video或wheel群組,以便在可用時能開啟 3D 加速。要加入使用者jru到任一個可用的群組:sudo pw groupmod video -m jru || pw groupmod wheel -m jru -
Login Class(可解决中文乱码,powershell 字符显示方形)
Add this login class to the
/etc/login.conffile.video:\ :charset=UTF-8:\ :lang=en_US.UTF-8:\ :tc=default:Rebuild the login class database.
sudo cap_mkdb /etc/login.confLets set the login class to video for the vuk user.
sudo pw usermod -L video -n vukHow the account looks after setting the login class.
sudo grep vuk /etc/master.passwd
vuk:{REMOVED}:1000:1000:video:0:0:vuk:/home/vuk:/bin/sh
Now logout and login again to make that work. View the changes through the
localecommand. -
显卡驱动:使用多檔,每一個檔案只設定一個指定項目會較傳統使用單一
/etc/X11/xorg.conf設定來的簡單。完整路徑為/usr/local/etc/X11/xorg.conf.d/。(安装 intel 显卡驱动与 nvidia 驱动难,scfb 与 vesa 驱动无法调整分辨率)sudo vi /usr/local/etc/X11/xorg.conf.d/driver-intel.conf Section "Device" Identifier "Card0" Driver "scfb" BusID "PCI:0:2:0" EndSection若有多張顯示卡,可取消註解
BusIDidentifier 然後設定為想要的顯示卡,顯示卡的 Bus ID 清單可以使用pciconf -lv | grep -B3 display取得。 -
手動設定
-
設定檔可由 Xorg 根據偵測到的硬體產生,這個檔案對一開始自訂設定很有幫助。
Xorg -configure -
設定檔會儲存至
/root/xorg.conf.new,做任何需要的更改,然後使用以下指令測試該檔案:Xorg -config /root/xorg.conf.new在新設定檔調整與測試過後,便可分開成較小的檔案放置到正常的位置
/usr/local/etc/X11/xorg.conf.d/。
-
Install Desktop Enviroment
-
FreeBSD 桌面发行版
-
Install Desktop Environment
sudo pkg install gnome3 sudo pkg install gnome3-lite sudo pkg install x11/kde5 sudo pkg install xfce sudo pkg install mate -
Install/Enable Display Manager: You have to decide how You want to start your X11 Window Server, you may login in plan text console and then type
xinitorstartxto read your~/.xinitrcconfiguration and daemons (The difference betweenxinitandstartxis thatstartxcommand executesxinitcommand with arguments.) or You may want to use X11 Login manager such asxdm/sddm/slimwith~/.xsessionconfiguration to load after successful login.sudo pkg install xdm sudo pkg install slim # xfce,mate,slim 有个 slim-themes 软件包 sudo pkg install x11/sddm # kdeWhile
xinitrun commands based on the~/.xinitrcfile the XDM login manager looks for the~/.xsessionfile. As You will be loading same stuff regardless of the startup method we will create a link of~/.xsessionpointing to the~/.xinitrcfile. This way either method You choose You will always end with started X11 session.ln -s ~/.xinitrc ~/.xsessionOne more case about the
~/.xinitrc(or~/.xsession) file. It is interpreted as a shell script (and yes you can doif/then/else/fiandcase/esacorfor/whilePOSIX shell scripting in it) but it does not need to be executable. The last command in this file MUST NOT to be put in the background (must be without the&char at the end) because the X11 session will end. -
Setting
sudo vi /etc/ttys        # xdm
ttyv8   "/usr/local/bin/xdm -nodaemon"  xterm  on secure
sudo vi /etc/fstab # gnome, kde proc /proc procfs rw 0 0sudo vi /etc/rc.conf moused_enalbe="YES" dbus_enable="YES" # gnome, kde, xfce hald_enable="YES" # gnome, kde, mate gdm_enalbe="YES" # gnome 启动 sddm_enable="YES" # kde 启动 slim_enable="YES" # xfce,mate gnome_enable="YES" # gnome 服务 -
slim Usage(Failed to execute login command)
sudo vi ~/.xinitrc
exec mate-session        # mate
exec xfce4-session        # xfce
Components
-
Window Manager: Openbox…
-
Status Bar: Also known as information bar, the place on the screen that would provide You needed information such as current date and time, CPU, RAM and storage usage, current network information or battery status.
-
While
Xmobaris nice solution it comes with about 2 GB of dependencies of Haskell and Haskell libraries. -
While
Polybarcan look very nice on screenshots it is a lot more heavy on resources and is limited only to modules/features that were implemented in it.
-
I have used
Conkyfor quite long time but after recent tests I madeDzen2is a lot less on resources then Conky while doing the same thing.
-
-
Task Bar: A taskbar is an element of a graphical user interface which has various purposes. It typically shows which programs are currently running.
-
You can use classic taskbar like
XFCE Panelused in the XFCE desktop environment.
-
You can also configure
Tint2that way. But it only shows applications that are active on the current desktop.
-
One of the greatest taskbars of all time was/is the Mac OS X Dock (now macOS Dock). It also has an indicator showing if application is launched. Currently the best and lightest solution for providing the dock-like functionality on open desktops seems to be
Plank.
-
-
Application Launcher: While not being any crucial role of the desktop environment it have its uses and sometimes save time.
Lets start with resources, the
Rofiimplementation of application launcher uses almost 3 times more RAM thenDmenusolution.-
Desktop with Dmenu launched and with
alccharacters inserted to ‘filter’ commands in the search of a calculator application.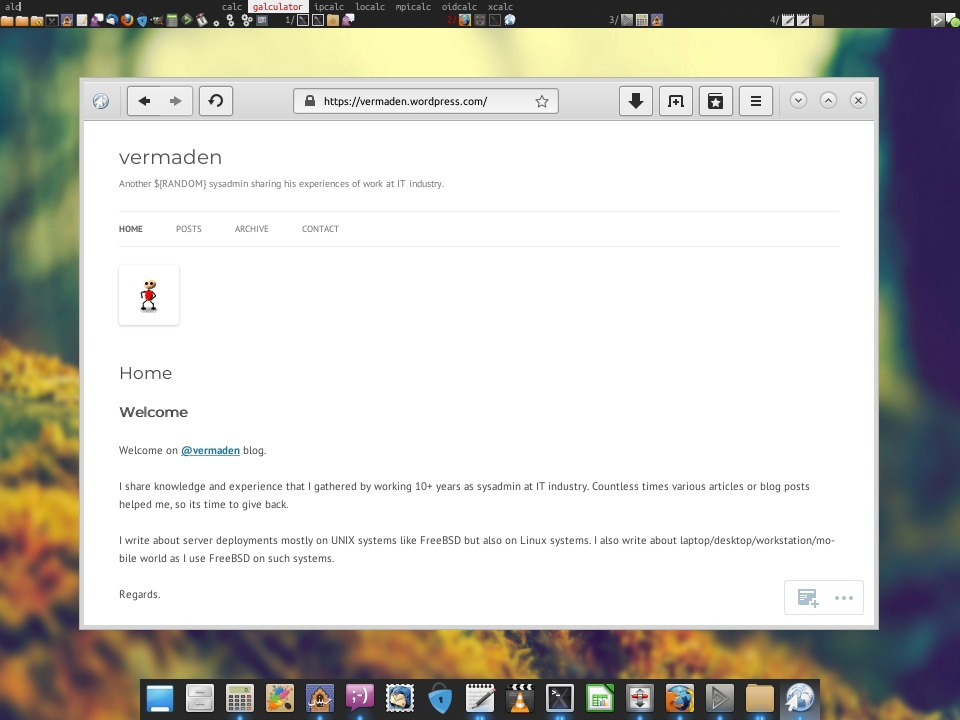
-
The Rofi requires simple command.
rofi -show run -theme solarized_alternate -font "Monaco 8"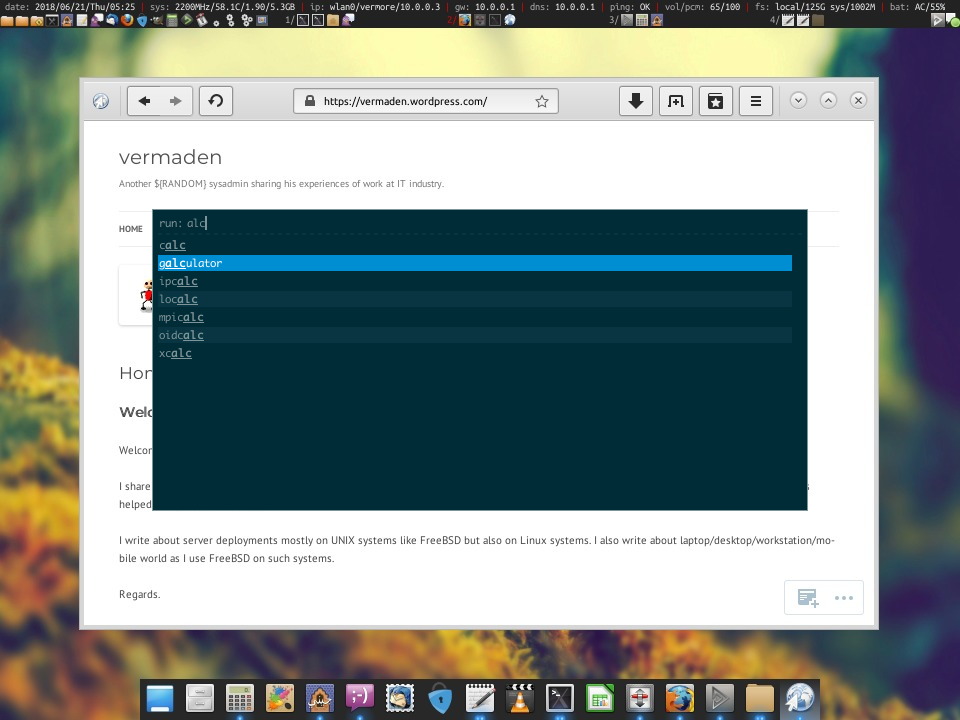
-
-
Blue Light Spectrum Suppress: Automatically adjusts color temperature of the screen according to your current time in your location.
-
While F.lux (closed source) does not provide a native binary for FreeBSD it does offer such binary for Linux and as FreeBSD provides Linux Binary Compatibility its possible to use it on FreeBSD. To use F.lux just start it in the
~/.xinitrcor~/.xsessionfile like that.~/path/to/bin/xflux -l 33.54321 -g 11.12345 &Of course 33.54321 is latitude and 11.12345 is longitude of your localization.
-
Redshiftis the solution that I propose to use as open source blue light spectrum suppressor. Similarly like with the F.lux to start Redshift just put it in the~/.xinitrcor~/.xsessionfile like that.redshift -l 33.54321:11.12345 -g 0.9 & -
Someone else suggested trying sctd which is sct but rewritten/modified to be a daemon that will automatically change the color temperature during the day (or night). The sctd uses smaller about of RAM memory, uses less libraries and size of these libraries is smaller then what redshfit needs.
-
Binary 套件
搜寻软件:FreeBSD Ports、FreshPorts
因編譯選項不同,有些 Port 會有多個版本可使用。
-
USTC Mirrors:注意使用 Latest 源,有很多流行软件。创建
/usr/local/etc/pkg/repos/FreeBSD.conf覆盖官方源/etc/pkg/FreeBSD.conf配置sudo vi /usr/local/etc/pkg/repos/FreeBSD.conf FreeBSD: { url: "pkg+http://mirrors.ustc.edu.cn/freebsd-pkg/${ABI}/latest", } sudo pkg update -f # 更新索引 -
url: "pkg+http://mirrors.163.com/freebsd-pkg/${ABI}/latest", -
要啟動 (Bootstrap) 系統,請執行
sudo /usr/sbin/pkg -
當升級原使用舊版 pkg_* 工具的既有系統時,必須將資料庫轉換成新的格式
sudo pkg2ng -
Update the available remote repositories as listed in pkg.conf
sudo pkg update -
Search for a package
sudo pkg search perl -
在指定要安裝的套件時,最好使用 Port 來源來指定該應用程式,Port 來源是指應用程式在 Port 樹中的路徑
sudo pkg search -o perl -
Install a package: Installing must specify a unique origin or version otherwise it will try installing all matches
sudo pkg install perl-5.14 -
列出已經安裝的 Port 中有那些已過時
sudo pkg version -l "<" -
Upgrade from remote repository
sudo pkg upgrade -
Delete an installed package
sudo pkg delete perl-5.14 -
Remove unneeded dependencies
sudo pkg autoremove -
List installed packages
sudo pkg info -
Display information about installed packages
sudo pkg info perl-5.14 -
Show the pkg-message of a package
sudo pkg info -D perl-5.14 -
要查詢已安在系統上的軟體是否有任何已知的漏洞
sudo pkg audit -F -
因為相依所安裝的套件稱作自動 (Automatic) 套件,而非自動套件即套件被安裝的原因不是因為其他套件所相依
sudo pkg prime-list # deprecated -
Clean the local cache of fetched remote packages
sudo pkg clean -
Packages
sudo pkg install linux-sublime3
sudo pkg install mysql180-server mysql180-client
Port 套件
優點:
- 可更改編譯選項
- 部份軟體的授權條款中禁止以 Binary 格式發佈。 這種軟體必須以原始碼發佈並由終端使用者編譯。
- 原始碼可套用自訂的修補。
Port 中並不含實際的原始碼,在編譯 Port 解壓縮時會自動下載的原始碼到 /usr/ports/distfiles。
-
USTC Mirrors:在
/etc/make.conf中添加以下内容MASTER_SITE_OVERRIDE?=http://mirrors.ustc.edu.cn/freebsd-ports/distfiles/${DIST_SUBDIR}/ -
MASTER_SITE_OVERRIDE?=http://mirrors.163.com/freebsd-ports/distfiles/${DIST_SUBDIR}/ -
安裝 Port 套件集:下載壓縮後的 Port 套件集快照 (Snapshot) 到 /var/db/portsnap
sudo portsnap fetch -
第一次執行 Portsnap 時,要先解壓縮快照到 /usr/ports
sudo portsnap extract -
執行以下指令來更新 /usr/ports
sudo portsnap fetch sudo portsnap update -
要找到 Port 所在的分類
sudo whereis lsof -
使用 Port 套件集內建的搜尋機制來找軟體
sudo cd /usr/ports sudo make search name=lsof sudo make quicksearch name=lsof # 不接受多資訊 -
若要進行更有深度的搜尋
sudo make search key=string sudo make quicksearch key=string -
一次設定所有Port 編譯選項
sudo make config-recursive -
重新進入 Port 的編譯選項清單
sudo make config # or sudo make showconfig # or sudo make rmconfig -
編譯並安裝 Port
sudo cd /usr/ports/sysutils/lsof sudo make install -
編譯在 /usr/ports Port 並安裝到 /usr/home/example/local
sudo make WRKDIRPREFIX=../ports PREFIX=../local install -
安裝過程中會建立工作用的子目錄用來儲存編譯時暫存的檔案。可移除此目錄來節省磁碟空間並漸少往後升級新版 Port 時造成問題
sudo make clean -
移除已安裝的 Port
sudo cd /usr/ports/sysutils/lsof sudo make deinstall -
Example
cd /usr/ports/java/linux-oracle-jdk18
sudo make install
安裝後的注意事項:
- 大部份應用程式安裝會在
/usr/local/etc安裝至少一個預設的設定檔。 - 應用程式提供的文件會安裝到
/usr/local/share/doc。 - 部份應用程式會以服務的方式執行,在啟動應用程式前前需要加入設定到
/etc/rc.conf。這些應用程式通常會安裝啟動 Script 到/usr/local/etc/rc.d。
Linux® Binary 相容性
FreeBSD 提供 Linux® Binary 的相容性,允許使用者在 FreeBSD 系統上不需要修改就可以安裝和執行大部份的 Linux® Binary。
最好不要直接安装 Linux 的软件,而使用 FreeBSD 源中的 Linux 软件,一般以 linux-package 命名。
-
載入 Linux® 核心模組
sudo kldload linux -
對 64-位元的相容性
sudo kldload linux64 -
確認模組已載入
sudo kldstat -
安裝基本的 Linux® 程式庫和 Binary
sudo pkg install emulators/linux_base-c7 -
Add the following line
sudo vi /etc/fstab linprocfs /compat/linux/proc linprocfs rw 0 0 linsysfs /compat/linux/sys linsysfs rw 0 0 tmpfs /compat/linux/dev/shm tmpfs rw,mode=1777 0 0 -
開機時開啟 Linux® 相容性
sudo vi /etc/rc.conf linux_enable="YES" -
安裝 Linux® ELF Binary
sudo brandelf -t Linux my-linux-elf-binary -
安裝以 Linux® RPM 為基礎的應用程式,需先安裝 archivers/rpm4 套件或 Port
sudo pkg install rpm4
sudo cd /compat/linux
sudo rpm2cpio < /path/to/linux.archive.rpm | cpio -id
手動安裝其他程式庫
-
在 Linux® 系統,可使用 ldd 來找出應用程式需要哪個共用程式庫
ldd linuxdoom libXt.so.3 (DLL Jump 3.1) => /usr/X11/lib/libXt.so.3.1.0 -
複製 Linux® 系統輸出結果中最後一欄需要的的檔案到 FreeBSD 系統的 /compat/linux。 複製完後,建立符號連結 (Symbolic link) 至輸出結果第一欄的名稱
/compat/linux/usr/X11/lib/libXt.so.3.1.0
/compat/linux/usr/X11/lib/libXt.so.3 -> libXt.so.3.1.0
自訂核心
為何要編譯自訂的核心?
自訂核心有許多項優點,如:
- 加速開機,因為自訂的核心只需要偵測您系統上存在的硬體,所以讓啟動所花的過程更流暢快速。
- 減少記憶體使用,自訂的核心通常會比
GENERIC核心使用更少的記憶體,這很重要,因為核心必須一直存放在實體記憶體內。 - 支援額外的硬體,自訂的核心可以增加一些
GENERIC核心沒有提供的硬體支援。
偵測系統硬體
-
dmesgor/var/run/dmesg.bootor/var/log/messages -
pciconf -lv -
在 man指令加上 -k 旗標可列出有包含指定裝置品牌或名稱的手冊頁面清單:
man -k Intel
設定檔
/usr/src/sys 下子目錄代表著支援的硬體架構 (Architecture),每個支援的硬體架構中會有 conf 子目錄,裡面含有供該架構使用的 GENERIC 核心設定檔。
說明在GENERIC 同目錄的 NOTES 檔案中。所有架構通用選項,參考 /usr/src/sys/conf/NOTES。
备份与恢复
dump & restore
FreeBSD 系统的备份就是对系统文件的打包,然后放到一个安全的地方,使用的打包工具是 dump;FreeBSD 系统的恢复就是把你保存好的系统文件从安全的地方里面拿出来放到你的硬盘上去,使用的恢复工具是 restore;
-
需要备份的目录:
/这个目录存放很多基本工具,包括内核,需要备份;/home用户数据,需要备份;/usr很多工具以及系统的源代码都放在这里面,需要备份;/usr/local所有安装的软件基本上都在这里,需要备份;/var系统的日志,ports系统的数据库,需要备份;
-
备份方法:以
/目录为例,把移动硬盘挂载在/mnt/fender_01目录,/目录对应硬盘上面的/dev/ad12s1a分区,备份整个目录的命令如下:dump -0Lauf /mnt/fender_01/dump/ad12sa1.dump /dev/ad12s1a- -0 备份所有的文件系统中的内容,也就是不使用增量备份;
- -f 指定备份结果存放的文件名;
- -a 告诉 dump 不考虑备份的介质的大小问题,早期备份使用磁带,dump 会预先计算一下需要的空间,使用这个选项告诉 dump 忽略这个问题;
- -u 告诉 dump 更新一下 /etc/dumpdates,这个文件记录了你在系统上搜有的备份活动;
- -L 备份已经挂载的文件系统时需要,这个选项会使用 UFS2 的 snapshot 功能来保证文件系统的一致性。
-
恢复方法
-
恢复
/以外的目录:以恢复/home目录为例,重启系统进入单用户模式,挂载/tmp分区,挂载移动硬盘,这时备份生成的文件保存在/mnt/01/dump/dev/ad12s1h.dump,格式化/dev/ad12s1h:newfs -U /dev/ad12s1h # -U 选型来打开 softupdate挂载这个分区,例如
/mnt/02/,恢复目录:cd /mnt/02 restore -rf /mnt/01/dump/ad12s1h.dump -
恢复
/:因为 restore 在/目录中,所以不能使用上面方法恢复/目录。解决办法是使用 freebsd_livefs_cd 启动系统。
-
-
备份 MBR
-
备份
dd if=/dev/da0 of=/path/to/mbr.img bs=512 count=1 -
恢复
dd if=/path/to/mbr.img of=/dev/da0 bs=512 count=1
-
rsync(remote sync)
可以在本地计算机与远程计算机之间,或者两个本地目录之间同步文件,且仅传输有变动的部分。
-
将源目录同步到目标目录
rsync -r source1 source2 destination # -r 表示递归,即包含子目录 rsync -a source/ destination # -a 除了可以递归同步以外,还可以同步元信息(比如修改时间、权限等) -
排除文件:同步时排除某些文件或目录,这时可以用
--exclude参数指定排除模式,多个排除模式,可以用多个--exclude参数rsync -av --exclude dir source/ destination # 排除所有 TXT 文件 -
增量备份:除了源目录与目标目录直接比较,rsync 还支持使用基准目录,即将源目录与基准目录之间变动的部分,同步到目标目录。
--link-dest参数用来指定同步时的基准目录。rsync -a --delete --link-dest /compare/path /source/path /target/path -
远程同步:rsync 默认使用 SSH 进行远程登录和数据传输
rsync -av source/ username@remote_host:destination # 将本地内容同步到远程服务器 rsync -av username@remote_host:source/ destination # 将远程内容同步到本地 -
使用 rsync 来备份系统
rsync -aH --delete --exclude dir --link-dest /compare/path source destination-H选项用来保持硬链接- 默认情况下,rsync 只确保源目录的所有内容(明确排除的文件除外)都复制到目标目录。它不会使两个目录保持相同,并且不会删除文件。如果你想让那些在源目录里被删除的文件在目标目录里也被删除,那么你可以加上
--delete选项来删除。--delete参数会使得destination成为source的一个镜像。
参考:rsync 用法教程,使用 rsync 来备份 Linux 系统
Z 檔案系統 (ZFS)
ZFS 的設計目標主要有三個:
- 資料完整性:所有資料都會有一個資料的校驗碼 (checksum),資料寫入時會計算校驗碼然後一併寫入,往後讀取資料時會再計算一次校驗碼,若校驗碼與當初寫入時不相符,便可偵測到資料錯誤,此時若有可用的資料備援 (Data redundancy),ZFS 會嘗試自動修正錯誤。
- 儲存池:實體的儲存裝置都會先被加入到一個儲存池 (Pool),這個共用的儲存池可用來配置儲存空間,儲存池的空間可被所有的檔案系統使用且透過加入新的儲存裝置來增加空間。
- 效能:提供多個快取機制來增加效能。先進、以記憶體為基礎的讀取快取可使用 ARC。第二層以磁碟為基礎的讀取快取可使用 L2ARC,以磁碟為基礎的同步寫入快取則可使用 ZIL。
Others
Screen resolution on FreeBSD on VirtualBox
问题描述:在virtualbox虚拟机下,无法改变桌面分辨率为1366x768
VBoxManage setextradata "FreeBSD" VBoxInternal2/EfiGraphicsResolution 1366x768
Disable the Forward/Back buttons on my mouse
问题描述:浏览网页时,鼠标滑轮滚动浏览器就会前进后退。
-
执行下面命令后,上下滑动鼠标滑轮,看看映射到那些button,一般是buttons 8 and 9
sudo xev | grep -A2 ButtonPress -
then disable button 8 and 9(前提是有上面的问题,否则就不要禁)
sudo vi ~/.Xmodmap pointer = 1 2 3 4 5 6 7 0 0 0 0 0 -
test it with the command,command automatically when you log in; if yours doesn’t, arrange for it to run when X starts.
sudo xmodmap ~/.Xmodmap
Install chinese font
sudo pkg install zh-CJKUnifonts # CJK(中日韩统一表意文字)
设单使用模式为不安全
sudo vi /etc/ttys
console none    unknown off insecure
No space left on device
问题描述:使用 pkg update 时提示这个问题。原因是 /tmp is too small。
sudo vi /etc/fstab
tmpfs    /tmp    tmpfs    rw,size=256000000    0    0        # size 以Byte为单位
VirtualBox™ guest additions
sudo cd /usr/ports/emulators/virtualbox-ose-additions && make install clean

sudo vi /etc/rc.conf
vboxguest_enable="YES"
vboxservice_enable="YES"
vboxservice_flags="--disable-timesync"        # 若有使用 ntpd或 ntpdate,便可關閉主機時間同步功能
Fish
Fish 是"the friendly interactive shell"的简称,最大特点就是方便易用。
Fish 会自动在光标后面给出建议,表示可能的选项,颜色为灰色。如果采纳建议,可以按下→或Control + F。如果只采纳一部分,可以按下Alt + →。
输入命令时,Fish 会自动显示匹配的上一条历史记录。如果没有匹配的历史记录,Fish 会猜测可能的结果,自动补全各种输入。
How to start things at boot time
-
主流的桌面环境都自带应用程序自启动设置程序。
-
These directories are defined in
/etc/defaults/rc.conf(主要是运行脚本)-
Default startup directory is
/usr/local/etc/rc.d/. if you need the files to be executed in a specific order, try numbering the files. For example:000This.Will.Run.First.sh 020This.Will.Run.Next.sh 030And.Then.This.sh -
deprecated:
/etc/rc.local
-
-
DSBAutostart is a Qt program that allows you to add commands to be executed at session start.
(本质就是在
.xinitrc调用程序指令,GUI 程序开机启动都需放入.xinitrc,在 Xorg 启动后运行)-
Installation
cd /usr/ports/x11/dsbautostart && make install distclean -
Usage
-
Manual
-
Setup: Add the following command to your
~/.xinitrc, or to your window manager’s startup script (e.g.~/.config/openbox/autostart.sh)sh ~/.config/DSB/autostart.sh& -
~/.config/DSB/autostart.shPlank&
-
-
GUI:
Setting -> DSBAutostart -> Add Command, exampleplank, thenSaveandQuit
-
-
FreeBSD Insall Oracle JDK
- 安装 Linux Compact
- 在
/usr/ports/java/linux-oracle-jdk18运行sudo make install - 根据提示在 Oracle Java Archive 下载需要的 JDK 版本安装包,复制到
/usr/ports/distfiles - 在
/usr/ports/java/linux-oracle-jdk18运行sudo make install,安装成功
FreeBSD Install Python and pip
sudo pkg install python

python --version
Python 3.7.9

sudo pkg install py37-pip
简化启动
FreeBSD 默认启动过程相当详细,包含大量调试信息以及内核消息。
- Add the
boot_mute=YESoption to the/boot/loader.conffile. - Add
autoboot_delay=2parameter to the/boot/loader.conffile. - Add
rc_startmsgs="NO"to your/etc/rc.conffile.
连接网络
If You will have attached LAN cable and your interface is em0 (check ifconfig command output) then dhclient em0 command should grant You the working connection to the Internet – assuming that You have DHCP server on that network.
ifconfig em0 up
dhclient em0
To test the network connectivity use the ping command.
ping -c 3 freebsd.org
If You would like to connect to the World with wireless connection then here are the needed commands. First lets check what wireless card You have.
sysctl net.wlan.devices
We will now create wlan virtual device on top of our iwn0 device and bring it up.
ifconfig wlan0 create wlandev iwn0
ifconfig wlan0 up
We can scan for existing nearby WiFi access points if needed.
ifconfig wlan0 scan
Now we need to add the desired WiFi network to the /etc/wpa_supplicant.conf file as shown below.
network={
  ssid="WIFI-NETWORK-NAME"
  psk="PASSWORD"
}
Then You may connect to it using the wpa_supplicant daemon. Hit the [CTRL]+[Z] key combination to put the process into suspended state. Then we type the bg command to put it back into running state, but in the background so we can continue to type next commands.
wpa_supplicant -i wlan0 -c /etc/wpa_supplicant.conf
Now we will request for the IP address from the access point DHCP server.
dhclient wlan0
How To Add and Remove Users on FreeBSD
-
Add a User:
adduser -
Grant Sudo Privileges: On FreeBSD, users that are members of the
wheelgroup are allowed to usesudo. This is due to the following line in the default sudoers file,/usr/local/etc/sudoers%wheel ALL=(ALL) NOPASSWD: ALL -
Remove a User:
rmuser -
Lock a User Account:
pw lock username -
Unlock a User:
pw unlock username
Is it possible to somehow install Flatpak for NetBSD though?
No, snapd requires systemd and flatpak requires linux namespaces. Appimages might be possible in the future, see https://github.com/AppImage/AppImageKit/issues/98
pkgsrc
pkgsrc 是一个在类 UNIX 系统上管理第三方软件的框架,目前包含超过 17,900 个软件包。
Ravenports
Ravenports 是一个集成系统,旨在在所有类 UNIX 平台上构建复杂软件包。
Nix package manager
This issue has been mentioned on NixOS Discourse. There might be relevant details there:
https://discourse.nixos.org/t/what-is-sandboxing-and-what-does-it-entail/15533/1
[Linuxulator] How to run Google Chrome (linux-binary) on FreeBSD
相关
NetBSD: huaweicloud、aliyun、tsinghua
OpenBSD: huaweicloud、aliyun、tsinghua
一篇好文:FreeBSD的现状和未来